How to Connect Power Automate to Excel Online and Update Rows Automatically comes down to one rule: Power Automate updates rows in an Excel table, not random worksheet cells. If your workbook is stored in OneDrive for Business or SharePoint and the data range is formatted as a table with a dependable key column, the Excel Online (Business) connector can update the matching row each time your trigger runs.
The connector is powerful, but it is less forgiving than a manual spreadsheet edit. Microsoft documents limits around file size, workbook locks, concurrent edits, and table-based actions. Build the workbook correctly first, then the flow becomes straightforward.
Prepare Excel Online before automation
Store workbook in Microsoft cloud
- Put the workbook in OneDrive for Business or a SharePoint document library that the flow connection can access.
- The Excel Online (Business) connector is designed for Microsoft 365 workbooks, so a local desktop file or unsynced copy will not give Power Automate a stable target.
- If the file belongs to a team process, SharePoint is usually easier to govern than a personal OneDrive path.
- Before building the flow, open the workbook in Excel for the web and confirm the account used by Power Automate can edit it. My Excel flows became much less fragile once the workbook lived with the process owner, not my personal files.
- Note: Avoid changing the file name or moving the workbook after the flow is built unless you plan to update the connection fields.
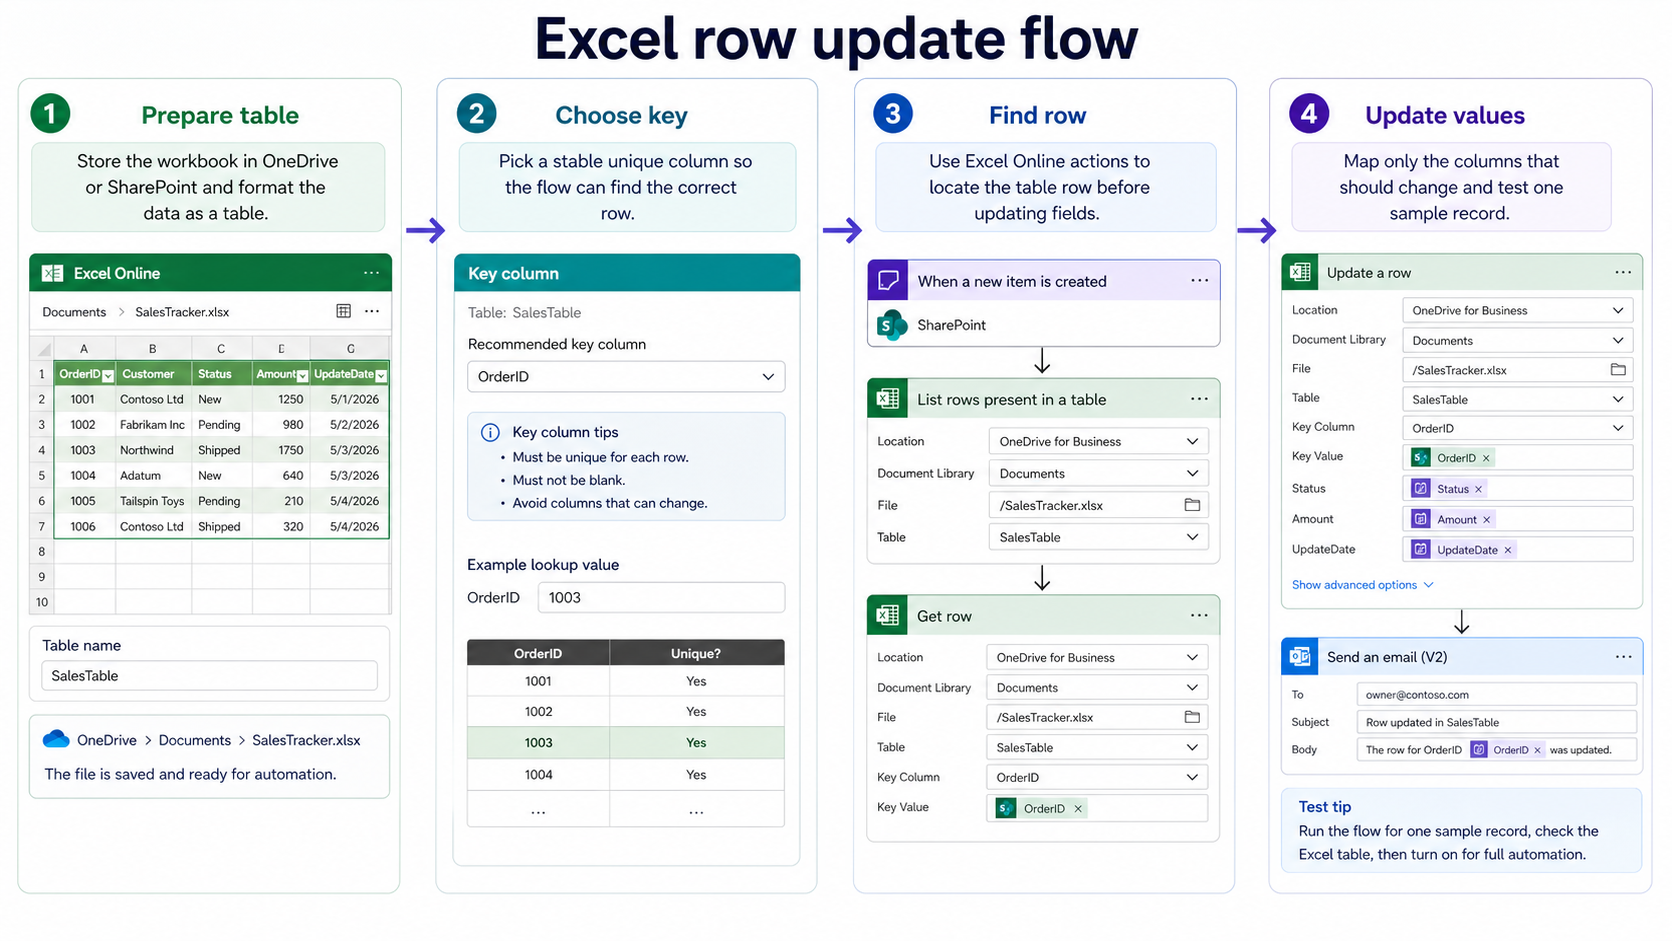
Format rows as a table
Select the range and use Insert >> Table in Excel. Give the table a readable name such as `Requests`, `Inventory`, or `ApprovalsLog`.
Why? because Power Automate actions such as listing rows and updating a row expect a table, and named tables are easier to select in the designer.
Add a key column that uniquely identifies each row. Good keys include request IDs, email addresses when each person appears once, ticket numbers, or system IDs from SharePoint or Forms. Do not use a name column as the key if two people might share the same name.
Decide which rows can change
List the columns the flow is allowed to update. Status, processed date, approver, notes, exported flag, and last synced time are common examples. Make sure to keep formulas out of the columns Power Automate writes to unless you have tested exactly how the workbook behaves after an update.
If you are exporting list data before automating updates, this send lists to Excel guide can help shape the source workbook. Once the workbook is table-based, Power Automate can update selected fields without replacing the entire file.
Build the Excel Online flow
Create trigger and Excel connection
Create an automated cloud flow from the event that should change the spreadsheet. Common triggers include a new SharePoint item, a Microsoft Forms response, a scheduled recurrence, or a Teams-related request. If you need the base flow setup first, start with this create cloud automation tutorial before adding Excel actions.
Add an Excel Online (Business) action and sign in with the account that has edit access to the workbook. Select the location, document library, file, and table. If the file or table does not appear, check permissions, confirm the data is a real table, and refresh the designer.
Find the target row reliably
Use List rows present in a table when you need to search for a matching row. Apply a filter query when possible so the action returns only the record you need. Microsoft documents that filtering and sorting support is basic for this action, so keep filters simple and test the exact key value format.
If the connector action supports a key column and key value in your design, use the unique ID from your trigger. Match text exactly, including spaces and casing where your process depends on it. A clean key saves you from updating the wrong row when the workbook grows.
Update only the needed columns
Add Update a row after you identify the target record. Select the same location, file, and table, then provide the key column and key value or the row identifier your previous action returned. Fill only the columns that should change, and leave unrelated fields untouched unless the action requires them.
For a status update, pass values like `Submitted`, `Approved`, `Rejected`, or `Synced`. For audit columns, use dynamic content from the trigger or the current time. Keep column names stable; renaming table headers after the flow is live can break the mapping.
Avoid common Excel connector issues
Prevent workbook locking and conflicts
Microsoft notes that an Excel file may be locked for update or delete for several minutes after connector use, and simultaneous modifications from multiple clients are not supported. That means desktop Excel, Excel for the web, Power Apps, Logic Apps, and Power Automate can collide if they all write to the same workbook at the same time.
For busy processes, avoid using Excel as the primary transactional database. Use SharePoint, Dataverse, or another list-style source for frequent writes, then sync summary values to Excel when reporting needs it. Excel works best when update volume is modest and ownership is clear.
Handle empty or duplicate matches
Before updating a row, check whether your lookup found exactly one match. If it found none, send yourself an alert or create a new row only if that is intended. If it found more than one, stop the flow or write an error note instead of guessing.
This is where the key column matters. Duplicate keys are the quiet failure that make spreadsheet automation feel random. In my builds, I add a manual spot check for duplicates before turning on any row update flow.
Watch connector limits and delays
The Excel connector has documented known issues, including delayed data freshness for filtered or sorted list-row actions, workbook locks, supported file types, and size limits.
- Keep the workbook small enough for the connector and avoid formulas or filters that make every update recalculate a large workbook.
- If the flow starts returning timeouts, test with a smaller table and fewer concurrent edits.
- Also watch for 504-style behavior when requests sit too long or when repeated failures happen in a workbook session. A retry can help with a temporary lock, but repeated timeouts are a design signal.
- Reduce write frequency, split the workbook, or move the high-volume process to a better data store.
Excel Power Automate questions answered
Does Power Automate update normal Excel cells?
For dependable row automation, use a formatted Excel table and connector row actions. Random cell-style updates are not the right model for most cloud flows. A named table gives the connector columns, rows, and keys it can work with consistently.
Why is my Excel table missing?
The most common causes are that the range was never formatted as a table, the workbook is in a location the connection cannot access, or the designer needs a refresh. Open the file in Excel for the web, confirm the table name, and verify the flow account can edit the workbook.
Can multiple flows update one workbook?
They can, but it is risky when updates happen at the same time. Microsoft warns against concurrent writes from multiple clients because they can create conflicts and inconsistent data. If several flows need to write frequently, use a list or database as the source and export to Excel for reporting.
Excel row automation works best when the workbook is treated like a small, structured data table. Give Power Automate a stable file, a named table, and a unique key, then test updates with the same data shape your real process will send.