Here’s a question from Annie:
I often use Microsoft Teams for video conferences with my colleagues and customers. I have seen that i am easily able to apply a virtual background quite easily, such as in Zoom. I can also add new image files and then use them as background filters in my Teams calls. The thing is that i don’t use any of the canned background filters that are installed with Teams and would like to remove them altogether. That said, there is no simple way to remove those backgrounds from the app. Is there a way to access the Teams background folders in Windows 10 and 11 and delete any unnecessary backgrounds manually?
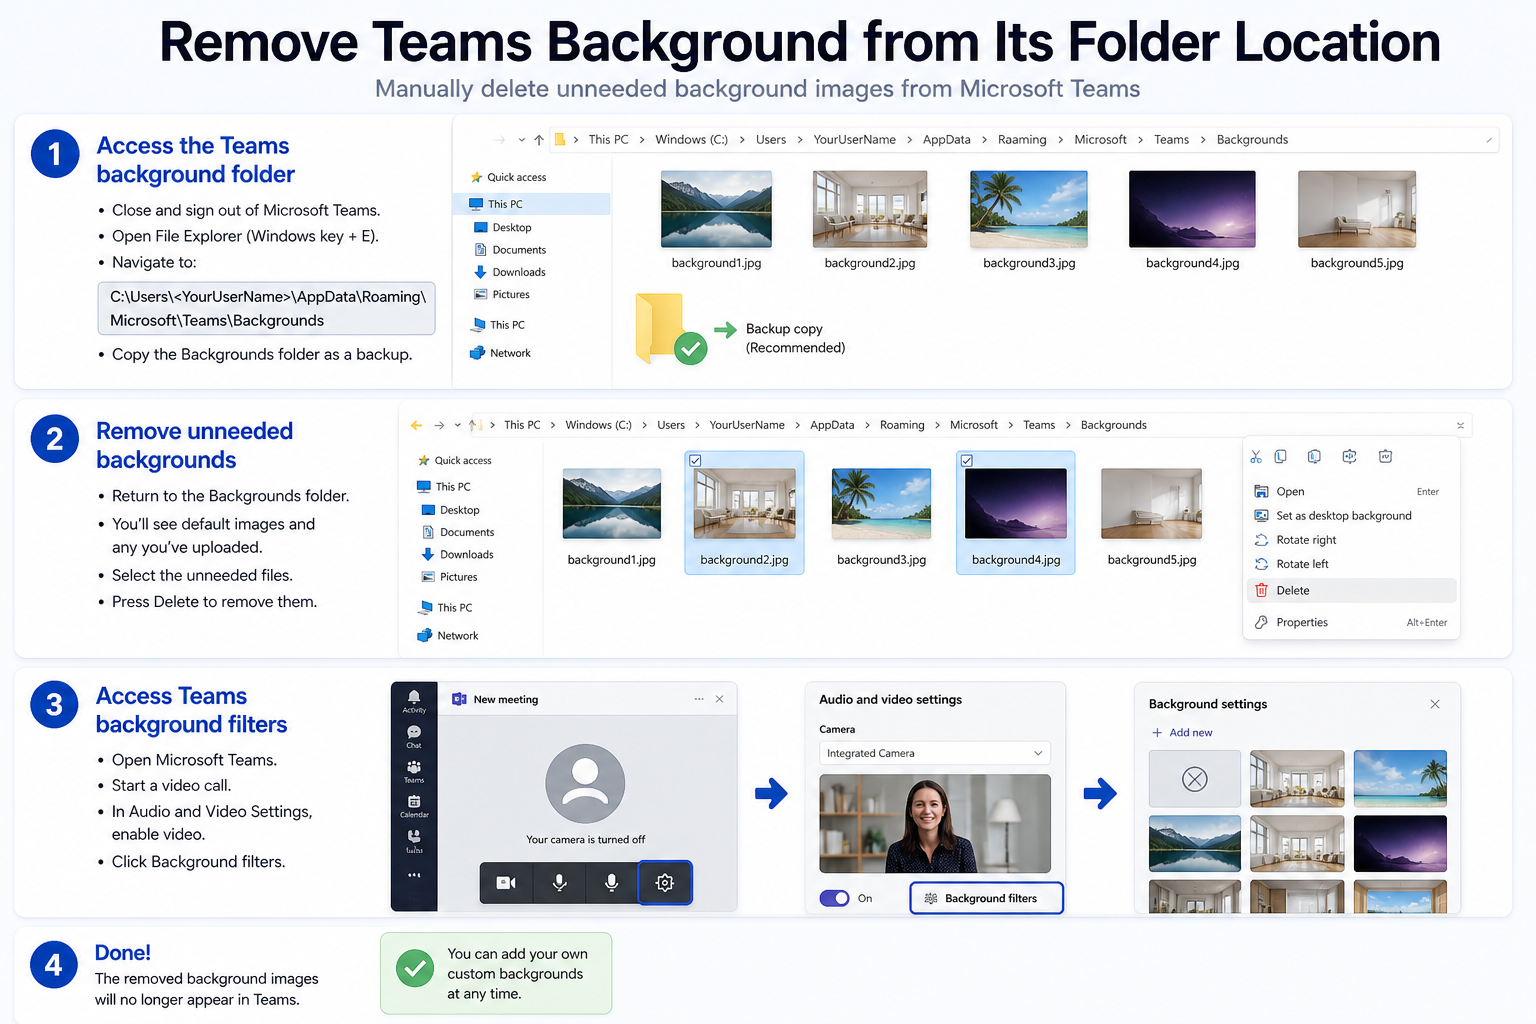
Remove Teams background from its folder location
Thanks for the question, indeed a good one. You are correct, as of today, Microsoft Teams does not provide a simple user interface that allows to delete unneeded entries from the background folder. That said, you are able to remove images manually, directly from the backgrounds folder, as shown in the step-by-step guide below.
Accessing the Teams background folder location
- First off, start by closing and signing out from Microsoft Teams.
- Now, go ahead and open your Windows computer File Explorer (by hitting the Windows key + E).
- Navigate to the Teams default image backgrounds directory: C:\Users\<enter_your_windows_your_user_name>\AppData\Roaming\Microsoft\Teams\Backgrounds .
- Make a copy of the Backgrounds folder. This will serve as a backup in case that you will need to restore any of the backgrounds you’ll remove. Don’t proceed further before completing this step.
Removing unneeded backgrounds
- Still in Windows Explorer, return to your Teams backgrounds directory (detailed location path provided in the previous section).
- You’ll see the default images shipped with Microsoft Teams, as well as the ones you have uploaded.
- Now go ahead and select the unneeded files and delete them.
Access Teams background filters
- Now, go ahead and open Microsoft Teams.
- Start a video call.
- In the Audio and Video Settings dialog for your call, enable video.
- Now hit background filters.
- Your unneeded virtual background images have been removed and won’t be available. You can easily add your own custom backgrounds to Teams, more on that in the next section of this tutorial.
Add Teams background images to your folder
So far, we showed how to remove those unnecessary canned Teams backgrounds that everyone seems to use. If you are interested to add new custom photos as Teams backgrounds, you can simply do that by copying those to the background folder location (specified above).
- Transfer your pictures from your camera, tablet or mobile phone to your computer or OneDrive.
- Resize your image as needed, ideally to the 1920 X 1080 dpi resolution and save it in your computer.
- Using the File Explorer or Finder in macOS, copy the image files to the Teams background folder (specified above).
- Open Microsoft Teams, create a new meeting and select your own new custom background!
FAQ
How to add or remove background pictures on Microsoft Teams for macOS?
- In your mac computer, open the Finder application.
- Then hit Command + Shift + G to launch the Go to Folder dialog box.
- Navigate to the Library folder, then select the Application Support folder.
- Then go to /Microsoft/Teams/Backgrounds.
- Transfer new jpeg, pmg, bmp files into the folder.
- Alternatively, delete the unneeded Teams background images.
Can i store Teams background images in a cloud service like OneDrive?
Teams doesn’t support cloud storage for it background pictures. In case that you would like to use a specific graphic files as your Teams background, you should place it the Teams backgrounds folder.
Fixing Custom Backgrounds That Do Not Appear in Teams
After copying images into the Backgrounds folder, they sometimes fail to show up in the background picker. The most common cause is an unsupported file format or incorrect dimensions. Teams accepts JPEG, PNG, and BMP files. Images saved as WebP, TIFF, or HEIC will not appear regardless of the file extension you give them.
Confirm the file is genuinely a JPEG or PNG by opening it in Paint and re-saving it as a PNG. Ensure the resolution is at least 1920 by 1080 pixels. Smaller images may load but appear blurry or stretched during calls, while extremely large files above 20 MB can be silently ignored by the client.
If the format and size are correct but the image still does not appear, close Teams completely from the system tray, wait a few seconds, and relaunch. Teams loads the Backgrounds folder contents at startup, so images added while the app is running require a full restart to register.
On the new Teams client for Windows 11, the folder path differs from classic Teams. New Teams stores backgrounds at:
%LOCALAPPDATA%\Packages\MSTeams_8wekyb3d8bbwe\LocalCache\Microsoft\MSTeams\BackgroundsCopy your images to this path instead if you are running the Store version of Teams.
Deploy Branded Backgrounds Across Your Organization
IT administrators can push a curated set of background images to every user in the tenant through the Teams Admin Center. Open the Admin Center, navigate to Meetings, then Meeting Policies, and select the policy you want to edit. Under the Audio and Video section, upload corporate-branded backgrounds that will appear in every user’s background picker alongside their personal images.
This approach ensures consistent branding during client-facing calls without requiring users to locate the folder or manually copy files. Uploaded org-wide backgrounds cannot be deleted by end users, which prevents accidental removal of branding assets during folder cleanups.