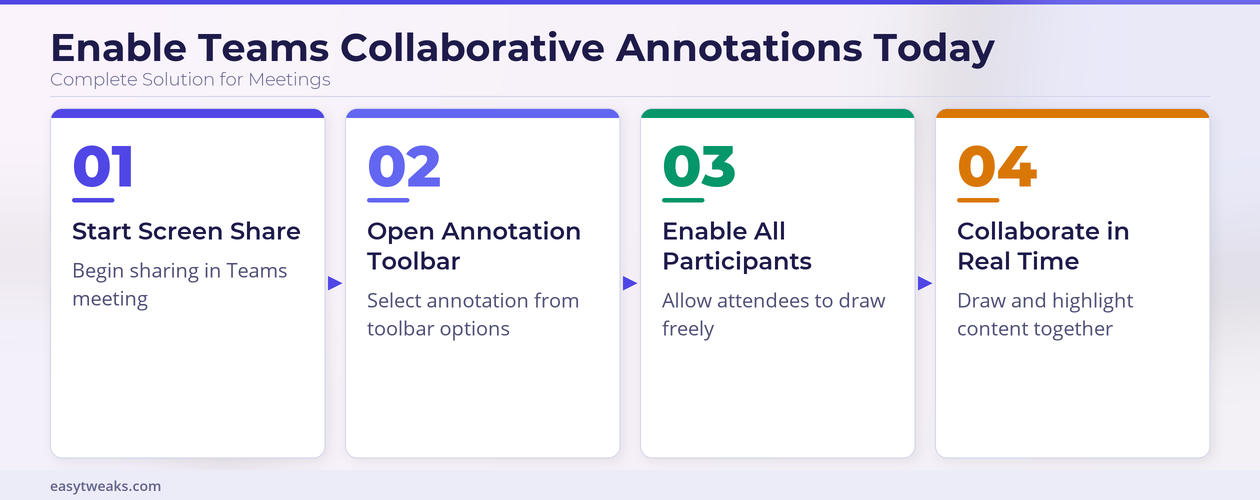
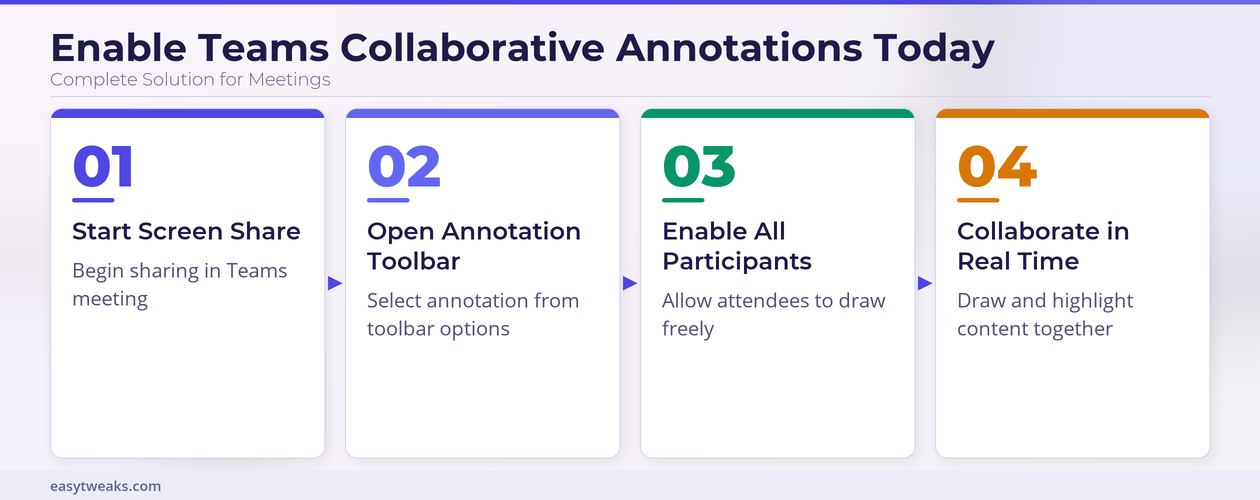
Collaborative annotations in Microsoft Teams turn a shared screen into a temporary, Whiteboard-powered canvas. The presenter can invite everyone to draw, highlight, add notes, or point to a specific area without handing over control of the computer. This works well for design reviews, training, troubleshooting, and any meeting where participants need to discuss something visible on screen.
You do not need to configure a separate attendee option before every meeting. Start annotation after screen sharing begins, then use the Whiteboard settings to decide whether everyone can annotate or only the presenter can add marks. The steps below show the complete workflow and the controls that keep the session organized.
How Collaborative Annotations Work in Teams
What Participants See When Annotation Starts
When annotation starts, Teams places the Microsoft Whiteboard toolset over the shared screen. Participants can use tools such as pens, highlighters, shapes, text, and sticky notes while the underlying application remains visible. Everyone in the meeting sees the marks as they are added, and collaborative cursors identify participants by name unless someone turns that option off.
The annotation layer does not give participants control of the presenter’s mouse, keyboard, or open applications. It is a visual workspace placed over the shared content. If someone needs to operate the shared desktop instead, use the separate request-control feature when organizational policy permits it.
Check the Presenter and Admin Requirements
The presenter should share from the Teams desktop app before starting annotation. Mobile attendees can annotate when a presenter shares from a desktop device, but they cannot start the desktop sharing session themselves. If the Annotate button is unavailable for every meeting, an administrator should review the organizer’s assigned meeting policy rather than changing individual attendee settings.
In the Teams admin center, the relevant control is under Meetings, Meeting policies, Content sharing, and Collaborative annotations. That policy must be enabled for participants to collaborate over a shared screen. Screen sharing must also be allowed, so administrators should confirm the organizer’s sharing permissions in the meeting policy when both sharing and annotation controls are missing.
Enable Annotations During a Teams Meeting
Start Annotation From the Presenter Toolbar
Join the meeting as a presenter and begin sharing your screen. If you are unsure which source to present, first choose the appropriate sharing view so private windows and notifications are not exposed to the audience.
- Move the pointer to the top edge of the shared screen to reveal the presenter toolbar.
- Select Annotate. Teams opens the Whiteboard toolset above the shared content.
- Select a pen, highlighter, shape, text, or note tool and begin marking the screen.
- Open Settings in the Whiteboard toolset when you are ready to control participant access.
The screen freezes as the annotation canvas opens, allowing participants to mark the same visible view. The presenter can still move through the underlying page or advance slides by temporarily switching to background interaction.
Let Everyone Annotate or Keep Presenter-Only Access
Open Settings in the Whiteboard toolset and choose Everyone can annotate to allow meeting participants to contribute. Select Only I can annotate when the presenter should retain exclusive access. The change applies immediately, so you can open collaboration for a short exercise and restrict it again before continuing the presentation.
A participant can also request access while someone else is presenting. Select Annotate in the meeting controls, choose Request, and wait for the presenter to approve it. This keeps the person sharing in control of when the collaborative canvas starts.
Move Through the Shared Content
Annotations normally stay in the foreground, which prevents an accidental click from changing the underlying application. When you need to scroll a document, open a menu, or advance a slide, select Start interacting with the background in the Whiteboard toolset. Select Stop interacting with the background to return to drawing mode.
Manage and Save the Annotation Session
Clear Marks or End Annotation
Use the clear options in the annotation toolbar when the canvas becomes crowded. You can remove your own marks without stopping the screen share, while the presenter can control the overall annotation session. To end annotation for everyone, select Annotate again in the presenter toolbar.
Stopping annotation does not necessarily discard the existing canvas. If annotation starts again during the same sharing session, earlier marks may reappear unless they were cleared. Clear sensitive or temporary notes before moving to the next part of the presentation.
Save a Snapshot for Later
Select Save a snapshot in the Whiteboard toolset when the group reaches a useful result. Teams saves the annotated view to a Whiteboard file. To find it later, open View more apps in Teams, select Whiteboard, and open Annotations. If collaborative annotation is available but the canvas is not, use this Teams Whiteboard meeting diagnostic.
A snapshot keeps the shared background and the annotations together for reference. It does not create a separate export of every annotation layer, so take the snapshot before anyone clears the canvas or replaces the visible content.
Use Teams annotations without exposing shared-screen content
Start with a reversible check that separates configuration from missing data. Confirm the presenter is sharing a supported screen or window and has enabled annotation. Do not combine several repairs at once; a successful result would not reveal which change mattered.
Isolate the failing layer
Decide whether everyone may annotate or only presenters. Pause on sensitive applications before allowing collaborative marks. Use a non-sensitive sample and the normal user account so owner or administrator privileges do not hide the problem.
Clear unwanted marks before capturing a snapshot. Preserve the original state until the new result survives a restart or synchronization cycle.
Verify normal use
Test guest and external participant behavior in advance because policy can limit access. End annotation explicitly when the shared activity is complete. Compare the outcome with the expected business workflow, not only a one-time technical test.
Record the application version, account type, device, time, and exact error if behavior still differs. That evidence helps support distinguish a local cache, profile, permission, data, policy, hardware, or service problem. Remove names, addresses, file content, and credentials from screenshots before sharing them.
Have another authorized user repeat the shortest safe test when shared access is involved. Reverse experimental settings that did not help, and keep a note of the final working condition for the next update or device change. Recheck the result after the next sign-in or scheduled cycle when timing can affect it. Keep a concise note of the successful condition so it can be restored later. Verify that the change did not alter unrelated files, permissions, or settings. Recheck the result after the next sign-in or scheduled cycle when timing can affect it. Keep a concise note of the successful condition so it can be restored later. Verify that the change did not alter unrelated files, permissions, or settings.
Troubleshooting Teams Annotation Issues
Fixing Teams Annotations Not Appearing
When participants report that the annotation toolbar is missing or grayed out during a Teams meeting, the most common cause is an outdated Teams client version that does not support the collaborative annotation feature. Administrators should verify through the Teams admin center that the meeting policy assigned to the organizer’s account has the annotation setting enabled, because tenant-level policies override individual meeting options and can silently prevent annotations. Clearing the Teams cache on affected machines and restarting the application often resolves display issues where the annotation toolbar fails to render, and this approach has consistently worked across different hardware configurations during troubleshooting sessions.
Resolving Teams Annotation Permission Conflicts
Organizations with strict compliance or data loss prevention policies may find that collaborative annotations are blocked at the tenant level, requiring a global administrator to modify the meeting policy in the Teams admin center under the meetings section. The specific policy setting labeled “Allow annotations” must be toggled to enabled for the relevant user groups, and changes to Teams admin policies typically propagate across the tenant within a few hours before taking effect. Testing the annotation feature in a quick test meeting after policy changes helps confirm that permissions are working correctly before relying on annotations for important presentations.
Frequently Asked Questions About Teams Annotations
How Do I Enable Teams Annotations for External Guests?
External guests who join a Teams meeting through a shared link receive annotation permissions based on the meeting organizer’s configuration, and they can use the drawing tools as long as the organizer has enabled annotations for all participants. Guest users accessing the meeting through a web browser should use a Chromium-based browser such as Microsoft Edge or Google Chrome, because older browsers do not support the annotation rendering engine. In my experience with cross-organization meetings, external guests who update their browser to the latest version consistently gain full access to the annotation toolbar without additional configuration steps.
Why Can’t Teams Meeting Participants See the Annotation Toolbar?
The annotation toolbar only becomes visible when a presenter is actively sharing their screen or a window, and participants who joined the meeting before screen sharing started may need to leave and rejoin if the toolbar does not appear automatically. Teams meeting policies set by the organization’s IT administrator can override individual meeting settings, so participants in organizations with restrictive policies should contact their administrator to verify that the annotation feature is enabled at the tenant level. Ensuring that every participant runs the latest version of the Microsoft Teams desktop client or uses a supported web browser eliminates most visibility issues with annotation controls.
How Do I Clear Teams Annotations During a Presentation?
Presenters can clear all annotations from the shared screen by clicking the eraser tool in the annotation toolbar and selecting the clear-all option, which removes every drawing and markup added by all participants during the current sharing session. Individual strokes can be removed using the standard eraser tool that targets specific markups without affecting other annotations, giving presenters precise control over which visual elements remain visible. Saving important annotations requires taking a screenshot before clearing, because Teams does not currently offer a built-in export function that preserves annotation layers separately from the underlying content.