Frequent Microsoft Teams notifications disrupt your concentration when you’re handling critical tasks. Your availability status displays as active, triggering a steady stream of incoming messages throughout your workday. You require dedicated periods of uninterrupted focus to complete demanding projects efficiently.
Implementing Teams focus controls
Constant interruptions from Microsoft Teams notifications significantly impact your ability to concentrate on complex assignments that demand sustained attention. The do not disturb availability mode provides a practical solution by temporarily blocking routine notifications while maintaining connectivity for genuinely urgent communications.
This tutorial demonstrates how to configure do not disturb settings in Microsoft Teams, customize notification exceptions for priority messages, schedule automatic quiet hours for recurring focus periods, and manage your availability status to align with your specific workflow requirements and team collaboration needs.
Prerequisites: Active Microsoft Teams account, Teams desktop or web application, Windows 10/11 or macOS operating system.
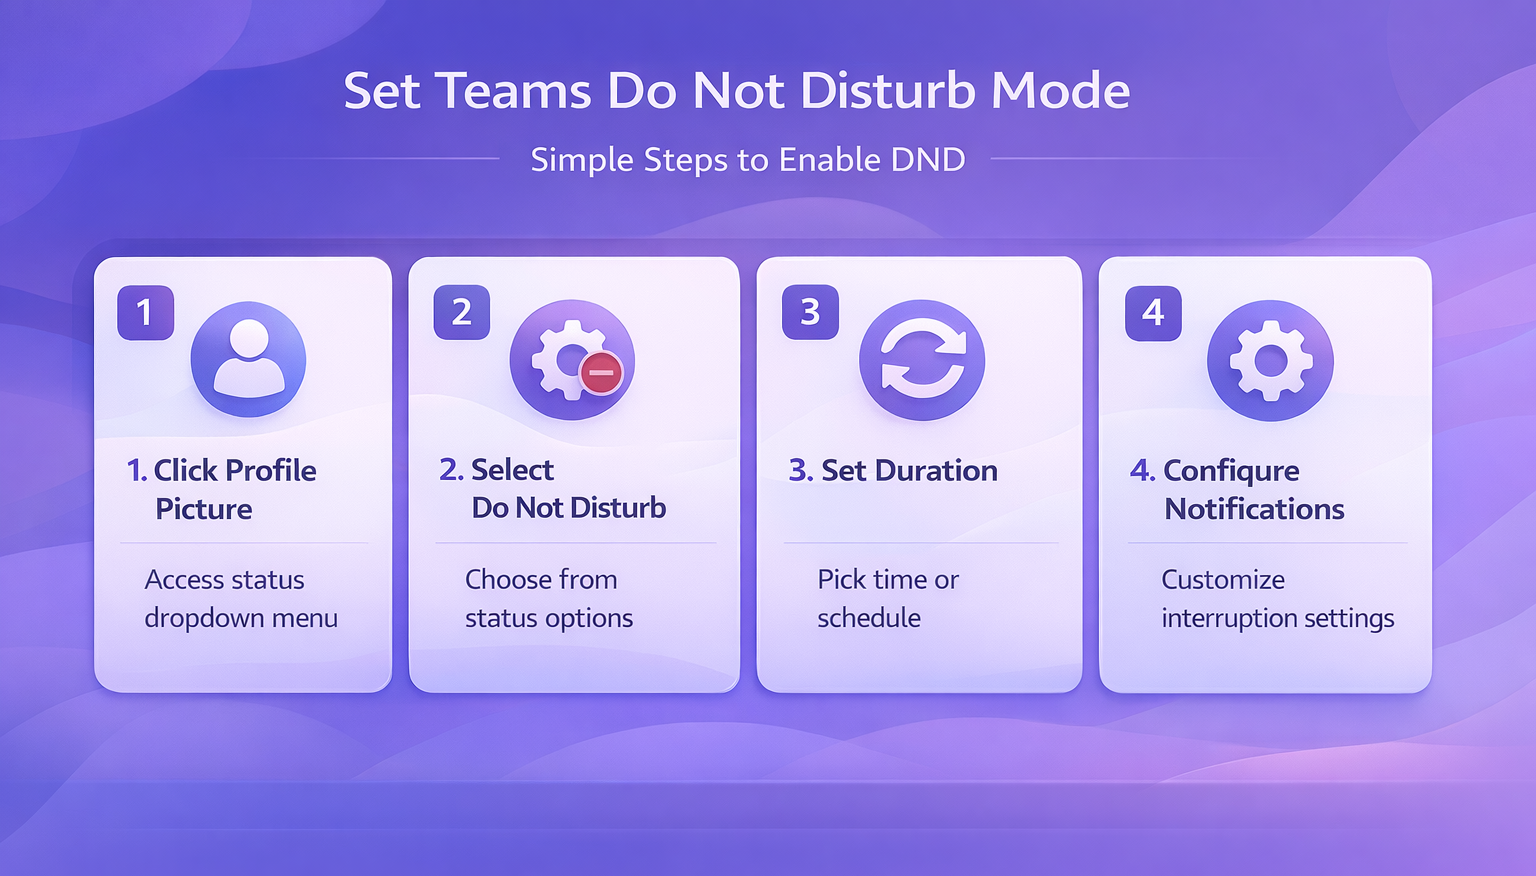
Accessing and configuring your availability status settings
- Navigate to the upper-right corner of your Microsoft Teams interface where your circular profile picture appears adjacent to the search bar and application controls.
- Click your profile picture to reveal a dropdown menu displaying your current availability indicator along with all selectable status options for immediate switching.
- Review the five primary availability modes presented in the menu: Available indicates online readiness, Busy signals active work, Do not disturb blocks notifications, Be right back suggests temporary absence, and Away activates automatically after periods of inactivity.
- Select “Do not disturb” from the status dropdown menu to immediately activate focus mode, which changes your indicator to a distinctive red circle with a diagonal line.
- Choose your preferred duration from the available options including thirty minutes for brief focus sessions, one hour for standard deep work blocks, two hours for extended concentration, four hours for half-day protection, until tomorrow for remainder of workday, or custom to specify your own end time manually.
Expert Tip: Setting a specific duration prevents you from forgetting to reactivate availability after your focus session concludes, maintaining appropriate responsiveness to your team.
Managing notification exceptions during focus periods
- Understand that priority notifications marked as urgent by message senders will bypass your do not disturb status and reach you despite the activated silence mode.
- Recognize that emergency contacts designated in your organizational hierarchy, such as direct managers or designated team leads, can break through the notification barrier with their communications.
- Consider informing your immediate team members about your focus periods through status messages or calendar blocks so they understand when to mark messages as urgent.
Customizing notification preferences for enhanced control
- Access the comprehensive notification control panel by clicking the three-dot menu icon, selecting Settings from the options, then navigating to the Notifications section.
- Locate the notification categories including chat messages for direct and group conversations, missed calls for voicemail alerts, meeting invites for calendar scheduling, channel mentions for team activity, and keyword alerts for messages containing specific terms you’ve designated as important.
- Toggle individual notification categories on or off based on what constitutes genuinely urgent communication within your specific workflow and organizational culture to create personalized filtering rules.
- Navigate to Settings then Privacy to configure automatic quiet hours that activate do not disturb mode during predictable focus periods like lunch breaks, early morning preparation time, or end-of-day wrap-up sessions without requiring manual status changes each day.
Remember: Granular notification controls allow you to maintain awareness of critical communications while filtering out routine messages that can wait until your focus session concludes.
Scheduling recurring focus time automatically
- Establish daily quiet hour schedules that align with your most productive concentration periods or recurring meetings that demand undivided attention throughout the week.
- Configure start and end times for automatic do not disturb activation, ensuring consistent protection during these windows without needing to remember manual status adjustments.
- Combine scheduled quiet hours with calendar blocking to provide both notification protection and visible time reservation that colleagues can see when scheduling meetings or expecting responses.
Note: Status messages appear next to your name in chat lists and meetings. Keep messages professional and informative. You can configure availability messaging with various contexts like “In focused work session” or “Available for urgent items only.”
Deactivating do not disturb and restoring normal availability
- Click your profile picture in the upper-right corner and select Available or Busy from the status dropdown menu to manually restore normal notification flow immediately.
- Allow automatic expiration to occur when your preset duration timer completes, which triggers Microsoft Teams to revert to your previous availability status without manual intervention required.
- Note that certain active participation behaviors like typing messages in conversations, joining scheduled meetings, or initiating calls may automatically reset your status from do not disturb to available based on Microsoft Teams activity detection algorithms.
- Monitor your status indicator periodically throughout extended focus sessions to ensure do not disturb mode remains active if you’ve engaged in brief communication that might have triggered automatic status changes.
Important Tip: Setting calendar events titled “Focus Time” alongside do not disturb status provides dual visibility to teammates about your unavailability for non-urgent matters.
Resolving common configuration and functionality issues
- If notifications continue appearing during do not disturb mode, verify that senders aren’t marking routine messages as urgent and check that your notification category toggles in Settings match your intended filtering preferences for different message types.
- When colleagues report they cannot see your updated availability status, confirm your Microsoft Teams application is fully synchronized with your organization’s servers by signing out completely and signing back in to refresh your presence information across all connected devices and platforms.
- Should do not disturb mode automatically deactivate unexpectedly before your scheduled duration expires, review your device’s power management settings to ensure Microsoft Teams maintains active background processes and isn’t being suspended during sleep or low-power states on laptops.
- If urgent messages fail to break through do not disturb barriers as expected, ask senders to confirm they’re using the priority notification feature correctly by clicking the exclamation mark icon when composing messages, and verify your organization hasn’t disabled priority notification capabilities through administrative policies in the Teams admin center.
Suggestion: Test your do not disturb configuration with a trusted colleague who can send both regular and urgent-marked messages to confirm your settings work as intended before relying on them during critical focus sessions.