
Background noise cancellation on Teams improves meeting productivity
How can I stop background noise from disrupting my Microsoft Teams meetings when working from home with construction happening outside, kids playing, or office chatter in shared workspaces? Many remote workers and hybrid employees struggle with unwanted audio interference during important video calls and presentations. Background noise can make it difficult for participants to focus on the conversation and may create an unprofessional impression during client meetings or executive briefings.
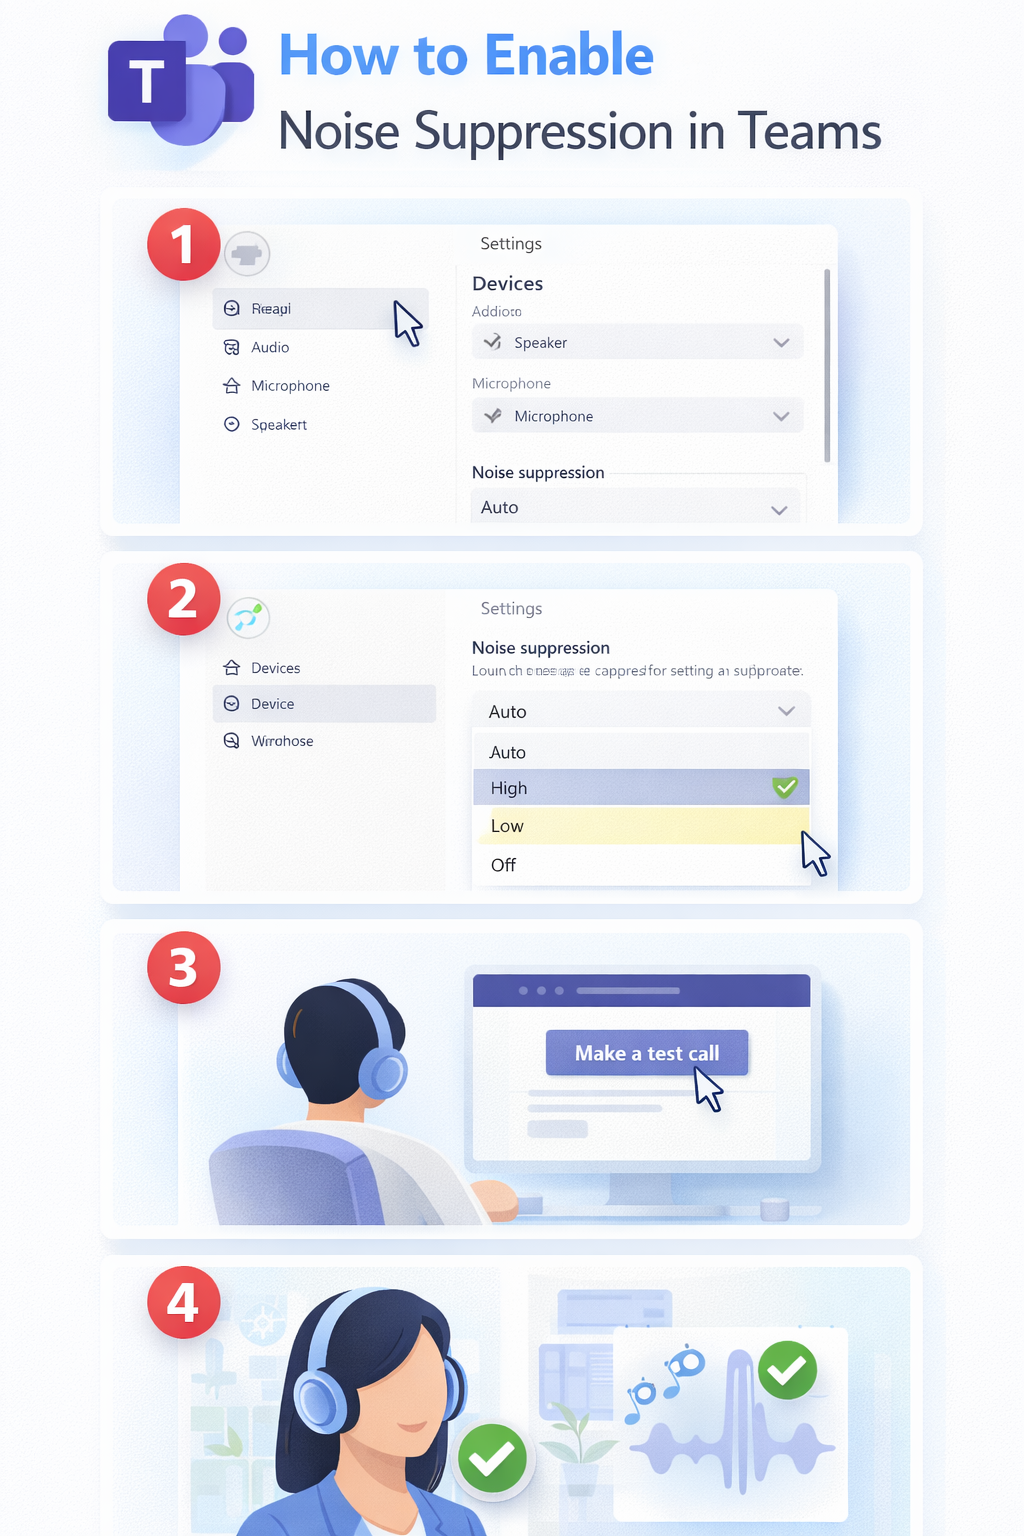
Turn on Noise cancellation in Microsoft Teams on Windows
Background noise during virtual meetings creates significant communication barriers that can derail important discussions and reduce overall meeting effectiveness. Microsoft Teams includes built-in noise suppression technology that uses artificial intelligence to filter out unwanted sounds while preserving your voice clarity. This tutorial will demonstrate how to enable noise cancellation in Teams, configure different suppression levels, and troubleshoot common audio issues.
We will cover accessing noise suppression settings in the Teams desktop application, mobile apps, and web browser version. The configuration process applies to Windows 11, 10; but also to macOS, iOS, and Android devices with Teams installed. You will need an active Microsoft 365 subscription with Teams access and administrative permissions to modify audio settings on your device.
The workflow includes navigating to Teams audio settings, selecting appropriate noise suppression levels, testing audio quality, and adjusting configurations based on your specific environment and meeting requirements.
How to reduce background noise in Teams desktop application?
The Teams desktop application provides the most comprehensive noise suppression controls and typically delivers the best audio processing performance compared to mobile or web versions.
- Open Microsoft Teams and click your profile picture in the top-right corner of the application window to access your account settings and preferences menu.
- Select Settings from the dropdown menu to open the main configuration panel where you can modify various Teams behaviors and audio preferences.
- Navigate to the Devices tab in the left sidebar menu to access all audio and video hardware settings including microphone, speaker, and camera configurations.
- Locate the Noise cancellation section under the microphone settings area and click the dropdown menu to view available suppression options for your current audio setup.
- Choose Auto (default) to let Teams automatically detect and suppress background noise based on your environment, or select High for maximum noise filtering in very noisy environments.
- Click the Make a test call button to verify that your microphone is working correctly and that noise suppression is functioning as expected before joining important meetings.
Expert Tip: The Auto setting provides the best balance between noise suppression and voice quality for most users, while High setting may occasionally filter out some speech sounds in very quiet environments.
Teams noise suppression Windows 10 configuration options
- Access the Windows 10 Sound settings by right-clicking the speaker icon in your system tray and selecting Open Sound settings to review your default audio devices.
- Ensure your preferred microphone is set as the default recording device in Windows before configuring Teams noise suppression settings to avoid conflicts between applications.
- Return to Teams and test different noise cancellation levels during a practice call to determine which setting works best with your specific microphone and room acoustics.
- Save your preferred noise suppression configuration by closing the Settings panel, and Teams will automatically apply these settings to all future meetings and calls.
Disable noise suppression Microsoft Teams when needed
Certain situations require disabling noise cancellation to ensure all audio is transmitted clearly, such as when sharing music, conducting audio demonstrations, or troubleshooting microphone issues.
- Open Teams Settings and navigate to the Devices tab using the same process described in the previous section for accessing audio configuration options.
- Click the Noise cancellation dropdown menu and select Off to completely disable all background noise filtering and suppression algorithms.
- Test your audio configuration by making a test call or asking meeting participants to confirm they can hear all sounds from your environment clearly and without distortion.
- Remember to re-enable noise suppression after completing tasks that require full audio transmission to maintain professional meeting quality and minimize distractions for other participants.
Mobile Teams noise cancellation configuration
The Teams mobile application offers simplified noise suppression controls that automatically adapt to your device’s capabilities and current environment.
- Open the Microsoft Teams mobile app and tap your profile picture in the top-left corner to access account settings and application preferences.
- Select Settings from the menu options and then tap Calling to access audio and video configuration options specific to mobile devices.
- Toggle the Noise cancellation switch to enable or disable background noise suppression based on your current meeting requirements and environmental conditions.
- Test the noise cancellation feature by starting a practice call or asking a colleague to confirm audio quality during your next scheduled meeting or conversation.
Troubleshooting noise suppression issues in Teams
Users may encounter various challenges when configuring or using noise cancellation features in Microsoft Teams, ranging from technical limitations to compatibility issues with specific hardware configurations.
- Noise suppression not available or grayed out typically indicates that your device lacks sufficient processing power or your microphone hardware does not support advanced audio filtering algorithms.
- Audio quality sounds muffled or robotic after enabling noise cancellation suggests that the suppression level is too aggressive for your speaking voice or microphone sensitivity settings need adjustment.
- Background noise still audible despite maximum suppression settings usually means your microphone is picking up vibrations through physical connections or your environment exceeds the system’s noise filtering capabilities.
- Voice cutting out during conversations with noise suppression enabled often indicates network bandwidth limitations or conflicts between Teams audio processing and other running applications consuming system resources.
Remember: Restart Teams completely after changing noise suppression settings to ensure all audio processing algorithms initialize correctly with your new configuration preferences.