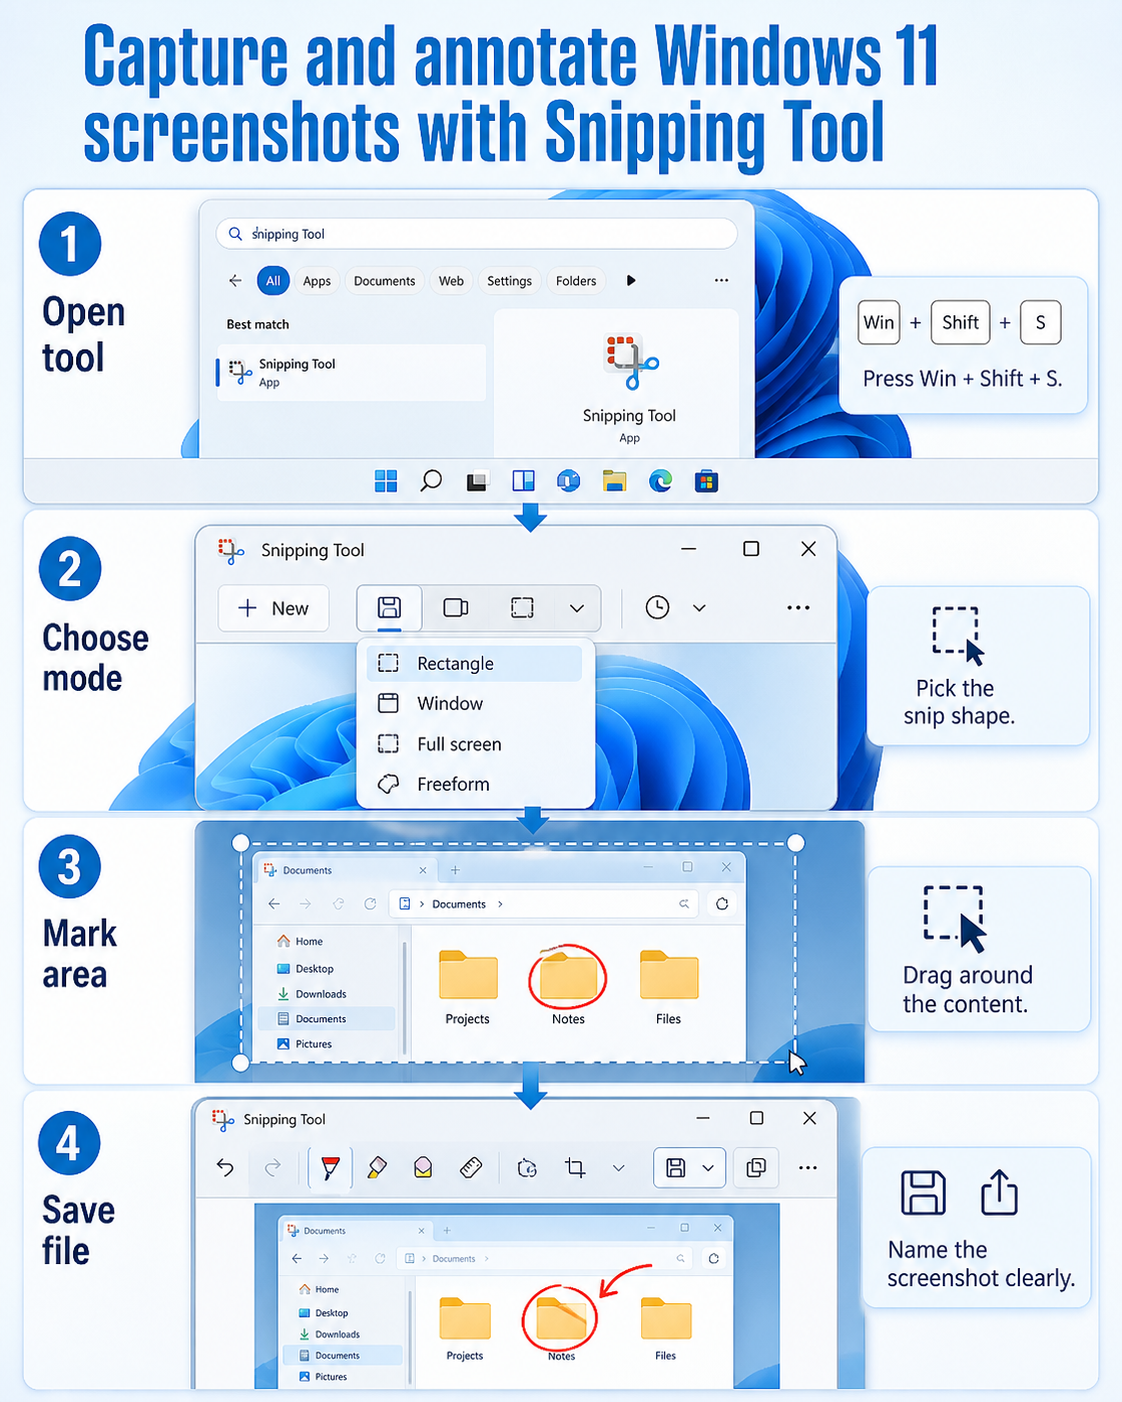
Windows 11 includes Snipping Tool for quick screenshots, delayed captures, annotations, and simple saving. The fastest path is Win + Shift + S, but opening the full Snipping Tool app gives you more control over the snip mode, delay, markup tools, and where the file is saved.
Use Win + Shift + S when you need a quick capture. The screen dims, the snipping toolbar appears, and you can choose rectangular, freeform, window, or full-screen capture. After you snip, Windows copies the capture to the clipboard and usually shows a notification.
Use the full app when you need a cleaner workflow. Open Start, search for Snipping Tool, and choose New. Pick the snip shape, use the delay option if you need to open a menu first, and then drag around the content.
If you are collecting screenshots for documentation, save files immediately with descriptive names. A name such as teams-share-policy-error.png is much easier to find later than a generic timestamp. For storage troubleshooting, see our guide on where screenshots are saved in Windows 11.
Snipping Tool is different from the older Print Screen workflow. Depending on your settings, Print Screen may open screen snipping, copy a full screenshot to the clipboard, or save to a Screenshots folder. If you prefer shortcut-based capture, our related article on Windows 11 screenshot keyboard shortcuts covers the main key combinations.
Step-by-step screenshot capture
- Press Win + Shift + S, or open Snipping Tool from Start.
- Choose the snip type: rectangle, window, full screen, or freeform.
- Drag around the area you want to capture, or choose the target window.
- Open the notification if you need annotation.
- Click Save, choose a folder, and use a clear filename.
When Snipping Tool does not open
Restart the app first. If the shortcut does nothing, open Snipping Tool from Start and check whether the app itself launches. Then check Windows notifications, keyboard settings, and whether another screenshot utility is intercepting the shortcut. A Windows restart can also clear a stuck capture overlay.
Recommended workflow for support screenshots
When you are taking screenshots for a help desk ticket, capture only the area that explains the problem. A rectangular snip around the error message, toolbar, or settings panel is usually better than a full desktop screenshot. It keeps private content out of the image and makes the important detail easier to read.
Use annotation sparingly. A short arrow or highlight can help, but too many marks make the screenshot harder to interpret. If the screenshot includes personal data, crop it out or cover it before sharing. Do not rely on the recipient to ignore unrelated email previews, customer names, or file paths.
Create a folder for the case before you start. Save each screenshot with a sequence number and a short description, such as 01-open-settings.png and 02-error-message.png. This makes it easier to attach the files in order and later rebuild what happened. If you paste captures directly into Teams or Outlook, still save the source files when the issue is important.
Snipping Tool versus screen recording
A screenshot is best for a stable state: a dialog, menu, error message, or final configuration. A recording is better when timing matters, such as a menu closing too quickly, a button disappearing, or a workflow failing after several clicks. If you use recording, keep the clip short and rehearse the path first so the viewer does not have to watch unrelated navigation.
For written tutorials, mix both approaches carefully. Use screenshots for steps readers need to inspect, and recordings only when movement is the point. Screenshots remain easier to search, annotate, and print, which is why Snipping Tool is still the better default for most business documentation.
Privacy and readability checks
Before you send a screenshot, zoom in to make sure the important text is readable at normal email or chat size. If the recipient has to zoom to 200 percent, crop tighter or retake the capture. A clean crop around the relevant pane is usually more useful than a full 4K desktop image.
Look for private information around the edges of the snip. Browser tabs, account initials, file paths, recent documents, and notification banners often appear even when the main capture area looks harmless. Retake the screenshot after closing those distractions, or crop the image inside Snipping Tool before saving.
If you are documenting a repeatable process, use the same capture size for each step. Consistent screenshots make instructions easier to scan and reduce layout problems when you paste them into Word, PowerPoint, Teams, or a ticketing system. Keep the pointer out of the capture unless it explains what to click next.
Best format to save
PNG is the safest default for screenshots because it keeps text and interface lines crisp. JPEG can make small labels fuzzy, especially on settings pages and dialog boxes. Use PNG for tutorials, support tickets, and knowledge-base articles. Use JPEG only when file size matters more than sharp text.
When the screenshot includes a white dialog on a white page, add a light crop margin so the edge is visible. If the image will be pasted into a document, avoid oversized blank space. The goal is not just to capture the screen; it is to produce an image that someone else can understand quickly.
Does Snipping Tool save screenshots automatically?
It can copy captures to the clipboard and may autosave depending on settings and Windows version, but you should still click Save when the file must be kept for documentation or support.
Can Snipping Tool capture menus?
Yes. Open the full app, set a delay, click New, open the menu, and wait for the capture overlay to appear.
Can I record video with Snipping Tool?
Current Windows 11 Snipping Tool builds include screen recording for many users. Use the recording option when you need a short workflow clip rather than a static screenshot.
Conclusion
For quick screenshots, use Win + Shift + S. For repeatable documentation, open Snipping Tool, choose the capture mode, annotate only what matters, and save the file with a clear name before moving to the next screenshot.