A Teams meeting test is most useful when it checks the same headset, camera, network, and account you will use in the real meeting. Microsoft Teams provides a built-in test call on the desktop app, but that is only one part of a reliable rehearsal. A short pre-join check catches the problems the bot cannot see, including the wrong audio source, an awkward camera crop, or an invite that opens under the wrong account.
This guide shows you how to test the essentials without bothering a colleague or joining the live meeting early.
Build a five-minute test plan
Do the test on the device and in the location you plan to use. A laptop microphone may pass at your desk but sound distant in a conference room. Bluetooth headphones can also switch profiles when their microphone becomes active, changing the sound you hear.
Before opening Teams, prepare these items:
- Connect the headset, webcam, dock, or room equipment you intend to use.
- Close apps that may already be using the camera or microphone.
- Confirm that you are signed in to the correct work, school, or personal Teams account.
- Keep the real meeting invite available so you can inspect its pre-join screen after the test call.
If your main symptom is that other people are silent or your selected output keeps changing, work through the deeper audio recovery checklist before relying on a successful rehearsal.
Make the built-in Teams test call
The test call is available in the Teams desktop app for Windows and Mac. Microsoft says it is not currently available in Teams on the web. The feature connects you to the Test Call Bot, records a short message, plays it back, and then shows a result summary. Microsoft deletes the test recording immediately after the call.
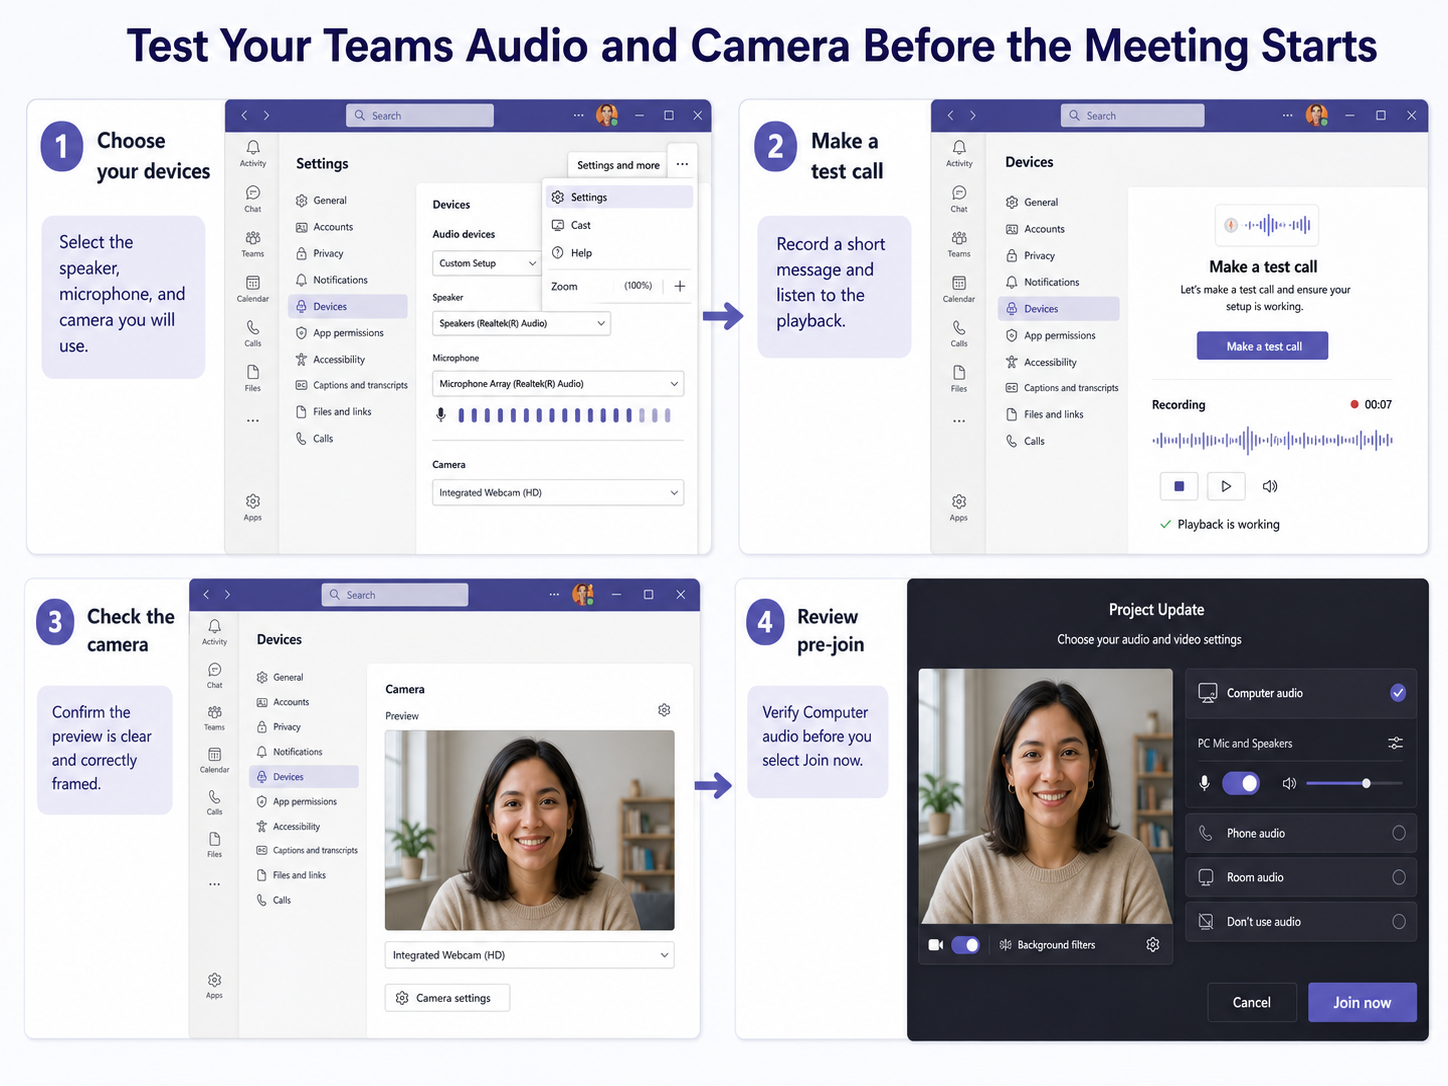
Select the actual meeting devices
- Open the Teams desktop app and sign in.
- Select Settings and more beside your profile picture, then choose Settings.
- Open Devices.
- Under Audio settings, select the speaker and microphone you plan to use.
- Under Video settings, select the intended camera and inspect its preview.
Speak normally while watching the microphone level. If the meter does not react, choose another microphone before starting the bot. Avoid leaving the setting on an unfamiliar dock, monitor, or virtual audio device just because it appears first in the list.
Record and judge the playback
Select Make a test call under Audio settings and follow the Test Call Bot prompt. Record a complete sentence at the distance you will sit from the microphone. During playback, listen for low volume, clipping, echo, long gaps, or heavy background noise—not merely whether sound exists.
If the playback uses the laptop speaker instead of your headset, return to Devices and change the speaker explicitly. When the microphone is faint, move it closer, check its hardware mute control, and repeat the call. One clean replay is more useful than changing several settings at once because it tells you which adjustment worked.
Check the camera and the real pre-join screen
A successful bot call does not prove that the meeting invite will select the same devices. Open the real invite and select Join to reach the pre-join screen, but do not select Join now. Choose Computer audio, open the device controls, and confirm that the listed speaker and microphone match the ones you just tested.
Inspect the camera as another attendee would see it
Turn the camera on and look for a stable, properly framed preview. Check that the lens is not covered, your face is lit from the front, and private material is outside the frame. If Teams shows a black preview or no camera choice, the device-permission walkthrough explains the operating-system checks that should come before reinstalling Teams.
Background effects can consume extra processing power, so test the exact background you expect to use. If the video becomes choppy, remove the effect and compare again. A clean natural background is safer than an effect that makes the camera feed unstable.
Confirm the meeting-specific choices
On the pre-join screen, review these controls:
- Computer audio is selected when you intend to use the computer’s devices.
- The microphone icon reflects whether you want to enter muted.
- The camera preview uses the expected camera rather than a dock or virtual camera.
- The speaker test or device menu points to the output you can actually hear.
- The signed-in account has permission to enter the meeting without an unexpected access prompt.
Back out of the pre-join screen when you are finished. You do not need to enter the meeting to preserve these checks.
Know what the test call cannot prove
The bot checks your local microphone, speaker, and camera path. It cannot guarantee that a weak network will stay stable during a long call, that an organizer will allow attendee video, or that a meeting-room system will behave like your laptop. It also does not test screen sharing, presentation sound, breakout rooms, or recording permissions.
For a high-stakes presentation, create a separate private meeting and join it from a second device or invite a trusted colleague. Keep the second device muted to prevent feedback. Share the exact window or slide deck, enable Include sound when the audience needs computer audio, and verify that confidential notifications are not visible.
Questions before your Teams meeting
Why is Make a test call missing in Teams?
First confirm that you are using the desktop app rather than Teams on the web, where Microsoft says the test-call feature is unavailable. Then open Settings > Devices and look under Audio settings. A managed organization can also limit features, so contact the help desk if the control is absent on an updated desktop client.
Does a Teams test call contact another person?
No. The built-in feature calls Microsoft’s Test Call Bot, which asks you to record a short message and plays it back. It does not ring a colleague or place you into the scheduled meeting, and Microsoft states that the recording is deleted immediately after the test.
Should I create a private test meeting as well?
Use one when you need to rehearse screen sharing, presentation audio, backgrounds, or the complete join flow. The bot is faster for basic device checks, while a private meeting is closer to the real experience. For important events, using both takes only a few extra minutes and covers different failure points.
What if the speaker works but the microphone does not?
Return to Settings > Devices and verify that the microphone dropdown names the intended device. Check the headset’s physical mute button and the operating system’s microphone permission for Teams, then close any recording app that may hold the device. Repeat the test after each change so you can identify the actual cause.
Enter the meeting with fewer surprises
Run the desktop test call early enough to fix a device problem, then revisit the real invite a few minutes before start time. The playback proves that Teams can hear and return your voice; the pre-join screen proves that the meeting is about to use the intended devices and account. If those two checks disagree, trust the pre-join selection and correct it before entering. This small rehearsal is especially valuable after changing a dock, headset, webcam, or Teams profile.