“How can I assign work items to my team members without endless email threads?”
As a project manager coordinating multiple initiatives across departments, I need a streamlined way to distribute responsibilities and track completion status. My team currently uses Microsoft 365, and I’m wondering if Outlook’s task management features can help us coordinate better. Is there a way to create and share tasks directly in Outlook so everyone stays aligned without constant status update meetings or confusing email chains?
Finding better ways to share Outlook to do lists for team productivity
Task management remains a critical challenge for organizations of all sizes. When teams rely on separate systems or manual tracking methods, important assignments fall through the cracks, deadlines get missed, and accountability becomes difficult to establish. Fortunately, Outlook provides robust task management features that enable teams to create, assign, and track shared tasks. By utilizing Outlook’s built-in task capabilities or integrating with Microsoft To Do, teams can significantly improve coordination and visibility across projects.
Sharing tasks in Outlook 365: Solution framework
This tutorial will demonstrate multiple approaches to sharing and assigning tasks in Outlook, focusing on both traditional Outlook tasks and the newer Microsoft To Do integration. We’ll cover creating tasks for others, setting up shared task lists, tracking completion status, and ensuring proper synchronization across the Microsoft 365 ecosystem. These methods work with Outlook 365 desktop clients, web versions, and mobile applications. You’ll need Microsoft 365 accounts for all team members and appropriate sharing permissions within your organization.
Note: When implementing shared tasks, you can leverage both traditional Outlook features as well as Microsoft Planner integration with Outlook to maximize team coordination and task visibility.
Creating Outlook tasks for others
- Access task creation in Outlook by navigating to the Tasks or To-Do section, which can be found in the navigation pane of your Outlook desktop client or by selecting the To-Do icon in Outlook web.
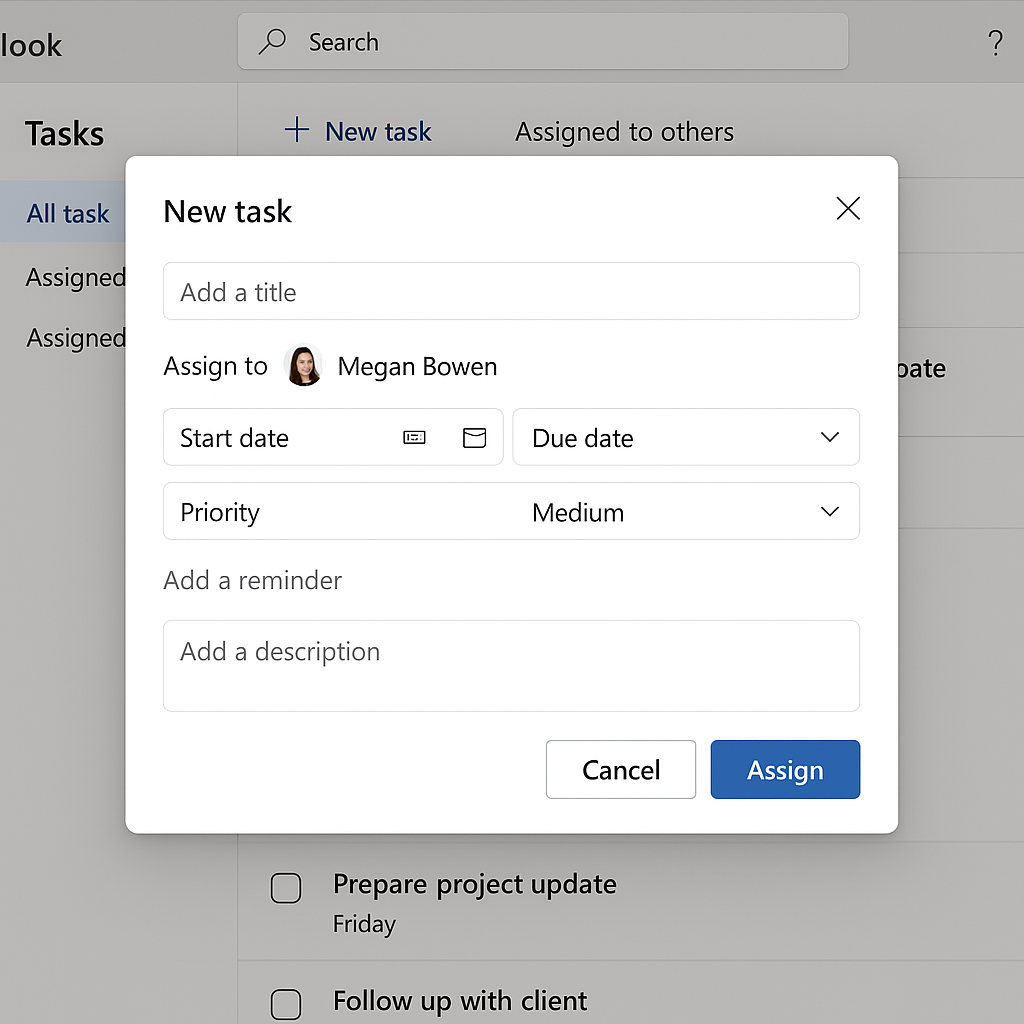
- Create a new task by clicking “New Task” or the plus icon, then enter a descriptive title that clearly communicates the expected deliverable to ensure clarity for your team members.
- Set a due date and priority level to help your team member understand the timeline and importance, using the due date picker and priority dropdown menu available in the task creation form.
- Add comprehensive details in the notes section including any relevant background information, resources needed, and specific expectations to minimize follow-up questions and clarifications from assignees.

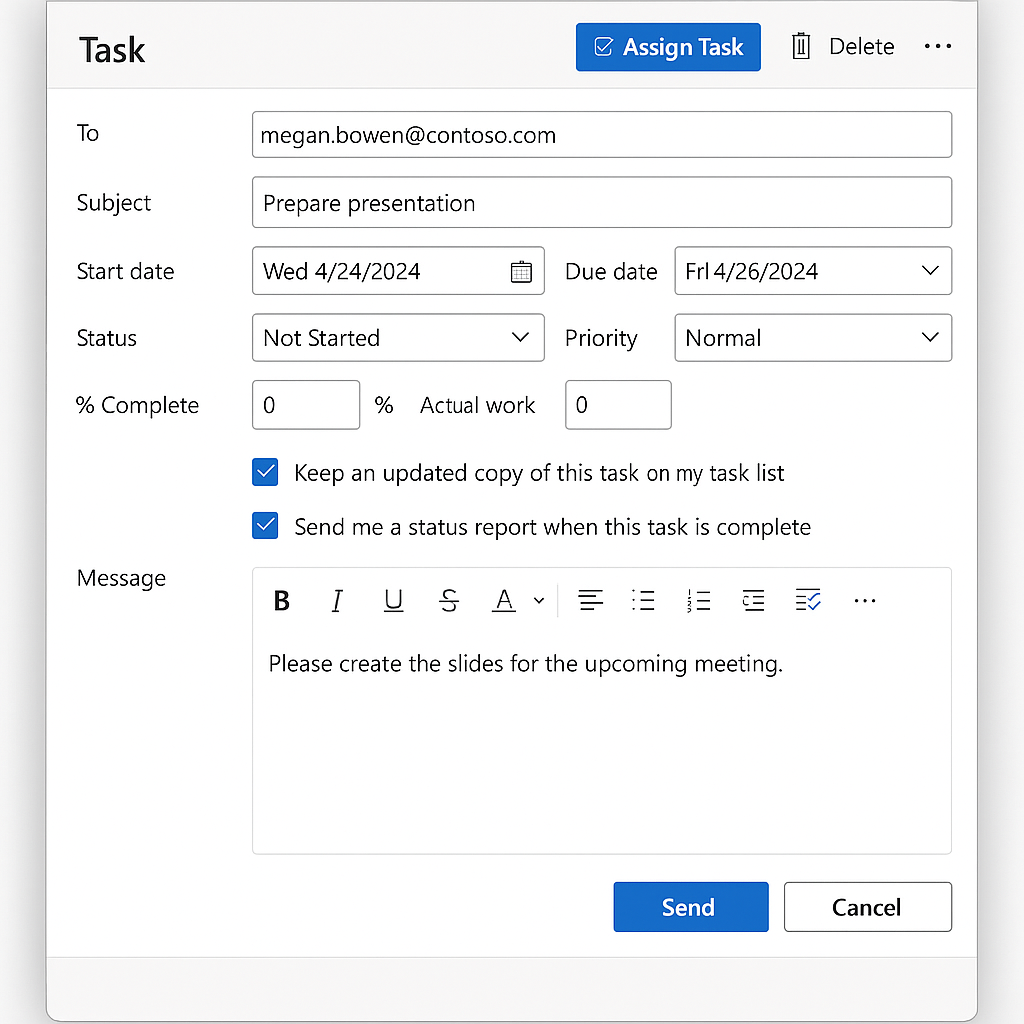
- Assign the task to a colleague by clicking the “Assign Task” button in the ribbon (desktop client) or using the sharing options in the task details, which opens a dialog similar to composing an email.
- Configure task options including whether you want to keep a copy of the task, receive status reports, and automatically update your copy when the status changes to maintain visibility.
- Send the task assignment which delivers it to your colleague’s inbox, where they can accept or decline the assignment based on their availability and capacity.
- Track task progress by viewing updates in your task list, which will reflect changes as your team member updates the status from not started to in progress to completed.

- Before setting up shared task lists, ensure your Outlook plugins are functioning correctly to avoid any synchronization issues between Microsoft 365 applications.
Microsoft To Do shared task list management approach
- Access Microsoft To Do through the web app, desktop application, or mobile app, which all synchronize with your Outlook tasks for seamless integration.
- Create a dedicated shared list by clicking “New List” in To Do, giving it a meaningful name related to your project or department to help organize tasks contextually.
- Share the list with team members by selecting the list, clicking the sharing icon, and entering the email addresses of colleagues who should have access to view and manage these tasks.
- Specify permission levels for each person, determining whether they can only view tasks or have full editing capabilities to add, modify, and complete tasks as needed.
- Add tasks to your shared list by clicking the “Add a task” option, entering task details, due dates, and any relevant notes or attachments that help clarify the assignment.
- Assign specific tasks to individuals by opening a task, selecting “Assign to” and choosing the team member who should be responsible for completion from the list of people with access.
- Organize tasks with priority flags and categories to visually indicate importance and help team members prioritize their work efficiently across multiple shared lists.
- Enable notifications for task assignments and due dates to ensure team members receive timely reminders about approaching deadlines and new responsibilities.
