Teams meeting invites created from Outlook still rely on Outlook and Exchange room resources for physical rooms. If room lists do not show, the issue is usually Room Finder, address data, permissions, or the selected building list rather than the Teams meeting link. Fix the room selection first, then add or confirm the Teams meeting details. That keeps the online meeting and the physical room reservation from drifting apart.
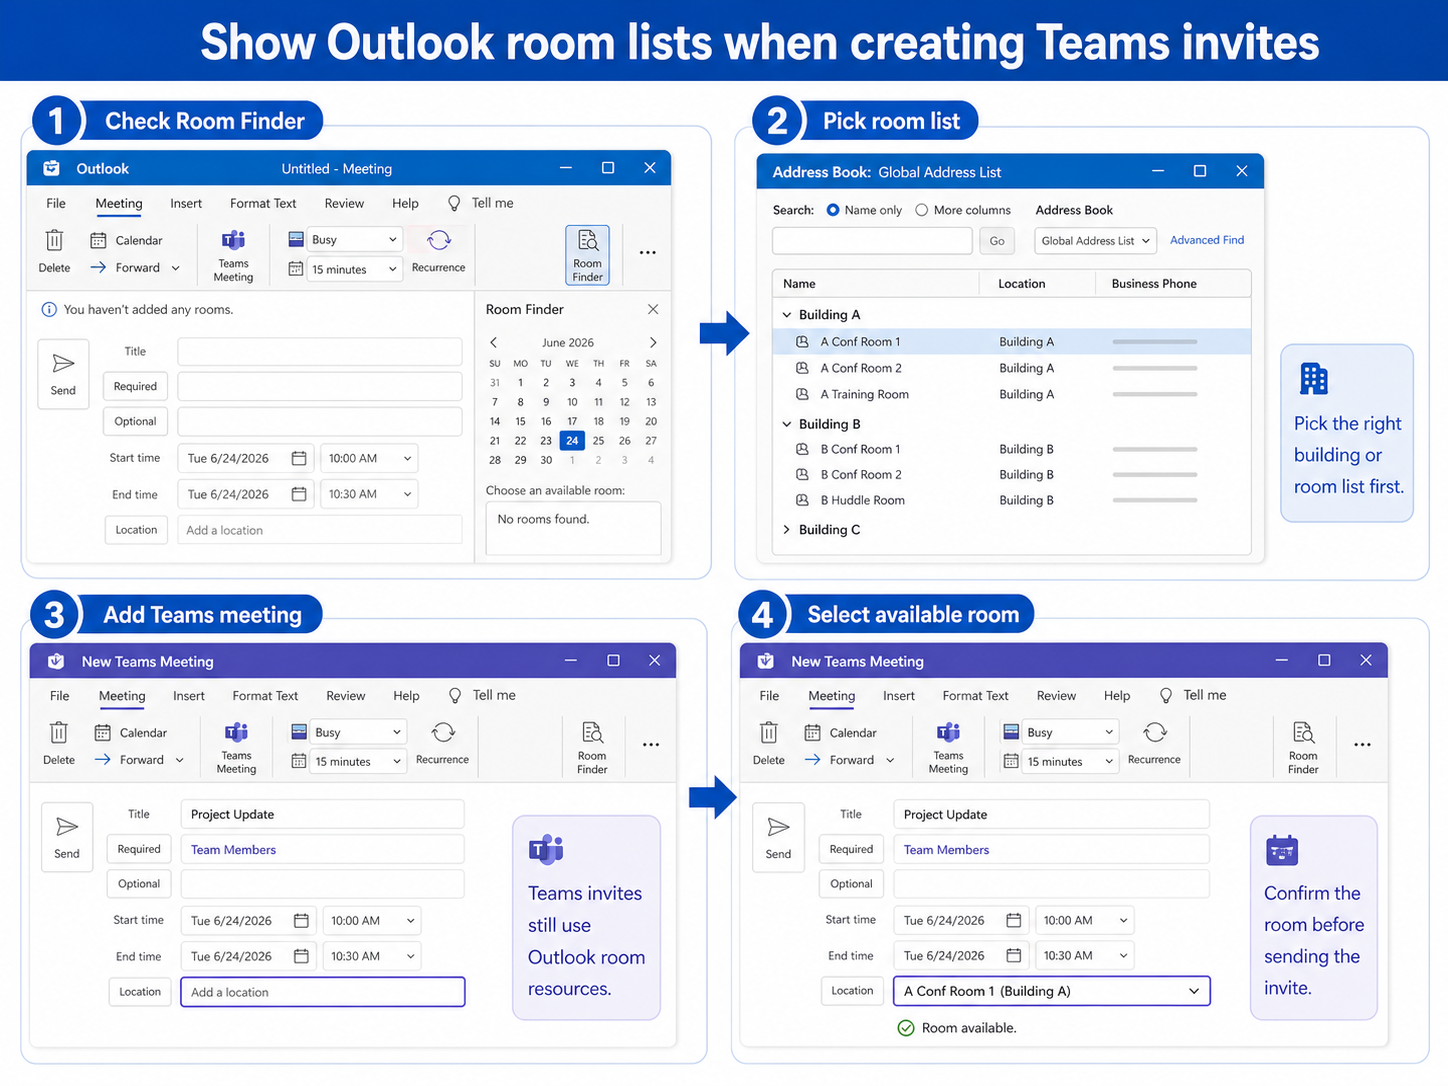
Open Room Finder before blaming Teams
Create the meeting in Outlook and open Room Finder or the location field. If no buildings or room lists appear, the room resource data is not reaching the organizer’s Outlook view.
Teams adds the online meeting portion, but Outlook still books the room mailbox. For invite setup context, see the mailbox-side checks.
Pick the right room list or building
Large tenants often group rooms by building, city, floor, or region. A blank list can simply mean the wrong building or room list is selected. Try a broader location or ask facilities which room list should be used.
If you schedule on behalf of someone else, compare the behavior with schedule a Teams meeting for someone else. Delegate scheduling can add another permission boundary.
Check room mailbox availability
A room can be hidden, disabled, booked, or restricted to certain organizers. Search the address book for the room name and confirm it appears as a room resource, not a normal contact.
Evidence to collect for IT:
- Organizer account.
- Room list or building selected.
- Room name that should appear.
- Whether the room appears in Outlook web.
- Whether other organizers can see the same list.
Keep the Teams link and room reservation aligned
After selecting a room, confirm the Teams meeting toggle or add-in still created the online meeting link. If you add Teams first and then change the room, review the invite before sending so the location, online link, and attendees all match.
Avoid typing the room name as plain text unless you only need a label. A real room resource should be selected from the directory so the room mailbox receives and processes the booking request.
Use Outlook web as a comparison
If desktop Outlook does not show room lists, test Outlook on the web with the same organizer account. If web works, the desktop cache or profile may be stale. If neither works, the room list or mailbox configuration probably needs admin review.
For urgent meetings, book the room through a known working account and send the Teams invite after the room is confirmed. Then fix the organizer’s room list access before the next meeting.
Prevent room-list problems in delegated scheduling
Assistants and delegates should test room access from their own mailbox, not only from the executive’s calendar. A delegate may be able to create the meeting but still have a different Room Finder experience. Testing both views prevents room booking surprises when a meeting is time-sensitive.
Facilities or Exchange admins can also rename or reorganize room lists. If a familiar list disappears, ask whether the building list changed before rebuilding the Outlook profile. A renamed room list is an address book problem, not a broken Teams meeting invite.
Confirm rooms before attendees receive the invite
After selecting a room, inspect the attendee list and location field before sending. The room should appear as a resource or attendee, not only as typed text in the location line. If it is only text, the room has not been booked.
If the room declines automatically, read the decline reason instead of sending the same invite again. The room may reject conflicts, meetings outside allowed hours, or requests from unauthorized organizers. That message usually tells you whether to pick another room or ask an admin to change booking policy.
What to capture before escalation
For support, capture the organizer account, Outlook web behavior, desktop Outlook behavior, room list name, room mailbox that should appear, and any automatic room decline. That evidence helps Exchange administrators check address lists and room booking policy quickly.
Include the exact date and time of the test, because calendar, meeting, and directory data can change while troubleshooting is in progress. A precise test record prevents the next person from comparing against a different sync state.
Make the final decision
If the room list still does not appear, do not keep sending test invites to real rooms. Ask an Exchange administrator to verify the room list membership, visibility, booking policy, and address book propagation first. Once the list is visible, send one test invite to confirm the room mailbox processes requests correctly.
Then use that confirmed path for live meetings. This avoids duplicate holds on busy conference rooms and reduces confusion for attendees. Keep the confirmed room list name in the team’s scheduling notes for future organizers as well.
Quick answers
Are room lists controlled by Teams?
No. Teams meeting invites can include rooms, but room lists and room mailboxes come from Exchange and Outlook scheduling data.
Why can another organizer see the rooms but I cannot?
The other organizer may have different address book visibility, delegate rights, or cached data. Compare Outlook web and desktop for both accounts before changing the room mailbox.
Can I type the room name manually?
You can type a location label, but that does not book the room resource. Select the room from Room Finder or the address book when you need an actual reservation.
Before sending
Room lists in Teams meeting invites are really an Outlook and Exchange resource problem. Confirm Room Finder, pick the correct list, select the actual room mailbox, and then verify the Teams link before sending. That final review prevents the common failure where the online meeting exists but the physical room was never booked.