“I’ve been trying to map a network drive in Windows 11 for hours, but it keeps failing with various error messages. Sometimes it says the network path cannot be found, other times it mentions credential issues. I need to access shared files on our company server regularly, but the connection process seems more complicated than it was in Windows 10. How can I successfully map a network drive and ensure it stays connected?”
Win11 map network drive configuration troubleshooting
Network drive mapping in Windows 11 has evolved from previous versions, introducing new security protocols and authentication methods that can create connectivity challenges. Many users experience difficulties when transitioning from Windows 10 mapping procedures, as Windows 11 implements stricter security measures and modified network discovery settings.
This tutorial will demonstrate how to map a network drive in Windows 11 using multiple methods, including File Explorer integration, Command Prompt techniques, and PowerShell automation. We’ll configure a persistent connection to a shared network folder, ensuring automatic reconnection after system restarts while addressing common authentication and permission issues.
Prerequisites: Administrative access to your Windows 11 system, valid network credentials for the target server, and confirmed network connectivity to the shared resource. We’ll use File Explorer, Command Prompt, and PowerShell throughout this implementation process.
Expert Tip: Before attempting to map any network drive, verify that network discovery is enabled in Windows 11’s network settings to avoid unnecessary connection failures.
Mount network drive Windows 11 using File Explorer method
Configure network drive mapping through Windows 11 interface
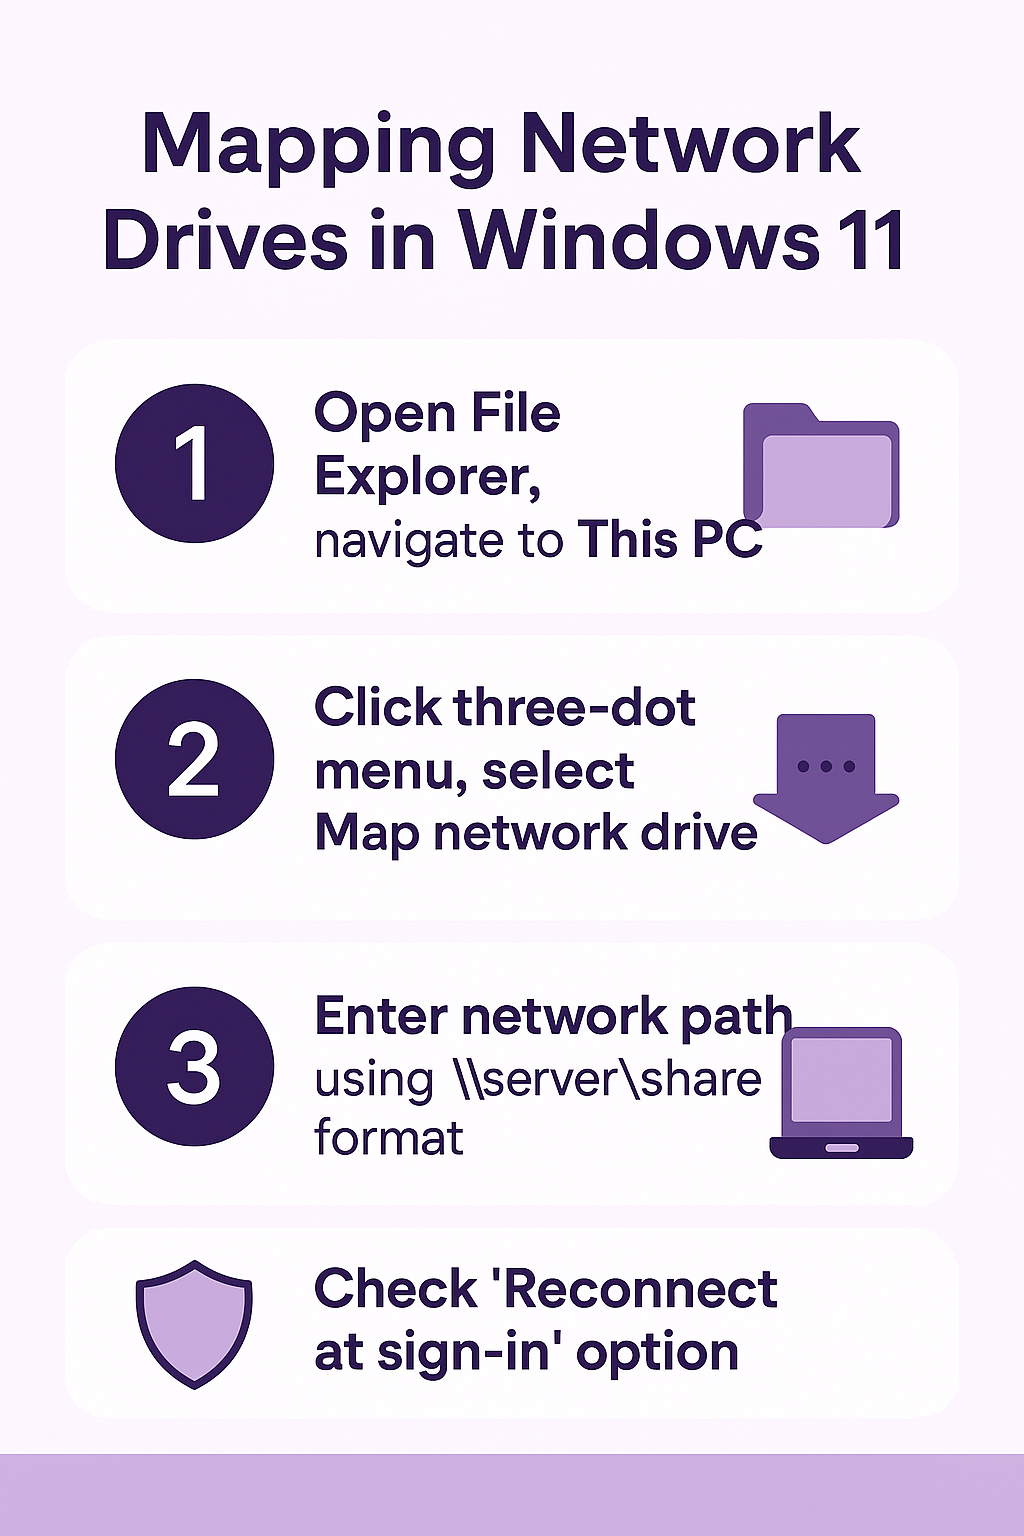
- Open File Explorer by pressing Windows key + E, then navigate to “This PC” in the left sidebar to access the main computer view where network drives will appear once successfully mapped.
- Click on the three-dot menu icon in the File Explorer toolbar, then select “Map network drive” from the dropdown menu to launch the network drive mapping wizard interface.
- Choose an available drive letter from the dropdown menu, ensuring you select a letter that isn’t already assigned to existing drives or removable storage devices on your system.
- Enter the complete network path in the “Folder” field using the Universal Naming Convention format: \servername\sharename or \IP-address\sharename, replacing servername with your actual server name and sharename with the specific folder you want to access.
- Check the “Reconnect at sign-in” option if you want Windows 11 to automatically restore this network drive connection every time you log into your user account.
- Enable “Connect using different credentials” if you need to authenticate with username and password credentials that differ from your current Windows 11 login information.
- Click “Finish” to initiate the connection process, and Windows 11 will attempt to establish the network drive mapping using your specified parameters and authentication settings.
How to map a drive in Windows 11 using Command Prompt
- Press Windows key + R to open the Run dialog, type “cmd” and press Ctrl + Shift + Enter to launch Command Prompt with administrative privileges for network drive operations.
- Execute the basic network drive mapping command: net use X: \servername\sharename where X represents your chosen drive letter and the path points to your target network location.
- For persistent connections that survive system restarts, use the enhanced command: net use X: \servername\sharename /persistent:yes to ensure automatic reconnection after Windows 11 reboots.
- When authentication is required, include credentials directly in the command: net use X: \servername\sharename /user:domain\username password replacing domain, username, and password with your actual network credentials.
- Verify successful mapping by typing net use without additional parameters to display all currently mapped network drives and their connection status information.
Windows 11 map network drive using PowerShell automation
Advanced network share mapping with PowerShell commands
- Launch PowerShell as administrator by right-clicking the Start button, selecting “Windows PowerShell (Admin)” from the context menu to ensure sufficient privileges for network operations.
- Create a new network drive mapping using the New-PSDrive cmdlet: New-PSDrive -Name “X” -PSProvider FileSystem -Root “\servername\sharename” -Persist where X is your desired drive letter.
- For credential-based authentication, first create a credential object: $credential = Get-Credential which will prompt you to enter username and password information securely.
- Apply the credential object to your network drive mapping: New-PSDrive -Name “X” -PSProvider FileSystem -Root “\servername\sharename” -Credential $credential -Persist for authenticated connections.
- Confirm successful mapping by running Get-PSDrive -PSProvider FileSystem to list all currently mounted drives including your newly created network drive connection.
Important Tip: PowerShell methods provide more granular control over network drive authentication and can handle complex domain authentication scenarios more effectively than File Explorer.
Cross-Version Behavior: Windows 10 vs Windows 11
Windows 10 allowed guest access to network shares by default, while Windows 11 blocks unauthenticated guest connections as part of its stricter security posture. If you are connecting to a NAS device or older file server that relies on guest access, you must explicitly enable guest access via Group Policy at:
Computer Configuration > Administrative Templates > Network > Lanman WorkstationSet “Enable insecure guest logons” to Enabled. Note that this reduces security and should only be applied when connecting to trusted internal network resources.
Unable to map network drive Windows 11 troubleshooting
Common network drive connection failures and resolutions
- Network path not found errors typically indicate DNS resolution problems or incorrect server names, so verify the server name by pinging the target system using ping servername in Command Prompt to confirm network connectivity and name resolution functionality.
- Access denied messages usually stem from insufficient permissions or incorrect credentials, requiring you to contact your network administrator to verify your account has appropriate access rights to the target shared folder location.
- SMB protocol version conflicts can prevent successful connections in Windows 11, necessitating the enabling of SMB1 protocol through Windows Features if connecting to older network storage devices or legacy server systems that don’t support modern SMB versions.
- Windows Credential Manager conflicts may cause authentication failures, so navigate to Control Panel > Credential Manager > Windows Credentials and remove any conflicting stored credentials for the target server before attempting to map the network drive again.
- Network discovery disabled status prevents Windows 11 from locating network resources, requiring you to enable network discovery through Settings > Network & Internet > Advanced network settings > Advanced sharing settings for your current network profile.
- Firewall restrictions can block network drive connections, so temporarily disable Windows Defender Firewall to test connectivity, then create specific firewall rules for SMB traffic on ports 445 and 139 if the connection succeeds with firewall disabled.
- Group Policy restrictions in corporate environments may prevent network drive mapping, requiring consultation with your IT administrator to modify relevant Group Policy settings or obtain necessary permissions for network resource access.