Check duplicate files Windows 11 with modern detection methods
“I’ve been using my Windows 11 laptop for work and personal projects for over a year now, and I’m running out of storage space. I suspect I have tons of duplicate photos, documents, and downloaded files scattered across different folders. How can I efficiently find and remove these duplicates without accidentally deleting important files?”
Detecting duplicate files in Windows 11
Storage management becomes increasingly challenging as users accumulate files across multiple directories, cloud sync folders, and backup locations. Duplicate files consume valuable disk space and create organizational confusion, particularly when working with large media libraries, document archives, or software installations. This tutorial demonstrates how to systematically identify and manage duplicate content using both Windows 11’s native capabilities and specialized third-party tools. We’ll explore PowerShell commands for technical users, File Explorer techniques for basic detection, and dedicated duplicate finder applications for comprehensive scanning.
This tutorial demonstrates how to systematically identify and manage duplicate content using both Windows 11’s native capabilities and specialized third-party tools. We’ll explore PowerShell commands for technical users, File Explorer techniques for basic detection, and dedicated duplicate finder applications for comprehensive scanning.
The workflow covers scanning specific directories, analyzing file properties, reviewing potential duplicates safely, and implementing removal strategies that protect critical system files. You’ll need administrator privileges for system-wide scans and approximately 30 minutes depending on your storage size.
We’ll utilize Windows PowerShell, File Explorer’s search functionality, and evaluate Auslogics Duplicate File Finder as our primary third-party solution for advanced duplicate detection scenarios.
Best duplicate finder methods for Windows 11
Using Windows PowerShell for duplicate detection
- Open PowerShell as administrator by right-clicking the Start button and selecting “Windows PowerShell (Admin)” from the context menu that appears.
- Navigate to your target directory using the
cdcommand, for examplecd C:\Users\YourUsername\Documentsto scan your Documents folder specifically. - Execute this PowerShell command to find files with identical sizes:
Get-ChildItem -Recurse | Group-Object Length | Where-Object {$_.Count -gt 1} | ForEach-Object {$_.Group}. - For more precise duplicate detection, use this hash-based command that compares file content:
Get-ChildItem -Recurse -File | Get-FileHash | Group-Object Hash | Where-Object {$_.Count -gt 1}. - Export results to a text file for review using:
Get-ChildItem -Recurse -File | Get-FileHash | Group-Object Hash | Where-Object {$_.Count -gt 1} | Out-File C:\DuplicateReport.txt.
Implementing File Explorer search techniques
- Open File Explorer and navigate to the directory you want to scan, such as your Downloads folder or entire C: drive for comprehensive analysis.
- Click in the search box and type
size:>1MBto filter files larger than 1MB, which helps focus on files that significantly impact storage space. - Sort results by “Date modified” or “Size” to identify potential duplicates with similar timestamps or identical file sizes that warrant closer inspection.
- Use advanced search operators like
name:*.jpg OR name:*.pngto focus on specific file types where duplicates commonly occur, particularly media files. - Right-click suspicious files and select “Properties” to compare file sizes, creation dates, and modification timestamps for manual duplicate verification processes.
Auslogics duplicate file finder installation and configuration
- Download Auslogics Duplicate File Finder from the official website and run the installer with administrator privileges to ensure proper system integration.
- Launch the application and select “Scan for Duplicates” from the main interface, then choose your target drives or specific folders for analysis.
- Configure scan settings by clicking “Settings” and enabling options like “Scan inside archives,” “Compare file contents,” and “Skip system files” for comprehensive yet safe scanning.
- Select comparison criteria including file name, size, content hash, and creation date to customize how the software identifies potential duplicate matches.
- Click “Start Scan” and wait for the analysis to complete, which may take several minutes depending on your storage size and selected comparison methods.
Remember: Always create a backup before removing duplicates, especially when scanning system directories or important work folders.
Reviewing and managing detected duplicates
- Examine the scan results carefully, paying attention to file locations, sizes, and modification dates to distinguish between legitimate duplicates and similar files. Use the preview feature to visually compare image duplicates or open text files to verify content similarity before marking files for deletion. Select duplicates for removal by checking boxes next to confirmed duplicate files, leaving the original versions in their preferred locations unchecked. Choose “Move to Recycle Bin” rather than permanent deletion to maintain recovery options if you accidentally remove important files during the cleanup process. Monitor the deletion progress and review the summary report showing total space recovered and number of files processed during the duplicate removal operation.
- Use the preview feature to visually compare image duplicates or open text files to verify content similarity before marking files for deletion.
- Select duplicates for removal by checking boxes next to confirmed duplicate files, leaving the original versions in their preferred locations unchecked.
- Choose “Move to Recycle Bin” rather than permanent deletion to maintain recovery options if you accidentally remove important files during the cleanup process.
- Monitor the deletion progress and review the summary report showing total space recovered and number of files processed during the duplicate removal operation.
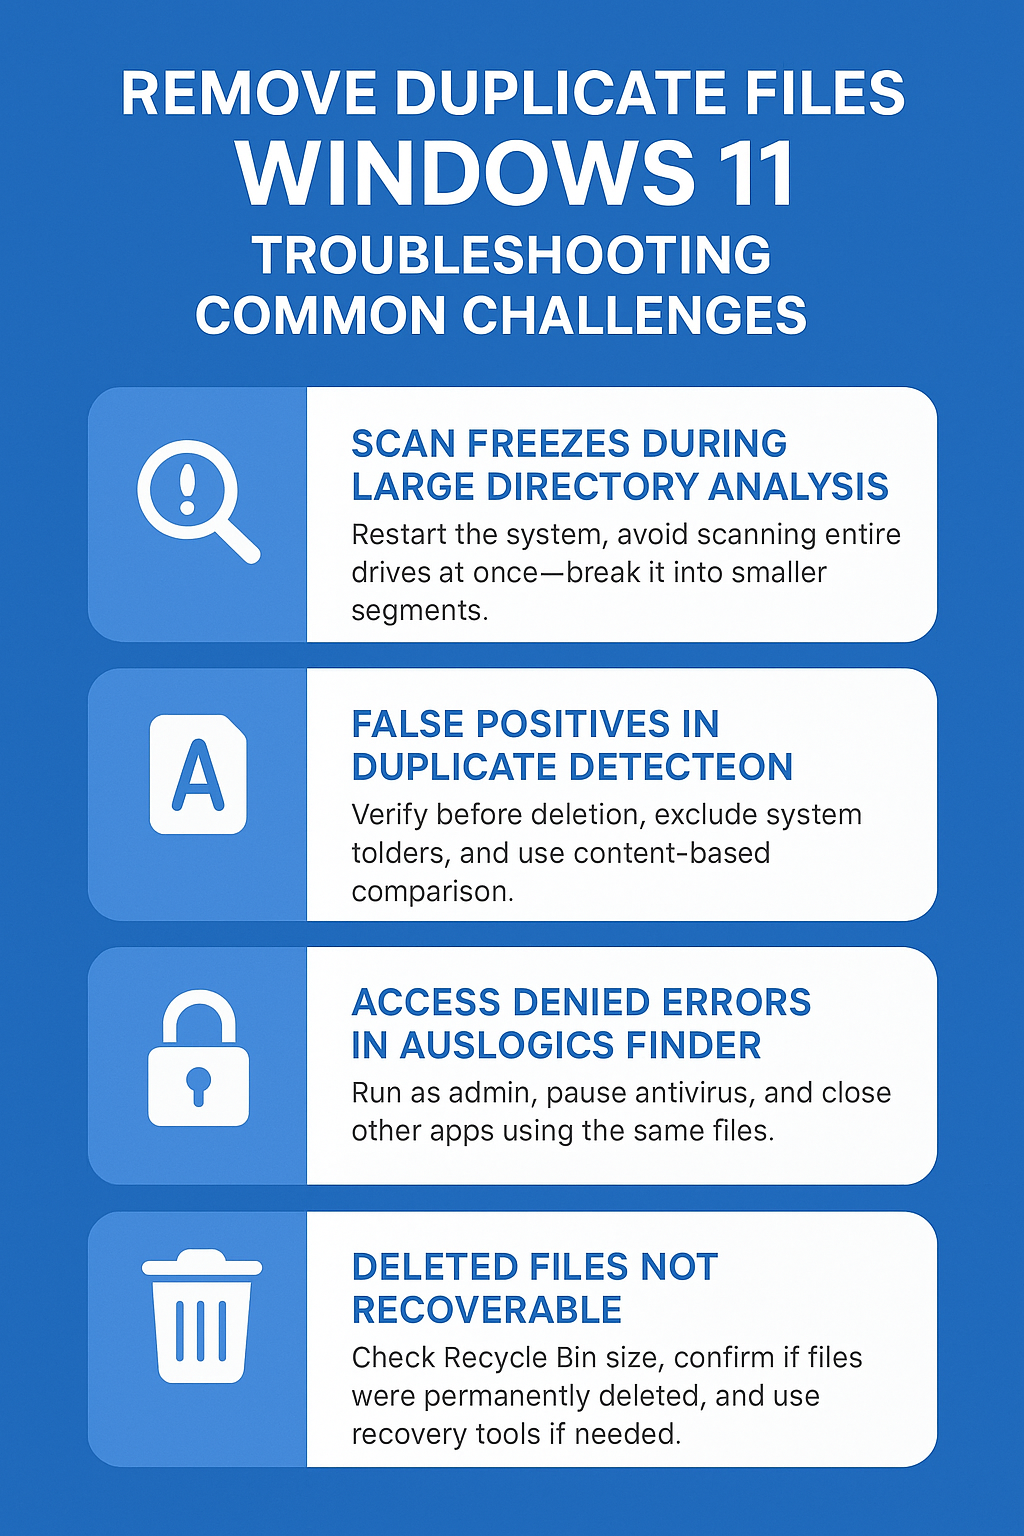
Remove duplicate files Windows 11 challenges
- Scan process freezes or becomes unresponsive during large directory analysis: Close the duplicate finder application completely, restart your computer to clear memory, then resume scanning with smaller directory segments rather than entire drives to prevent system overload.
- False positives identifying system files or important documents as duplicates: Always verify file locations and purposes before deletion, exclude Windows system directories from scans, and use content comparison rather than name-only matching to reduce incorrect duplicate identification.
- Auslogics duplicate finder reports access denied errors for certain directories: Run the application as administrator, temporarily disable antivirus real-time protection during scanning, and ensure no other applications are accessing the target files during the duplicate detection process.
- Deleted files cannot be recovered from Recycle Bin after duplicate removal: Check Recycle Bin size limits in Properties settings, verify the files weren’t permanently deleted due to size restrictions, and consider using file recovery software like Recuva for emergency file restoration scenarios.
Important Tip: Test duplicate detection on a small folder first to understand how your chosen tool behaves before scanning entire drives or critical directories.