
Managing default save locations in Windows 11
I recently upgraded to Windows 11 and noticed all my downloads and documents are saving to my C drive, which is an SSD with limited space. How can I change where Windows 11 saves my files by default? I’d like to redirect my documents, downloads, and other files to my larger secondary drive to keep my system drive from filling up.
Why modifying where files save by default?
Managing where your files save by default is crucial for efficient storage management. Similar to how you can map SharePoint and OneDrive to your Windows drive, properly configuring your save locations helps maintain system efficiency and organization. Windows 11 automatically saves most files to your system drive, which can quickly consume valuable space on smaller SSDs. By changing these default locations, you can:
- Extend the lifespan of your SSD by reducing write operations
- Prevent performance issues caused by a nearly full system drive
- Organize files more logically across multiple storage devices
- Simplify backup processes by consolidating important files
Storage settings: Options for changing default locations
Windows 11 provides several methods to configure where your files save by default. This tutorial will cover three main approaches:
- Changing default save locations for Windows libraries (Documents, Pictures, etc.)
- Modifying default app save locations through Settings
- Moving the default download location for web browsers
You’ll need administrator privileges on your Windows 11 device and a secondary storage drive with sufficient space.
Move default save folder to another drive in Windows 11
Changing Windows library default locations
- Right-click on any Windows library folder (Documents, Pictures, Music, or Videos) in File Explorer and select “Properties” to access the folder configuration options.
- In the Properties dialog, click on the “Location” tab to view the current save path and prepare to change it to your preferred storage location.
- Click the “Move” button and navigate to your desired drive and folder location where you want this library to save files by default.
- Select the new folder (or create a new one by clicking “Make New Folder”) and click “Select Folder” to confirm your choice for the new default location.
- Windows will ask if you want to move existing files to the new location; choose “Yes” to transfer everything or “No” if you prefer to keep files in their current location.
- Click “Apply” and then “OK” to finalize the change, which will immediately redirect all new saves for this library to your specified location.
Changing default storage drive in Windows 11 Settings
- Open Windows Settings by pressing Win+I on your keyboard or clicking the Start menu and selecting the Settings gear icon.
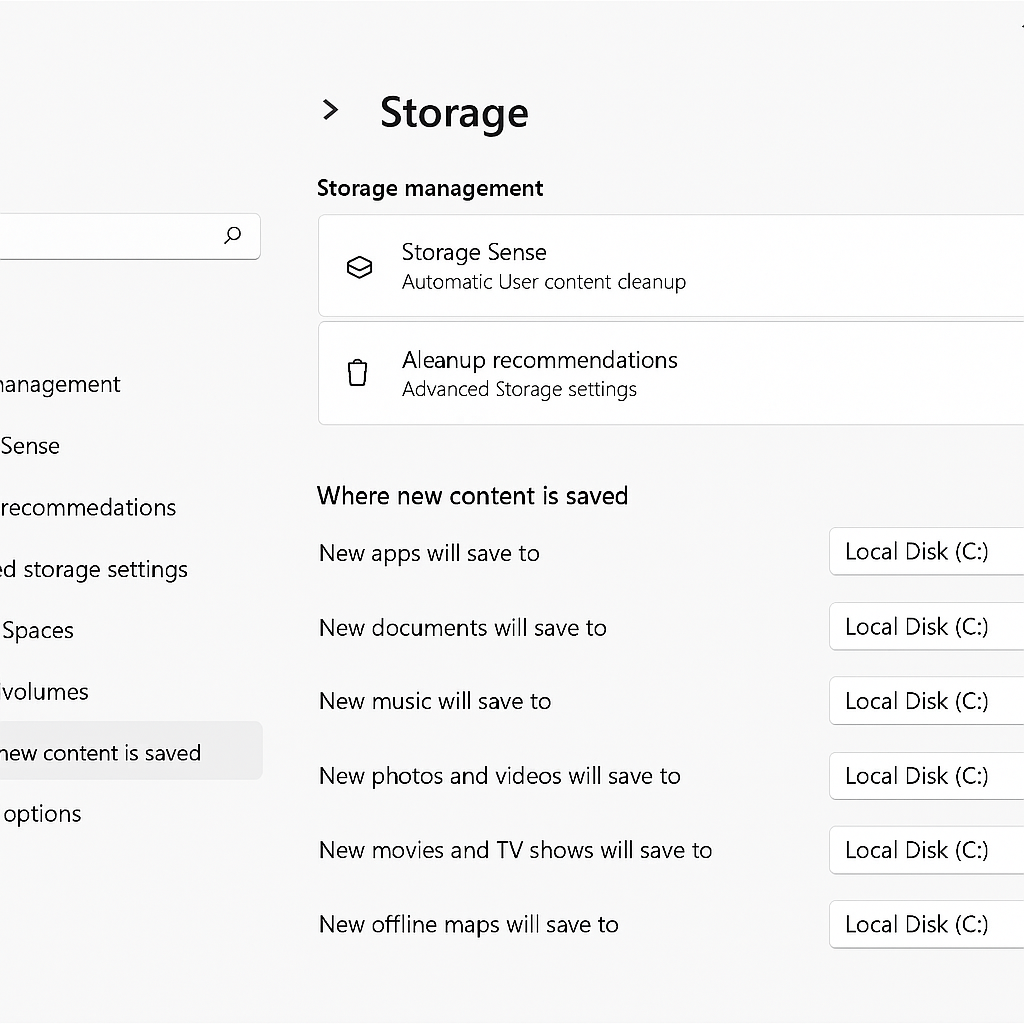
- Navigate to System > Storage to access the storage management options where you can configure various save location settings.
- Scroll down and click on “Advanced storage settings” and then select “Where new content is saved” to view and modify default save locations.
- For each content type (Documents, Music, Pictures, Videos, etc.), use the dropdown menu to select your preferred drive from the available storage options.
- Once you’ve selected new locations for all desired content types, close the Settings window and your changes will be automatically applied to future saves.
Configure default document save path for specific applications
- For Microsoft Office applications, open any Office app like Word or Excel and click on File > Options to access application-specific settings.
- In the Options dialog, select “Save” from the left sidebar to view the current default save location settings for this specific application.
- Change the “Default local file location” field to your preferred path, such as “D:\Documents\Office Files” to redirect all new document saves.
- Click “OK” to apply the changes, and now whenever you save a new document in this application, it will default to your specified location.
- For other applications, look for similar settings in their preferences or options menus, as many programs allow you to specify custom save locations.
- Note: Consider creating a consistent folder structure on your secondary drive before changing default locations to maintain organization across all your saved files.
Windows 11 default save location issues
- If you receive an “Access Denied” error when trying to change default locations, ensure you’re running File Explorer as an administrator by right-clicking on File Explorer and selecting “Run as administrator”.
- When the new location isn’t appearing as an option in Settings, verify that the drive is properly formatted with NTFS and has been assigned a drive letter in Disk Management.
- For applications that continue saving to the old location despite your changes, check if the app has its own internal save location settings that override the Windows defaults.
- If files aren’t appearing in your new default location after making changes, restart your computer to ensure all services recognize the updated file paths and storage configurations.
- When changing default install location for apps, remember that some applications may still install components to the C drive regardless of your settings due to their programming requirements.
Windows Save location questions and answers
Can I set different default locations for different user accounts?
Yes, default save locations are configured per user account. Each user can independently set their preferred save locations without affecting other users on the same system. This is particularly useful in shared computer environments or family PCs where different users have different storage preferences.
What happens to existing files when I change default locations?
Existing files remain in their current locations unless you specifically choose to move them during the change process. Only new files will save to the updated default locations. To consolidate files, you’ll need to manually move existing content or use the “Move” option when changing library locations.
Will changing default locations affect system performance?
Generally, moving default locations to a secondary drive can improve system performance by reducing load on your primary SSD. However, if you move locations to a slower mechanical drive, you may notice slightly longer file access times. The performance impact is typically minimal for document storage but may be more noticeable for frequently accessed media files.
Can I revert default locations back to the original C drive folders?
Yes, you can easily revert changes by following the same steps and selecting the original C drive locations. Windows will recreate the default folder structure if necessary, ensuring system stability and proper application functionality.