Why do Teams audio settings keep changing automatically?
Have you ever joined a Microsoft Teams meeting only to discover your microphone isn’t working, your headset isn’t detected, or your carefully configured audio preferences have mysteriously reverted to different devices? This frustrating scenario disrupts productivity and creates awkward moments during important calls when you scramble to troubleshoot audio issues while colleagues wait.
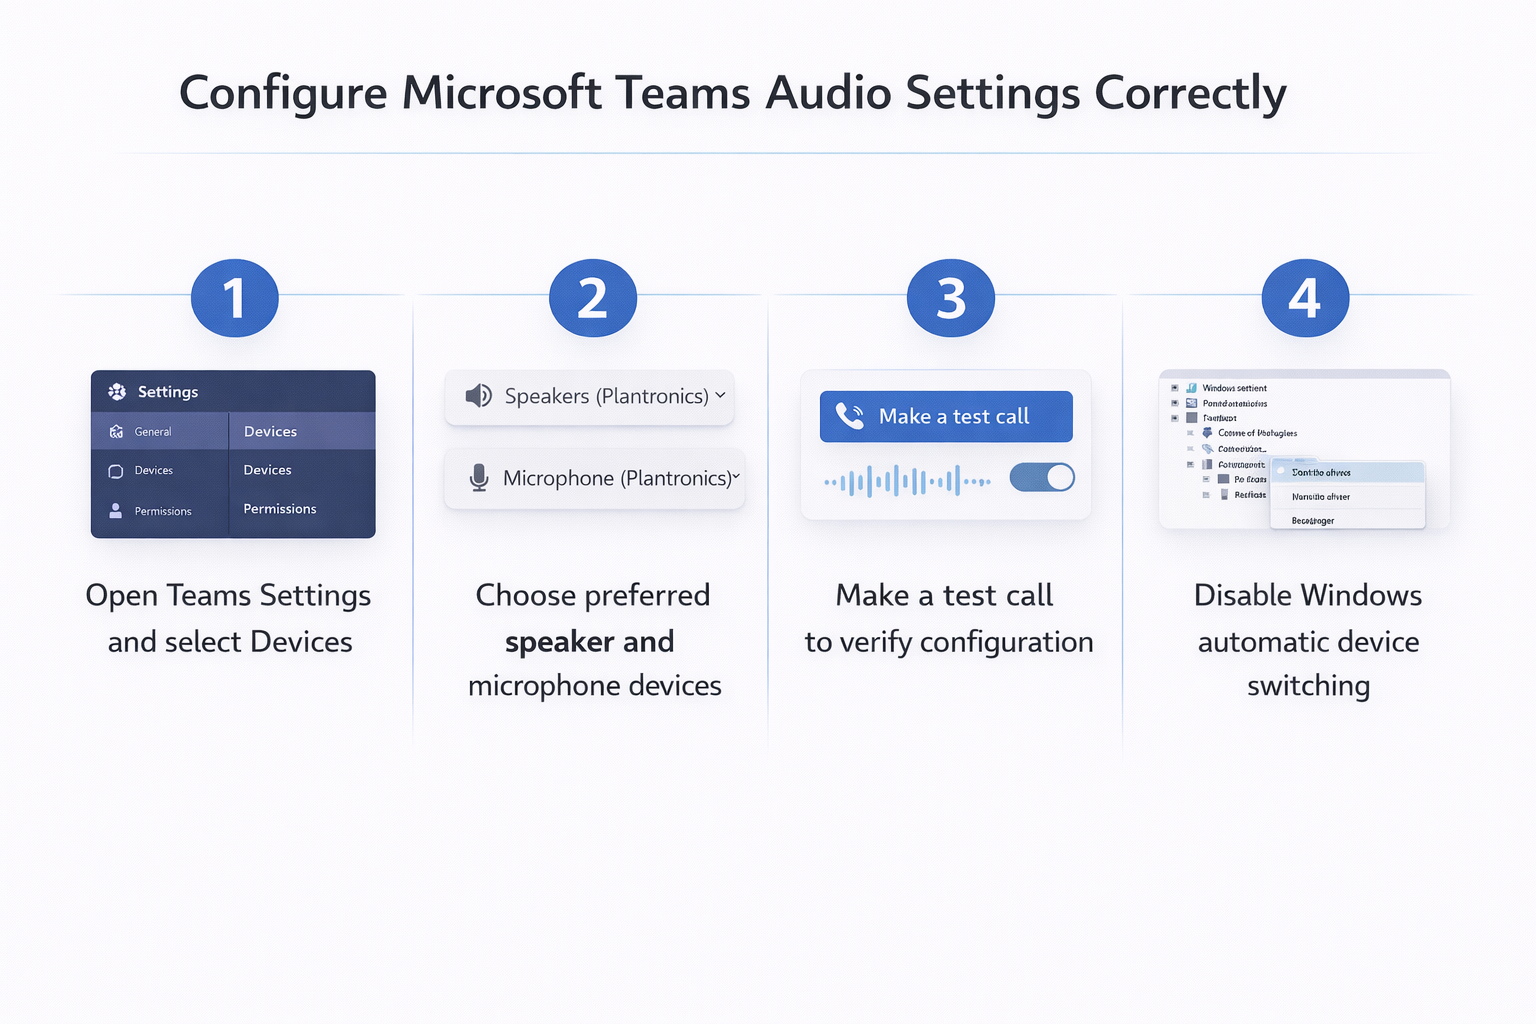
Understanding Teams call audio settings and common configuration issues
Microsoft Teams audio settings can change automatically due to several factors including Windows system defaults, device driver updates, multiple audio devices connecting and disconnecting, and synchronization conflicts between Teams desktop and Teams web audio settings. When you connect or disconnect a headset, Windows may reassign default audio devices, causing Teams to switch automatically to what it perceives as the primary communication device.
This tutorial will show you how to access the Teams audio settings menu, configure your preferred devices including headsets, prevent unwanted automatic changes, and resolve situations where Teams audio settings are greyed out or Teams audio is not working entirely. You’ll learn to adjust audio settings in Teams across both desktop and web versions, ensuring consistent audio performance during calls and meetings.
Prerequisites: You need an active Microsoft 365 account with Teams access, appropriate permissions to modify device settings on your computer, and physical access to your audio devices such as headsets or speakers.
How to access and adjust audio settings in Teams properly
Configuring your Teams audio settings correctly starts with accessing the proper configuration menu and understanding how Teams prioritizes audio devices across different scenarios including calls, meetings, and system-level interactions.
Accessing the Teams audio settings menu on desktop
- Launch Microsoft Teams on your desktop and click your profile picture in the top-right corner of the application window to open the account menu with various configuration options available.
- Select Settings from the dropdown menu, then navigate to the Devices section in the left sidebar where all audio and video hardware configurations are managed centrally for your Teams experience.
- Locate the Audio devices section which displays three critical dropdown menus: Speaker for audio output, Microphone for audio input, and an optional Secondary ringer for notification sounds on alternative devices.
- Click each dropdown menu to view all available audio devices currently recognized by your system, including built-in speakers, external speakers, headsets, and USB audio interfaces connected to your computer.
- Select your preferred devices from each dropdown, and Teams will immediately apply these settings without requiring you to save or restart the application for changes to take effect.
- Use the Test call feature located below the device selections to verify your audio configuration by making a test recording where you can hear how you sound to others.
Expert Tip: Always make a test call after changing audio devices to confirm both input and output are functioning correctly before joining important meetings.
Configuring Teams audio settings for headset devices specifically
- When connecting a headset to your computer via USB or audio jack, Windows typically recognizes it as a new communication device and may attempt to set it as the system default automatically.
- Open Teams Settings and navigate to Devices, then manually select your headset from both the Speaker and Microphone dropdown menus to ensure Teams routes audio through the correct hardware during calls.
- Enable the “Also ring” option if you want Teams to send incoming call notifications to your computer speakers even when your headset is configured as the primary audio device for conversations.
- For Bluetooth headsets, ensure the device is properly paired in Windows Settings under Bluetooth & devices before attempting to select it within Teams, as connection issues often stem from incomplete system-level pairing.
- If using a premium headset with dedicated software such as Jabra Direct or Plantronics Hub, configure call control integration so headset buttons can answer or end Teams calls directly from the device.
Adjusting Teams web audio settings in browser-based sessions
- Access Teams through your web browser and join a meeting or call, then click the three-dot More actions menu during the active session to reveal in-call options.
- Select Device settings from the menu to open a panel displaying available speakers, microphones, and cameras that your browser has permission to access for the current session.
- Choose your preferred audio devices from the dropdown menus, noting that browser-based Teams may have fewer device options than the desktop application depending on browser permissions and drivers.
- Grant microphone and speaker permissions when prompted by your browser, as denying these permissions will prevent Teams web audio from functioning entirely regardless of device configuration.
- Remember that Teams web audio settings are session-specific and may not persist between different meetings, requiring you to reconfigure devices when joining new calls or refreshing your browser.
Important Tip: Browser-based Teams requires explicit permission for each audio device, so check your browser’s site settings if devices aren’t appearing in the menu.
Teams audio not working or settings are greyed out
Even with proper configuration, you may encounter situations where Teams audio stops working completely, devices become unavailable, or the Teams audio settings menu appears greyed out and unresponsive to changes.
Resolving greyed out audio settings in Teams desktop application
- Greyed out settings typically indicate that another application has exclusive control over your audio devices, preventing Teams from accessing them, so close other communication apps like Zoom, Skype, or Discord that might be locking the devices.
- Check Windows Sound settings by right-clicking the speaker icon in your system tray and selecting Sound settings, then ensure your preferred devices are enabled and not disabled or disconnected in the system configuration.
- Restart the Teams application completely by right-clicking the Teams icon in your system tray near the clock, selecting Quit, and then relaunching Teams to reset the audio device detection and initialization process.
- Verify that Windows hasn’t set your audio devices to exclusive mode by navigating to Sound Control Panel, selecting your device, clicking Properties, then the Advanced tab, and unchecking “Allow applications to take exclusive control of this device” option.
Fixing persistent Teams audio not working issues during calls
- If your microphone isn’t working during a call, verify that Teams has permission to access your microphone in Windows Privacy settings under Microphone, ensuring both system-wide access and Teams-specific access are enabled.
- Test your microphone outside of Teams using Windows Voice Recorder or another application to confirm the hardware is functioning correctly and the issue is specific to Teams rather than a system-wide hardware problem.
- Clear the Teams cache by closing Teams completely, pressing Windows key plus R to open Run, typing %appdata%\Microsoft\Teams and deleting the contents of the cache folders to resolve corrupted configuration files.
- Update your audio drivers through Device Manager by expanding Sound, video and game controllers, right-clicking your audio device, selecting Update driver, and choosing to search automatically for updated driver software from Microsoft’s servers.
Suggestion: If audio issues persist after driver updates, try uninstalling and reinstalling your audio drivers to establish a fresh configuration baseline.
Preventing Teams audio settings from changing between calls
- Configure your default communication device in Windows by opening Sound settings, scrolling to Advanced sound options, clicking App volume and device preferences, and setting Teams to always use your preferred microphone and speakers.
- Disable automatic device switching in Windows by navigating to Sound settings, selecting your output device, clicking Device properties, then Additional device properties, and adjusting the Communications tab to “Do nothing” instead of automatically adjusting volumes.
- Create a consistent device connection routine by always connecting your headset before launching Teams, which helps Windows and Teams maintain stable device assignments rather than detecting changes mid-session.
- Use the Teams desktop application instead of the web version when possible, as the desktop app maintains more persistent audio settings across sessions and provides better device management than browser-based implementations.