“How can I make the Windows 11 start menu work better for my workflow?”
Are you struggling with the new Windows 11 start menu layout? Many users find the default configuration doesn’t match their workflow needs. Just like adding Teams to your start menu, customizing the overall layout can significantly improve your daily workflow. The centered icons and recommended section might not align with how you prefer to access your applications and files.
Customizing Windows 11 start menu matters for efficiency
The start menu serves as your primary gateway to applications, settings, and files. When configured properly, it can significantly reduce the time spent searching for programs and improve your overall workflow efficiency. Windows 11 introduced a completely redesigned start menu with centered icons, a simplified layout, and a recommendations section that many users find disruptive. By taking control of your start menu configuration, you can create a more intuitive interface that matches your specific work patterns.
Windows 11 start menu customization options overview
Before diving into specific modifications, it’s helpful to understand what aspects of the Windows 11 start menu you can customize. You can adjust the position (centered or left-aligned), pin/unpin applications, resize the menu, modify the recommended section, organize apps into folders, and change various visual elements. This tutorial will walk you through the most useful customizations to help you create a start menu that enhances your productivity rather than hindering it.
Manage Windows 11 start menu layout
Changing the start menu position
- Right-click on an empty area of the taskbar and select “Taskbar settings” to open the personalization options for your Windows 11 interface.
- Scroll down in the settings window until you locate the “Taskbar behaviors” section, which contains several important customization options.
- Find the “Taskbar alignment” dropdown menu and change it from “Center” to “Left” if you prefer the traditional Windows start menu position.
- The change will take effect immediately, moving your start button and taskbar icons to the left side of the screen for a more familiar Windows experience.
Pinning and organizing applications
- Open the start menu by clicking the Windows icon or pressing the Windows key on your keyboard to access the current configuration.
- To pin a frequently used application, search for it in the search box, right-click on the app, and select “Pin to Start” from the context menu.
- Rearrange your pinned apps by simply dragging and dropping them into your preferred order, creating a layout that matches your workflow priorities.
- Create logical groups by placing related applications next to each other, such as keeping all Microsoft Office apps or creative tools in the same section.
- For more advanced organization, right-click on a pinned app and select “Create folder” to group multiple applications together in a single folder.
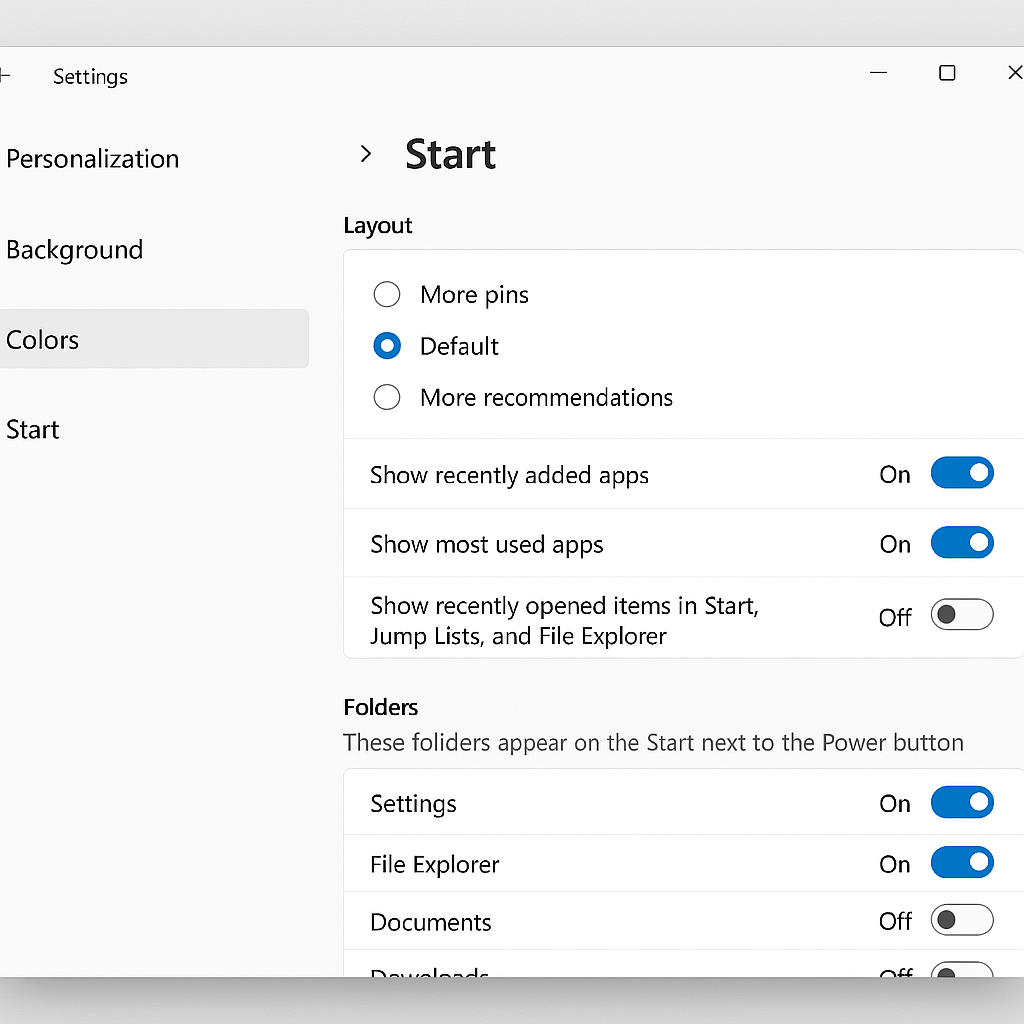
Customizing the recommended section
- Open Settings by pressing Win+I and navigate to Personalization > Start to access the start menu configuration options.
- Toggle off “Show recently opened items in Start, Jump Lists, and File Explorer” if you prefer not to see recently used files in your start menu.
- Disable “Show recently added apps” if you don’t want newly installed applications to appear in the recommended section of your start menu.
- Consider enabling “Show most used apps” if you want Windows to automatically display your frequently used applications for quicker access.
Using start menu folders for better organization
- Right-click on a pinned app in the start menu and select “Create folder” to begin grouping related applications together.
- Drag and drop additional apps onto the newly created folder to add them to the group, creating logical collections of tools you use together.
- Click on the folder to expand it, then click the pencil icon at the top to rename it to something descriptive like “Office Apps” or “Creative Tools.”
- Organize multiple folders by dragging them into a logical arrangement, placing your most frequently used folders at the top for quick access.
Common Windows 11 start menu customization issues
- If your pinned apps disappear after a system update, try restarting your computer and then repinning the applications, as Windows updates occasionally reset start menu configurations.
- When the start menu becomes unresponsive or fails to open, press Ctrl+Alt+Delete, select Task Manager, find “Windows Explorer” in the processes list, right-click it, and select “Restart” to refresh the interface.
- For persistent start menu problems, open PowerShell as administrator and run the command “Get-AppXPackage -AllUsers | Foreach {Add-AppxPackage -DisableDevelopmentMode -Register “$($_.InstallLocation)\AppXManifest.xml”}” to repair potentially corrupted system files.
- If you’re unable to create folders in the start menu, ensure your Windows 11 is updated to the latest version, as this feature was added in a post-release update.
- When customization options appear grayed out in settings, check if your organization uses group policies that restrict personalization, which is common in corporate environments.