Power Automate turns repetitive manual tasks into automated workflows that run on their own. Whether you need to route approval emails, copy files between services, or send notifications based on specific triggers, a well-configured power automate flow handles the work without constant supervision. Most users build a working flow in under ten minutes once they understand triggers, actions, and conditions.
Prerequisites for Power Automate Flows
- Microsoft 365 account with Power Automate access — most business and enterprise plans include it. Check your app launcher for the Power Automate icon.
- Permissions for connected services — if your flow reads SharePoint lists or sends Teams messages, your account needs access to those resources.
- A clear workflow goal — define the trigger event and the desired outcome before opening the designer.
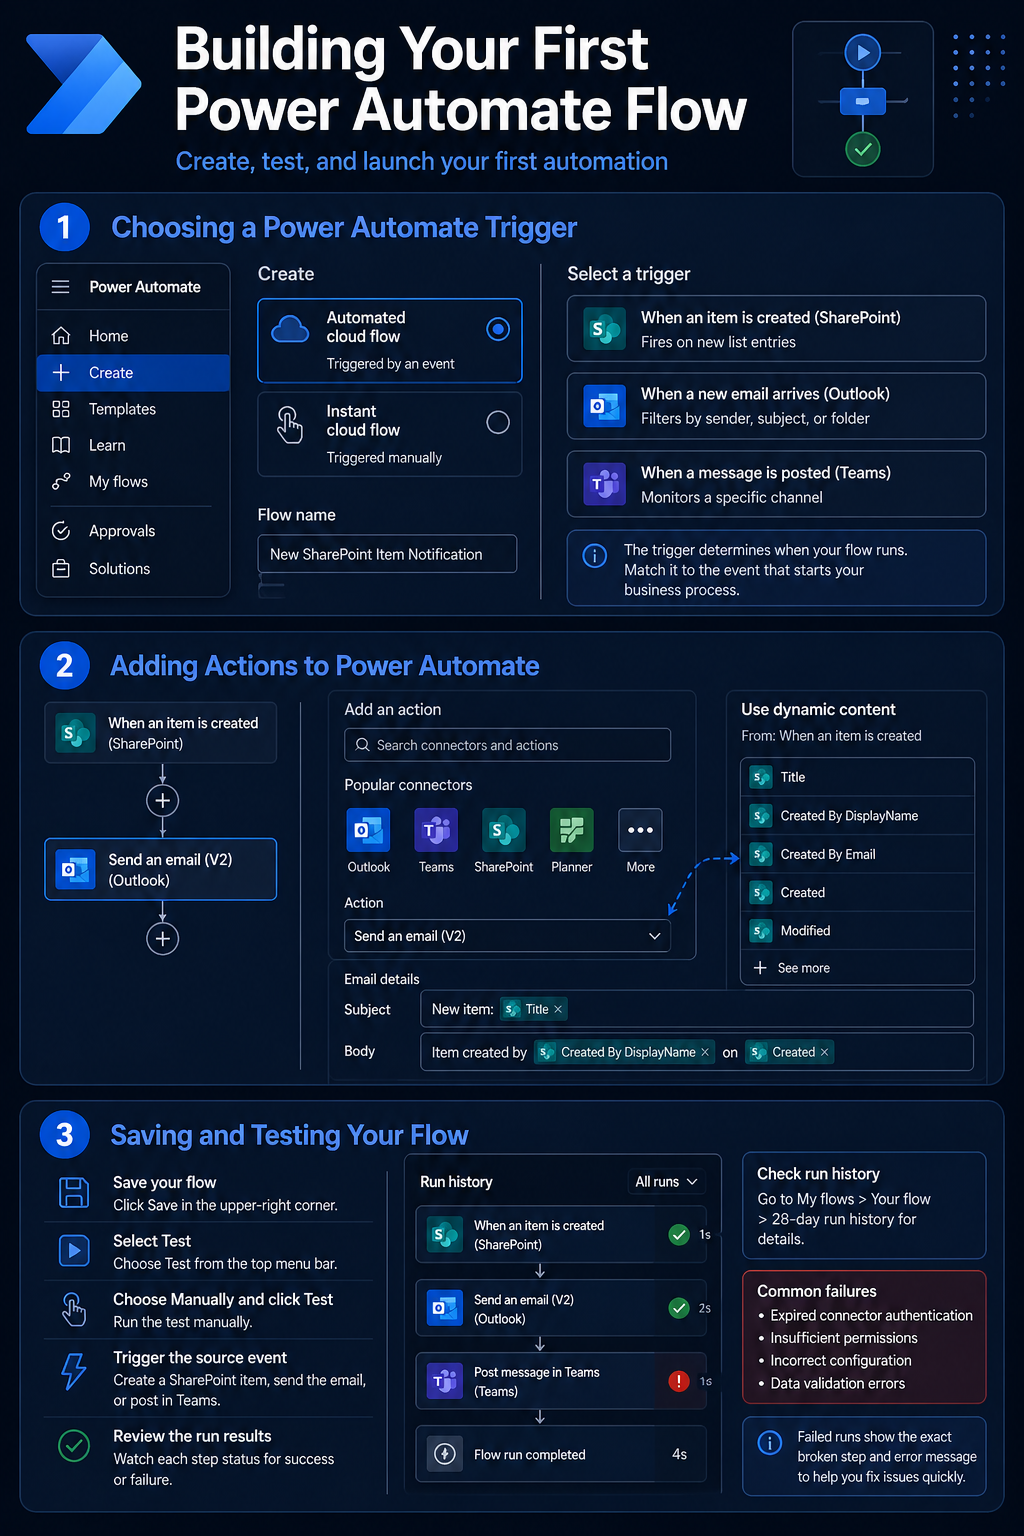
Building Your First Power Automate Flow
Choosing a Power Automate Trigger
Open Power Automate from the Microsoft 365 app launcher and select Create from the left navigation. Choose Automated cloud flow for event-driven automation or Instant cloud flow for on-demand scenarios. Give your flow a descriptive name that reflects its purpose — “New SharePoint Item Notification” reads better than “My Flow 1” when you manage dozens of flows later.
Select a trigger from the connector list. Popular triggers include:
- When an item is created (SharePoint) — fires on new list entries
- When a new email arrives (Outlook) — filters by sender, subject, or folder
- When a message is posted (Teams) — monitors a specific channel
Each trigger has configuration fields specific to its connector. For a SharePoint trigger, specify the site address and list name. The trigger determines when your power automate flow runs, so match it to the event that genuinely starts your business process.
Adding Actions to Power Automate
Click New step below your trigger to add the first action. Search for the connector you need — Outlook, Teams, SharePoint, Planner — and select the specific operation. For example, Send an email (V2) under the Outlook connector composes a notification whenever the trigger fires.
Use dynamic content to pull data from the trigger into your action fields. When your trigger is a new SharePoint list item, the dynamic content panel shows fields like Title, Created By, and Modified date. Drag these tokens into the email subject or body. Power Automate handles the data mapping at runtime, so each execution uses real values from the triggering event. If you manage Outlook tasks with Power Automate, the same dynamic content approach applies to task properties.
Saving and Testing Your Flow
Save your flow before testing by clicking Save in the upper-right corner. The testing process follows a quick sequence:
- Select Test from the top menu bar
- Choose Manually and click Test
- Trigger the source event — create a SharePoint item, send the target email, or post in the designated Teams channel
- Watch each step’s status update with green checkmarks or red failure indicators
Check the run history under My flows >> your flow name >> 28-day run history if the test does not fire immediately. Failed runs show the exact broken step along with the error message. Common failures include expired connector authentication and insufficient permissions on a target service. Re-authorize the connector under Data >> Connections if you encounter a 401 error.
Advanced Power Automate Options
Adding Conditions and Branching
Select New step and search for the Condition control to add decision logic. Conditions evaluate a value against a rule — for example, check whether an email subject contains “urgent” before routing it to a specific Teams channel. The condition splits your flow into If yes and If no branches, each holding independent action steps.
Nest conditions inside branches for multi-level decisions. A support ticket flow might check priority first, then check department, routing each combination to a different handler. Keep nesting to two levels maximum — deeper branches become difficult to debug. Use the Switch control instead when evaluating one field against three or more possible values.
Power Automate Approval Workflows
Power Automate includes a built-in Approvals connector that sends structured requests to designated reviewers. Add the Start and wait for an approval action, configure the type (Approve/Reject or custom responses), and specify the approver’s email address. The flow pauses until the approver responds through Teams, Outlook, or the Power Automate mobile app. For multi-stage reviews, you can set up advanced approval routing in Power Automate with sequential or parallel chains.
After the approval step, add a condition that checks the outcome:
- Approved — route to the next business process: create a record, send a confirmation, or update a status field
- Rejected — notify the requester with the approver’s comments attached
Scheduling Recurring Flows
Choose Scheduled cloud flow from the Create menu when your automation runs on a fixed interval rather than reacting to an event. Set the frequency to minutes, hours, days, weeks, or months, and configure the start time. A daily report flow might query a SharePoint list at 7:00 AM, format the results, and email a summary before the workday begins.
Scheduled flows count against your daily run limits. The standard plan allows 10,000 runs per user per day, while the free tier caps at 750. Monitor your consumption under Power Automate >> Analytics to avoid throttling on high-frequency schedules.
Q&A
Why is my Power Automate flow not triggering?
Check connector authentication under Data ? Connections and re-authorize any expired sessions. Verify the trigger conditions match the actual event — a SharePoint trigger pointed at the wrong list ignores matching events entirely. Confirm the flow is toggled on under My flows.
How do I fix a failed Power Automate flow run?
Open the failed run from the 28-day run history and expand the red-marked step to read the error details. Permission errors require re-authorizing the connector. Timeout errors on approval steps mean the approver did not respond within the configured window — extend the timeout or add a reminder action.
Can I use Power Automate without a premium license?
Standard connectors like Outlook, SharePoint, Teams, and OneDrive work with any Microsoft 365 plan that includes Power Automate. Premium connectors — Salesforce, SAP, HTTP requests, and custom connectors — require a Power Automate Premium license at $15 per user per month.
Automate one workflow at a time, test it thoroughly, and expand from there. A single reliable power automate flow that saves your team five minutes per day adds up to over twenty hours of recovered productivity each year.