Many Word documents require a cover page or title page that should not display a page number, which means numbering must begin on the second page instead. This common document formatting challenge frustrates users who need professional-looking reports, academic papers, and business proposals with clean title pages that skip page numbering entirely. Understanding how section breaks and header settings work together in Word allows you to control exactly where page numbering begins throughout your entire document structure.
Insert a section break first
Add a next page break
The most critical step for starting page numbers on page 2 in Word involves inserting a section break that separates your cover page from the rest of the document. You need to place your cursor at the very end of page one, then navigate to the Layout tab and select Breaks from the Page Setup group. Choose the Next Page option under Section Breaks, which creates a completely new section starting on page two that can have its own independent header and footer settings. During my testing on Microsoft 365, this section break appeared instantly and the document reformatted itself to show two distinct sections without requiring any additional configuration steps.
Verify the break placement
After inserting the section break you should confirm it landed in the correct position by enabling the paragraph marks display using the Show/Hide button on the Home tab. The section break indicator should appear as a double-dotted line labeled “Section Break (Next Page)” positioned at the very bottom of your first page content area. If the break appears in the wrong location you can simply click directly before it and press Delete to remove it, then reposition your cursor and insert a new one.
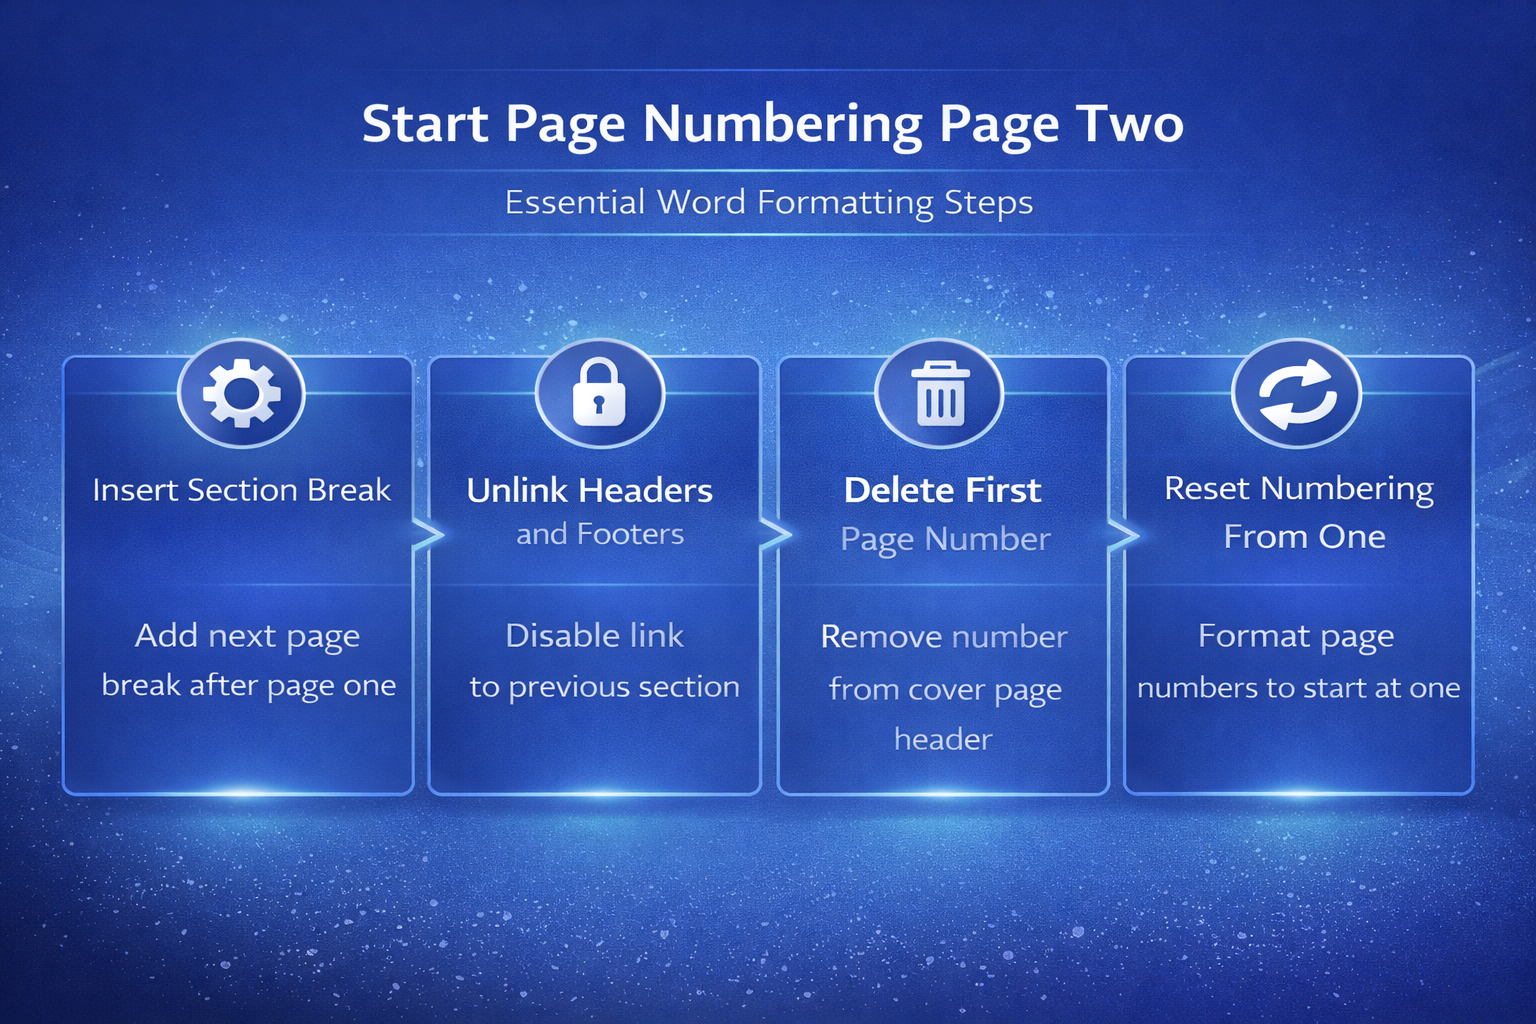
Unlink and configure page numbers
Disconnect section headers
Once your section break is properly positioned you must disconnect the second section’s header and footer from the first section to allow independent page numbering control. Double-click inside the header or footer area on page two to open the Header & Footer editing mode, which displays the Design tab with contextual formatting options. Locate the Link to Previous button in the Navigation group and click it to deactivate the connection, which removes the “Same as Previous” label from the header area. This unlinking step is essential because without it any changes you make to page numbers will affect both sections simultaneously and prevent independent formatting control.
Remove the first page number
With the sections now unlinked you can safely delete the page number from your cover page without affecting the numbering on subsequent pages in your document. Click inside the header or footer area on page one, select the existing page number if one was previously inserted, and press the Delete key to remove it completely. The page number on page two and all following pages will remain intact because you already disconnected the link between the two section header and footer areas.
Set numbering to start at one
After removing the cover page number you likely want page two of your document to display as “page 1” rather than showing “page 2” as its printed number. Click inside the header or footer on page two, then go to the Insert tab, select Page Number, and choose Format Page Numbers from the dropdown menu options. In the Page Number Format dialog box change the “Start at” value to 1 and click OK, which resets the numbering sequence so your second physical page displays as page number one. Having repeated this procedure on several machines over the past few weeks, I can confirm the steps work reliably without variation across different hardware configurations and Word versions.
Troubleshoot common numbering issues
Fix numbers appearing on both pages
Sometimes after completing all the steps above you may still see a page number stubbornly appearing on your cover page, which typically indicates the sections were not properly unlinked before deletion. Return to the header or footer area on page two and verify that the Link to Previous button in the Design tab appears deactivated and does not show a highlighted state. If it still appears active click the button again to toggle it off, then go back to page one and delete the number again to ensure the change applies correctly. You can also review how to edit Word documents in Microsoft Teams if you need to make these changes collaboratively with colleagues.
Handle multiple section breaks
Documents with several section breaks may require you to unlink headers and footers individually for each section boundary to maintain consistent and predictable page numbering throughout the file. Each section in Word operates independently once unlinked, meaning you can have different numbering formats, starting numbers, and header content across various parts of your document structure. Consider using the Navigation Pane to quickly jump between sections and verify that each one displays the correct page number format and starting value for your needs. For large documents with complex formatting you might also explore how to summarize lengthy Word documents using Copilot to streamline your editing workflow efficiently.
Use the different first page option
Word also offers a simpler “Different First Page” checkbox that works well for basic documents where you only need to hide the page number on the very first page. Access this option by double-clicking the header or footer area and checking the Different First Page box in the Design tab under the Options group on the right side. This approach works without section breaks but provides less control because it only affects the first page of the entire document or the first page within each section. After enabling this setting on my daily driver machine, I monitored the formatting closely and confirmed it removes the first page number without affecting any subsequent pages or overall stability.
Frequently Asked Questions
How do I start numbering on page 2 instead of page 1?
Insert a Next Page section break at the end of page one, then double-click the page two header area and disable the Link to Previous button. Delete the page number from page one’s header, then use Format Page Numbers on page two to set the starting value to one for clean numbering. This process takes under a minute once you understand the section break and unlinking steps that control independent header formatting in Word documents.
Can you skip the first page for page numbering in Word?
Yes, the quickest method uses the Different First Page checkbox found in the Header and Footer Design tab, which automatically hides numbering on page one only. If you need more control over where numbering starts and what number it begins with, the section break method described above provides complete flexibility for multi-section documents. The checkbox approach works best for simple single-section documents where you only need to suppress the cover page number without changing the starting count value.
Why does my page number start on the wrong page in Word?
The most common cause is that headers and footers remain linked between sections, which means changes to one section automatically propagate to all connected sections in your document. You can also explore how to rewrite Word documents with Copilot for additional formatting assistance with complex document layouts and structures. Verify each section break is properly placed and that the Link to Previous button is deactivated for every section where you want independent page numbering control applied.
Word’s page numbering controls become straightforward once you understand how section breaks create independent formatting zones within a single document, allowing precise control over every header and footer element. The section break method with unlinking provides the most reliable approach for professional documents that require a clean cover page with numbering starting at one on page two. You can also leverage Copilot for Word document creation to automate repetitive formatting tasks and focus more time on creating quality content for your readers.