“My Edge browser is running slow. How do I clear the cache to improve performance?”
Are you experiencing slow loading times or website display issues in Microsoft Edge? These problems often stem from an overloaded browser cache. The cache stores temporary files to help websites load faster, but over time, these files can accumulate and cause performance issues. Clearing your Edge cache regularly can help maintain optimal browsing speed and resolve many common browser problems.
Clearing the Edge cache matters for your system
When you browse the internet, Microsoft Edge stores various files like images, scripts, and webpage data on your Windows 10 device. This cached data helps websites load faster on subsequent visits. However, an overfilled cache can eventually slow down your browser, cause display errors, or prevent websites from updating properly. Clearing cached images and other temporary files in Edge can free up storage space and resolve many browsing issues without affecting your important data.
Microsoft Edge cache clearing options overview
Microsoft Edge offers several ways to empty your cache, from clearing only specific items to performing a complete cache reset. Before proceeding, note that clearing your cache will sign you out of most websites and may remove some site preferences. However, your bookmarks, passwords (if saved in a password manager), and download history will remain intact. This tutorial will guide you through the various methods to clear cached data in Microsoft Edge.

Instructions to clear cache in Microsoft Edge
Using the browser settings menu
- Open Microsoft Edge on your Windows 10 computer by clicking the icon in your taskbar or Start menu.
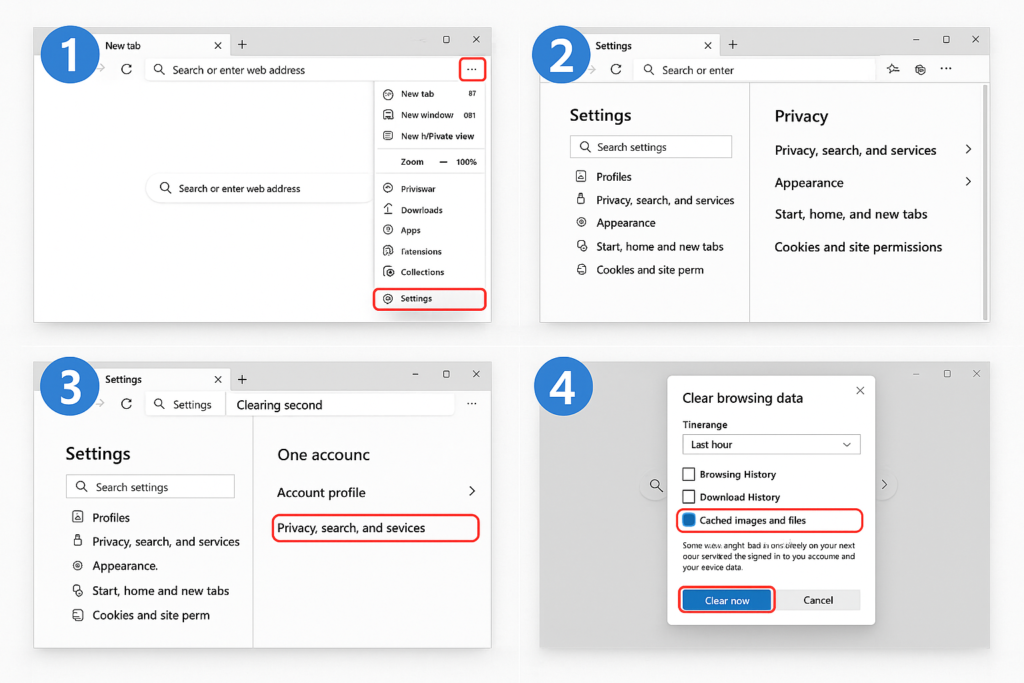
- Click on the three dots (ellipsis) in the top-right corner of the browser window to open the menu.
- Navigate to “Settings” by scrolling down and clicking on the option near the bottom of the dropdown menu.
- In the Settings sidebar, select “Privacy, search, and services” to access the clearing options for your browsing data.
- Scroll down until you find the “Clear browsing data” section, then click on the “Choose what to clear” button.
- Check the box next to “Cached images and files” to select it for deletion, and uncheck any data types you want to keep.
- Use the “Time range” dropdown menu to select how far back you want to clear the cache (options include “Last hour,” “Last 24 hours,” “Last 7 days,” “Last 4 weeks,” or “All time”).
- Click the “Clear now” button to empty the selected cache data from your Microsoft Edge browser.
- Wait for the process to complete, which typically takes only a few seconds depending on how much data is being cleared.
- Once finished, you’ll see a confirmation message indicating that your browsing data has been cleared successfully.
Using keyboard shortcuts
- With Microsoft Edge open on your screen, press Ctrl+Shift+Delete on your keyboard to directly access the “Clear browsing data” panel.
- Select “Cached images and files” and choose your preferred time range from the dropdown menu.
- Click “Clear now” to empty the cache according to your selections.
- The browser will process your request and clear the selected data types from the specified time period.
Clearing cache for a specific website
- Open Microsoft Edge and navigate to the website you want to clear cache for.
- Click the lock icon (or info icon) in the address bar to open the site information panel.
- Select “Site permissions” from the dropdown menu that appears.
- Click on “Clear site data” to remove all cached content specifically for that website.
- Confirm your choice when prompted, and the cache for only that site will be cleared while preserving cache for other websites.
Important: Schedule regular cache clearing as part of your system maintenance routine to prevent performance issues before they start. Once monthly is sufficient for most users.
Troubleshooting edge cache clearing issues
- If clearing the cache doesn’t resolve your browsing issues, try restarting Microsoft Edge completely by closing all windows and reopening the browser, as some cached data may remain in memory until the application is fully restarted.
- When the “Clear now” button appears unresponsive, check if you have multiple Edge windows or tabs open that might be preventing the clearing process, then close unnecessary tabs and try again.
- For persistent cache problems, consider using InPrivate browsing temporarily, which automatically deletes browsing data when you close the window, by pressing Ctrl+Shift+N to open a new InPrivate window.
- If you notice that certain websites still display outdated content after clearing the cache, try holding down the Shift key while clicking the refresh button, which forces Edge to ignore cached content and download everything fresh from the server.
- f cache clearing doesn’t resolve your issues, you may want to delete temporary files Windows 11 storage to free up additional system resources and improve overall performance.
- When experiencing severe performance issues that persist after clearing the cache, consider resetting Microsoft Edge completely by going to Settings > Reset Settings > Restore settings to their default values, which will clear all browser data including extensions and settings.
