“Our department needs to configure several workstations with fixed IP addresses for our cameras system. I’ve just upgraded to Windows 11, and I can’t find where to set a static IP address anymore. The network configuration seems different from Windows 10. Can you provide a step-by-step guide on how to manually assign an IP address in Windows 11?”
Why fixed IP addresses matter for network stability?
When running servers, networked printers, or specialized equipment, using a static IP address ensures consistent connectivity. Dynamic IP addresses can change unexpectedly, breaking connections to critical devices. Windows 11 maintains the ability to configure manual IP assignments, though the interface has been refreshed. This tutorial will guide you through the process using both the Settings app and Control Panel methods.
Aside: When running servers, networked printers, or specialized equipment, using a static IP address ensures consistent connectivity. Just like when you need to set Microsoft Teams working hours or customize Outlook calendar time range intervals, configuring static IP addresses helps maintain stable network connections. Dynamic IP addresses can change unexpectedly, breaking connections to critical devices.
Manual IP configuration options in Windows 11
This guide covers how to set a static IP address on Windows 11 using two different methods. We’ll walk through both the modern Settings app approach and the traditional Control Panel method. You’ll need administrator privileges on your Windows 11 device and should know the IP address details provided by your network administrator or ISP before starting.
Configuring a fixed IP address through Windows 11 Settings
- Open the Start menu and click on Settings or use the keyboard shortcut Windows key + I to launch the Settings application quickly.
- In the Settings window, select Network & Internet from the left sidebar to access all network-related configuration options.
- Click on your current network connection (either Wi-Fi or Ethernet) depending on which connection type you’re using for your Windows 11 device.
- Find and click on the Hardware properties link for your active network adapter to view detailed connection information.
- Locate the IP assignment section and click the Edit button to modify how your computer obtains its IP address.
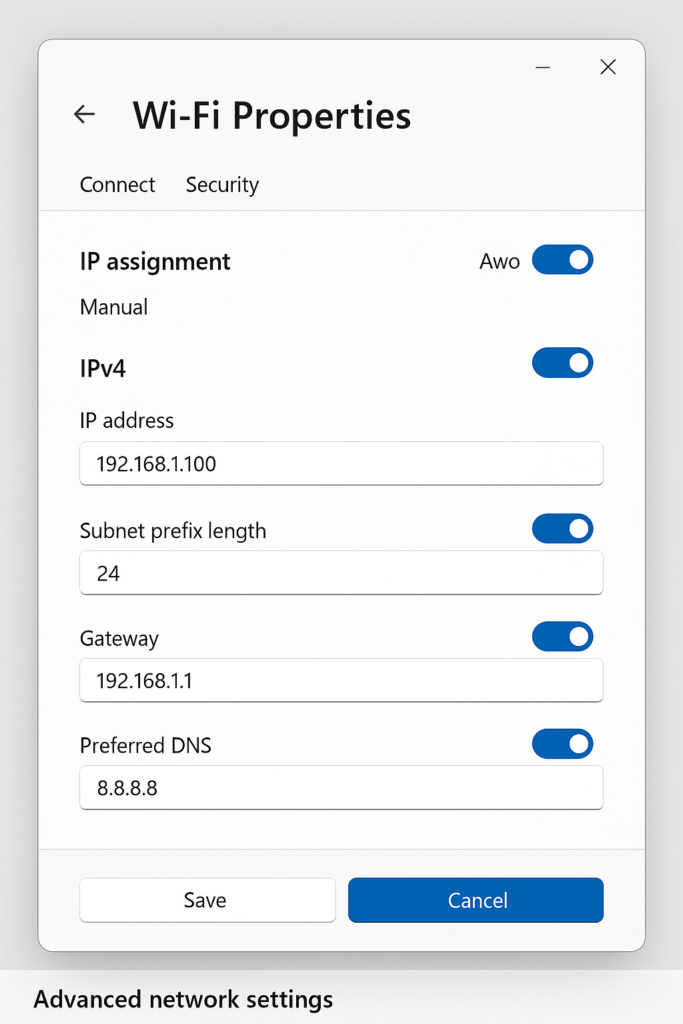
- In the Edit IP settings dialog box, change the dropdown from “Automatic (DHCP)” to “Manual” to enable static IP configuration.
- Toggle the IPv4 switch to the On position to configure IPv4 settings manually on your Windows 11 computer.
- Enter your static IP address information in the appropriate fields: IP address, Subnet mask (usually 255.255.255.0), Gateway, and DNS servers.
- Click Save to apply your new static IP configuration to the network adapter in Windows 11.

Setting a static IP address using Control Panel
- Right-click on the Start button and select Network Connections from the menu to access network settings quickly.
- In the Network Connections window, right-click on your active network adapter (Wi-Fi or Ethernet) and select Properties.
- In the connection properties dialog box, locate and select Internet Protocol Version 4 (TCP/IPv4) from the list of items.
- Click the Properties button to open the IPv4 configuration dialog where you can change your IP assignment method.
- Select the option Use the following IP address to switch from automatic to manual IP configuration.
- Enter your desired static IP address, subnet mask, and default gateway as provided by your network administrator.
- In the same dialog, select Use the following DNS server addresses and enter your preferred and alternate DNS servers.
- Click OK to save your changes and close the dialog box, then click Close on the connection properties window.
- Test your new configuration by opening a web browser or pinging another device on your network.
Static IP address change issues
- If you encounter “Limited connectivity” warnings after changing your IP address, verify that your gateway address matches your router’s IP address and that subnet mask settings are correct for your network.
- When experiencing “IP address conflict” errors, another device on your network may already be using the same IP address you’ve configured, so choose a different available address within your network range.
- Should you lose internet connectivity after setting a static IP, double-check that your DNS server addresses are entered correctly, as incorrect DNS settings will prevent domain name resolution while still allowing local network access.
- If you need to revert to automatic IP assignment, return to the same settings area and change the configuration from Manual back to Automatic (DHCP) to let your router assign addresses dynamically.
- For persistent connection problems after configuring a static IP, try opening Command Prompt as administrator and running “ipconfig /release” followed by “ipconfig /renew” to refresh your network configuration.
Pro tip: Before making changes, document your current network settings using the “ipconfig /all” command in Command Prompt so you can revert if needed.
