
Have you ever needed to troubleshoot a Windows issue or configure an application, only to discover that critical system files seem to be missing from your File Explorer? Many Windows 11 users encounter this challenge when trying to access configuration files, debug software problems, or manage system-level settings that require visibility into normally hidden directories and files.
Understanding hidden and system files in Windows 11
Windows 11 conceals certain files and folders by default to protect your operating system from accidental modifications or deletions that could compromise system stability. These hidden elements include critical system directories, configuration files with specific attributes, and temporary files that Windows uses for background operations. Understanding the distinction between hidden files and system files helps you navigate your file system more effectively while maintaining appropriate caution when modifying protected content. For users who want to learn more about file and folder management in Windows 11, these visibility settings provide essential access to system-level components.
We’ll show how to make hidden files visible in Windows 11 through File Explorer settings, enabling you to access system files and folders that are normally concealed from view. You will learn multiple methods for revealing these files, understand the differences between hidden and system file attributes, and discover how to toggle visibility settings based on your current needs. The process requires no special software or administrative privileges for basic hidden file viewing, though accessing certain system folders may require elevated permissions.
IMPORTANT: Create a system restore point before making any changes to system file visibility or permissions, providing a safety net that allows you to revert your system to a known good state if modifications cause unexpected problems or instability. Make sure to not delete any system files as this might directly impact your system stability!
Configuring File Explorer to display system files in Windows 11
Windows 11 provides several straightforward methods for finding hidden files and accessing system folders through File Explorer’s built-in options. The primary approach involves modifying the View settings within File Explorer, which controls how files and folders appear throughout your entire system. This configuration persists across sessions, meaning you only need to adjust these settings once unless you choose to revert them later.
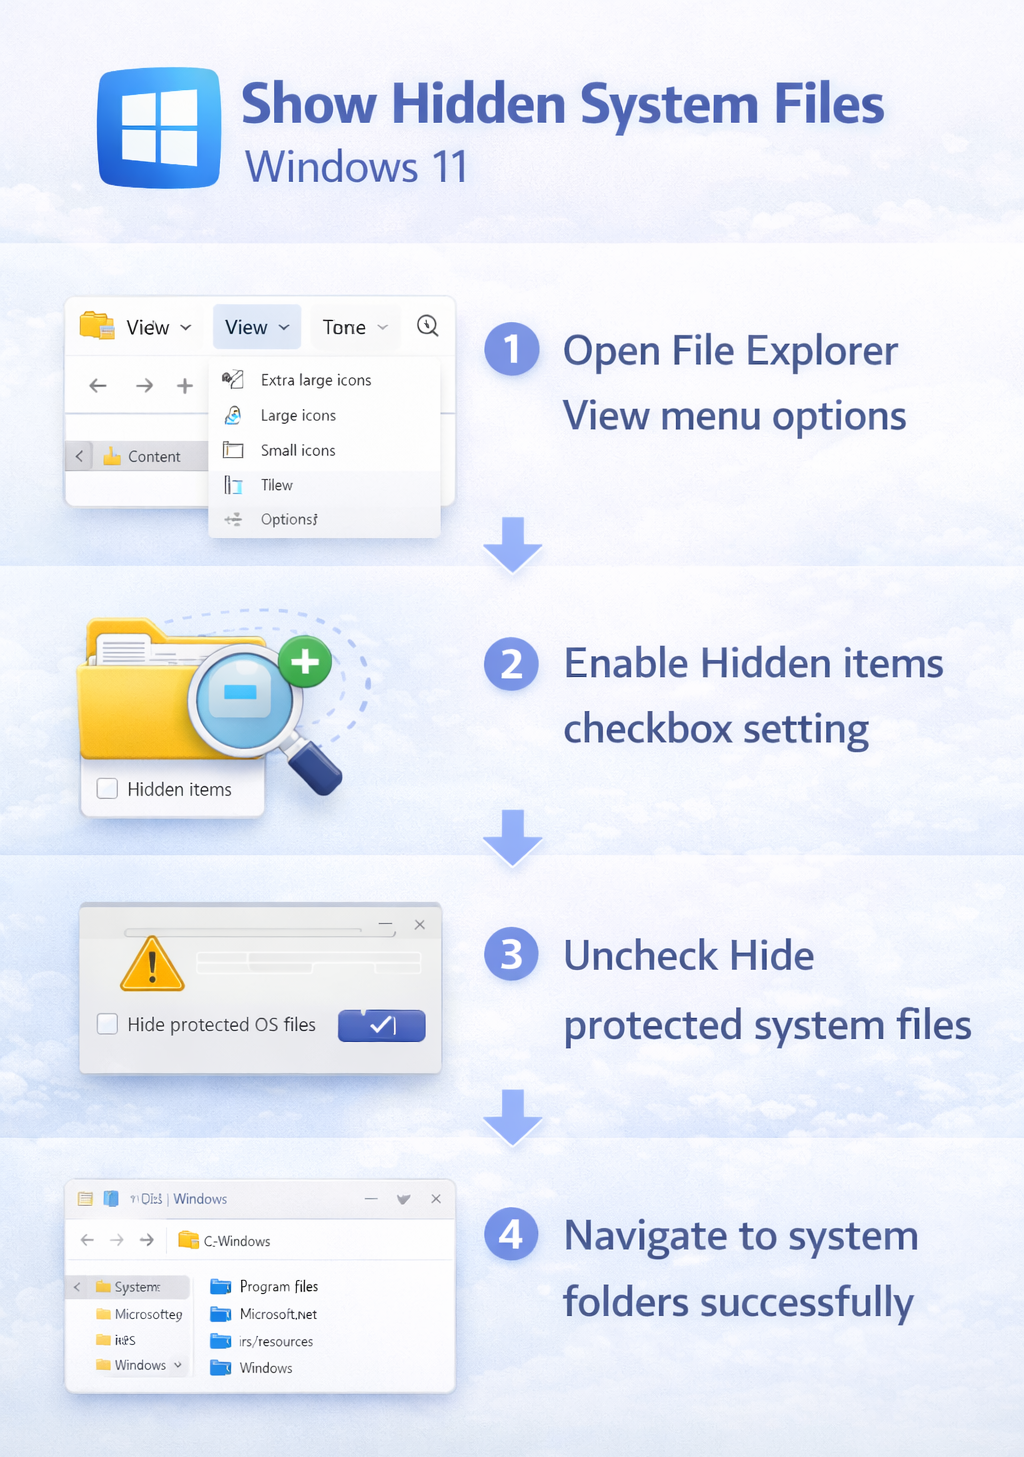
Enable hidden files through the View menu
- Open File Explorer by pressing Windows key + E or clicking the folder icon in your taskbar to launch the file management interface.
- Navigate to the View menu in the top ribbon and click on Show to reveal additional visibility options for files and folders.
- Locate the Hidden items checkbox in the dropdown menu and click it to enable the display of files and folders marked with the hidden attribute.
- Verify that hidden files now appear in File Explorer by navigating to your user profile folder, typically located at C:\Users\YourUsername, where you should see dimmed folder icons representing hidden directories.
- Confirm that previously concealed folders like AppData are now visible with a slightly transparent icon appearance indicating their hidden status.
Expert Tip: Hidden files appear with dimmed or semi-transparent icons in File Explorer, making them visually distinguishable from regular files even when visibility is enabled. This design helps prevent accidental modifications while still allowing intentional access.
Access advanced folder options for system files
- Click the three-dot menu icon in the File Explorer toolbar and select Options to open the Folder Options dialog window.
- Navigate to the View tab within the Folder Options window to access advanced visibility and display settings for your file system.
- Scroll through the Advanced settings list until you locate the “Hidden files and folders” section near the middle of the options list.
- Select the radio button labeled “Show hidden files, folders, and drives” to enable visibility for content marked with the hidden attribute.
- Locate the checkbox labeled “Hide protected operating system files (Recommended)” further down in the Advanced settings list and uncheck it to make system files visible.
- Click Apply to save your changes, then click OK to close the Folder Options dialog and return to File Explorer with your new visibility settings active.
- Accept the warning dialog that appears when unchecking the system files option, which reminds you to exercise caution when modifying protected operating system content.
View system folders in specific directories
- Navigate to your C: drive root directory by typing C:\ in the File Explorer address bar to access the primary system partition where Windows 11 stores core operating system files.
- Observe that system folders like ProgramData, Recovery, and System Volume Information now appear in the directory listing if you successfully disabled the system file protection setting.
- Access your user profile’s AppData folder by typing %appdata% in the File Explorer address bar, which automatically navigates to C:\Users\YourUsername\AppData\Roaming for application-specific configuration files.
- Explore the Local and LocalLow subfolders within AppData to find application caches, temporary files, and program-specific data that many applications store in these hidden locations.
- Use the address bar shortcut %localappdata% to jump directly to the Local folder, which contains larger application data files and installation components for modern Windows applications.
Remember: System files serve critical functions for Windows operation, and modifying or deleting them can cause system instability, application failures, or prevent Windows from starting properly. Always create backups before making changes to system-level content.
Alternative methods for accessing hidden content
Windows 11 offers additional approaches for finding hidden files beyond the standard File Explorer settings, providing flexibility for different workflows and user preferences. These alternative methods can be particularly useful when you need temporary access to hidden content without permanently changing your File Explorer visibility settings, or when working with specific directories that require different viewing configurations.
Use File Explorer ribbon options
- Open any File Explorer window and locate the View tab in the ribbon interface at the top of the window to access quick visibility toggles.
- Click directly on the View tab to expand the ribbon if it appears collapsed, revealing all available view customization options in a single interface.
- Find the Show/hide section within the View ribbon, which contains checkboxes for common visibility options including file name extensions and hidden items.
- Toggle the “Hidden items” checkbox on or off as needed to quickly switch between showing and hiding files with the hidden attribute without opening the Folder Options dialog.
- Combine this setting with the “File name extensions” checkbox to simultaneously view file types and hidden content, which proves particularly useful when working with configuration files that use specific extensions.
Navigate using direct path entry
- Click in the File Explorer address bar and type the complete path to a hidden folder, such as C:\ProgramData, to access system folders directly regardless of your current visibility settings.
- Press Enter after typing the path to navigate immediately to the specified location, bypassing the need to browse through parent directories where hidden folders might not be visible.
- Use environment variables like %temp%, %appdata%, or %programdata% in the address bar to quickly jump to commonly accessed hidden system locations without memorizing full directory paths.
- Create shortcuts to frequently accessed hidden folders by dragging them to your Quick Access section, allowing one-click navigation even when hidden file visibility is disabled in your general File Explorer settings.
- Right-click any hidden folder you’ve accessed and select “Pin to Quick access” to maintain permanent access to that location from the File Explorer sidebar.
Important Tip: Environment variables provide consistent access to system folders across different Windows installations and user accounts, making them ideal for documentation, scripts, or sharing instructions with other users who may have different drive configurations.
Common challenges when accessing system files
Even after configuring Windows 11 to show hidden files and system folders, you may encounter specific obstacles that prevent full access to certain protected locations or files. These challenges typically relate to permission restrictions, file system protections, or application-specific security measures that Windows implements to safeguard critical system components from unauthorized modifications.
Permission denied errors when opening folders
- Right-click the folder displaying permission errors and select Properties, then navigate to the Security tab to examine the current permission assignments for your user account. Click the Advanced button to access detailed security settings that control folder access at a granular level. Select your user account in the permission entries list and click Edit to modify the permissions, ensuring that Full Control or at least Read & Execute permissions are enabled for your account. Apply the changes and select the option to replace permissions on all child objects if you need access to subdirectories within the protected folder.
System files remain invisible after enabling settings
- Verify that you unchecked both “Hide protected operating system files” in Folder Options and enabled “Show hidden files, folders, and drives” since both settings must be configured correctly for complete system file visibility. Press F5 in File Explorer to refresh the current directory view, as Windows sometimes caches folder contents and may not immediately display newly visible files. Close and reopen File Explorer completely if refreshing doesn’t reveal the expected files, as some visibility changes require a fresh File Explorer instance to take effect. Check the specific file attributes using Command Prompt with the
attribcommand to confirm whether files are marked as both hidden and system, which requires both settings to be properly configured.
File Explorer crashes when accessing certain directories
- Disable thumbnail generation for the problematic folder by opening Folder Options, navigating to the View tab, and checking “Always show icons, never thumbnails” to prevent File Explorer from attempting to generate previews for corrupted or problematic files. Clear the File Explorer history and cache by opening File Options, clicking the “Clear” button next to “Clear File Explorer history” on the General tab, which removes potentially corrupted cached data. Navigate to the folder using Command Prompt with the
dir /acommand to list all files including hidden and system files without loading the graphical File Explorer interface, which helps identify specific files causing crashes. Boot into Safe Mode by holding Shift while clicking Restart, then selecting Troubleshoot > Advanced options > Startup Settings > Restart > Safe Mode, which loads Windows with minimal drivers and may allow access to directories that crash in normal mode.