Why won’t Windows 11 sync my time automatically?
Many Windows 11 users encounter situations where their system clock displays incorrect time, causing issues with scheduled meetings, file timestamps, and authentication processes. Whether you’re traveling across time zones, working with international teams, or experiencing synchronization problems, knowing how to properly configure your date and time settings becomes essential for maintaining productivity and system reliability.
Modify time and date on Windows 11: Problem overview
Windows 11 offers multiple methods for managing date and time settings, from automatic synchronization with internet time servers to manual configuration for specific requirements. Organizations often need precise time coordination across devices, while individual users may require adjustments for travel or system troubleshooting purposes.
We’ll show a pretty comprehensive date and time management procedure in Windows 11, including automatic synchronization setup, manual time zone adjustments, and troubleshooting common synchronization issues. You’ll learn to configure both automatic and manual time settings, customize regional formats, and resolve connectivity-related time sync problems.
Expert Tip: Always verify your time zone settings before important virtual meetings or when scheduling automated tasks, as incorrect time zones can cause significant scheduling conflicts.
Adjusting time date Windows 11: Step-by-step implementation
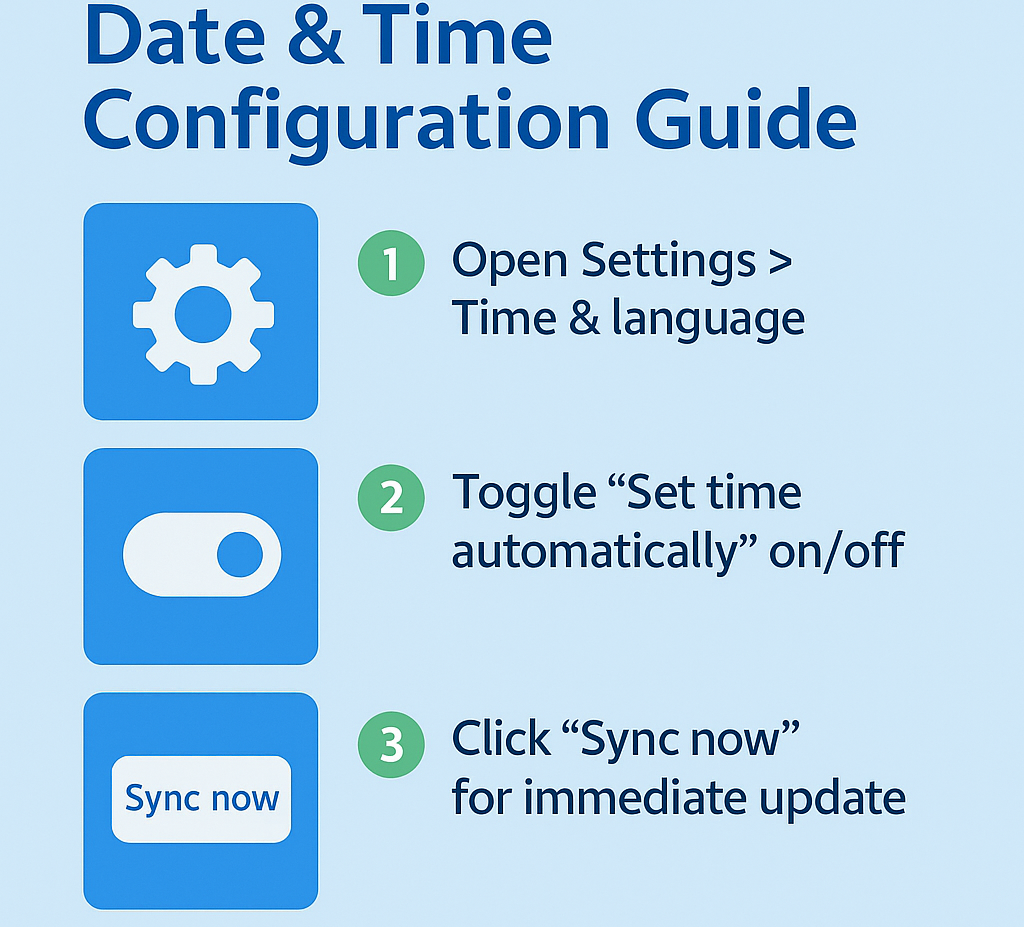
Windows 11 change time automatically configuration
- Navigate to Windows Settings by pressing Windows key + I, then select “Time & language” from the left sidebar menu to access comprehensive date and time configuration options.
- Click on “Date & time” in the Time & language section to open the primary time management interface where you can control automatic synchronization and manual time settings.
- Toggle the “Set time automatically” switch to the ON position to enable automatic time synchronization with Microsoft’s time servers, ensuring your system maintains accurate time without manual intervention.
- Verify that the “Set time zone automatically” option is also enabled, allowing Windows 11 to detect your geographical location and adjust the time zone accordingly based on your network connection.
- Click the “Sync now” button under the “Set time automatically” section to immediately synchronize your system clock with the internet time server and verify proper connectivity.
Set your time and zone manually Windows 11 process
- If automatic synchronization isn’t suitable for your needs, toggle OFF the “Set time automatically” switch to enable manual time configuration options in the same Date & time settings page.
- Click the “Change” button next to the current date and time display to open the manual time setting dialog where you can specify exact date and time values.
- Use the date picker to select the correct month, day, and year, then adjust the time using the hour and minute selectors to match your desired time settings precisely.
- For manual time zone configuration, first disable the “Set time zone automatically” toggle, then click the dropdown menu under “Time zone” to select your specific geographical time zone from the comprehensive list.
- Choose your exact time zone from the dropdown list, which includes major cities and UTC offset information to help you identify the correct regional setting for your location.
- Note: If you frequently travel and need to manage multiple time zones, you might find our tutorial on how to view multiple time zones in Outlook calendar helpful for scheduling across different regions.
Important Tip: Manual time settings will remain static and won’t adjust for daylight saving time changes automatically, requiring periodic manual updates throughout the year.
Change date and time Windows 11 advanced settings
- Access additional time formatting options by clicking “Additional date, time & regional settings” link at the bottom of the Date & time settings page to open Control Panel options.
- In the Control Panel window, select “Change date, time, or number formats” to customize how dates and times appear throughout your Windows 11 system interface and applications.
- Click the “Additional settings” button in the Region dialog to access detailed formatting options for date separators, time formats, and regional number display preferences according to your locale requirements.
- Navigate to the “Date” tab to modify short date and long date formats, allowing you to customize how dates appear in file explorers, applications, and system notifications.
- Switch to the “Time” tab to adjust time format preferences, including 12-hour versus 24-hour display formats and AM/PM indicator positioning for optimal readability in your workflow.
- Use the Internet Time tab in the Date and Time Properties dialog (accessible through Control Panel > Clock and Region > Date and Time) to configure alternative time servers if Microsoft’s default servers aren’t accessible in your network environment.
Issues when setting time automatically on Windows 11
- Time synchronization fails repeatedly: Check your internet connection stability and firewall settings, as Windows time synchronization requires outbound access to time.windows.com on port 123 for proper functionality.
- Incorrect time zone detection: Disable location services temporarily, then manually select your time zone from the dropdown menu, as automatic detection sometimes fails in areas with complex geographical boundaries or VPN connections.
- Date and time reset after restart: Run Windows Update to install latest system patches, as outdated system files can cause time persistence issues that prevent proper date and time retention across system reboots.
- Manual time changes don’t persist: Verify you have administrative privileges on your Windows 11 device, as standard user accounts may lack sufficient permissions to modify system-wide date and time settings permanently.
Remember: Group Policy settings in corporate environments can override individual time settings, so contact your IT administrator if time changes don’t apply in managed business networks.
- Time server synchronization errors: Open Command Prompt as administrator and run “w32tm /resync” to force immediate time synchronization, or use “w32tm /config /manualpeerlist:pool.ntp.org /syncfromflags:manual” to configure alternative time servers.
- Regional format conflicts: Reset regional settings to default by opening Region settings in Control Panel, clicking “Reset” button, then reconfiguring your preferred date and time formats to resolve display inconsistencies.