
“My computer is running slow and I’m getting low disk space warnings. I’ve heard that temporary files might be taking up space on my Windows 10 PC. How can I safely remove these temporary files to free up space and potentially improve performance? Are there different types of temporary files I should be aware of, and what’s the best way to clean them regularly?”
Why you need to free up space by deleting temp files ?
Windows 10 creates numerous temporary files during normal operation. These files accumulate over time, consuming valuable disk space and potentially affecting system performance. Temporary files include installation remnants, update caches, browser data, and application temporary storage. For businesses managing multiple workstations, this unnecessary data can impact productivity and system reliability. Regular maintenance by removing these files helps maintain optimal performance while freeing up storage space for important documents and applications.
How to clean the temp folder in Windows 10 ?
In this tutorial, we’ll explore multiple methods to remove temporary files from your Windows 10 system. We’ll cover both built-in Windows tools and manual approaches to give you complete control over the cleaning process. The methods range from using the Disk Cleanup utility to accessing hidden system folders and setting up automated maintenance. These techniques are suitable for both individual users and IT administrators managing multiple systems.
Delete system temp files Windows 10
Using the Windows Disk Cleanup tool temp files deletion
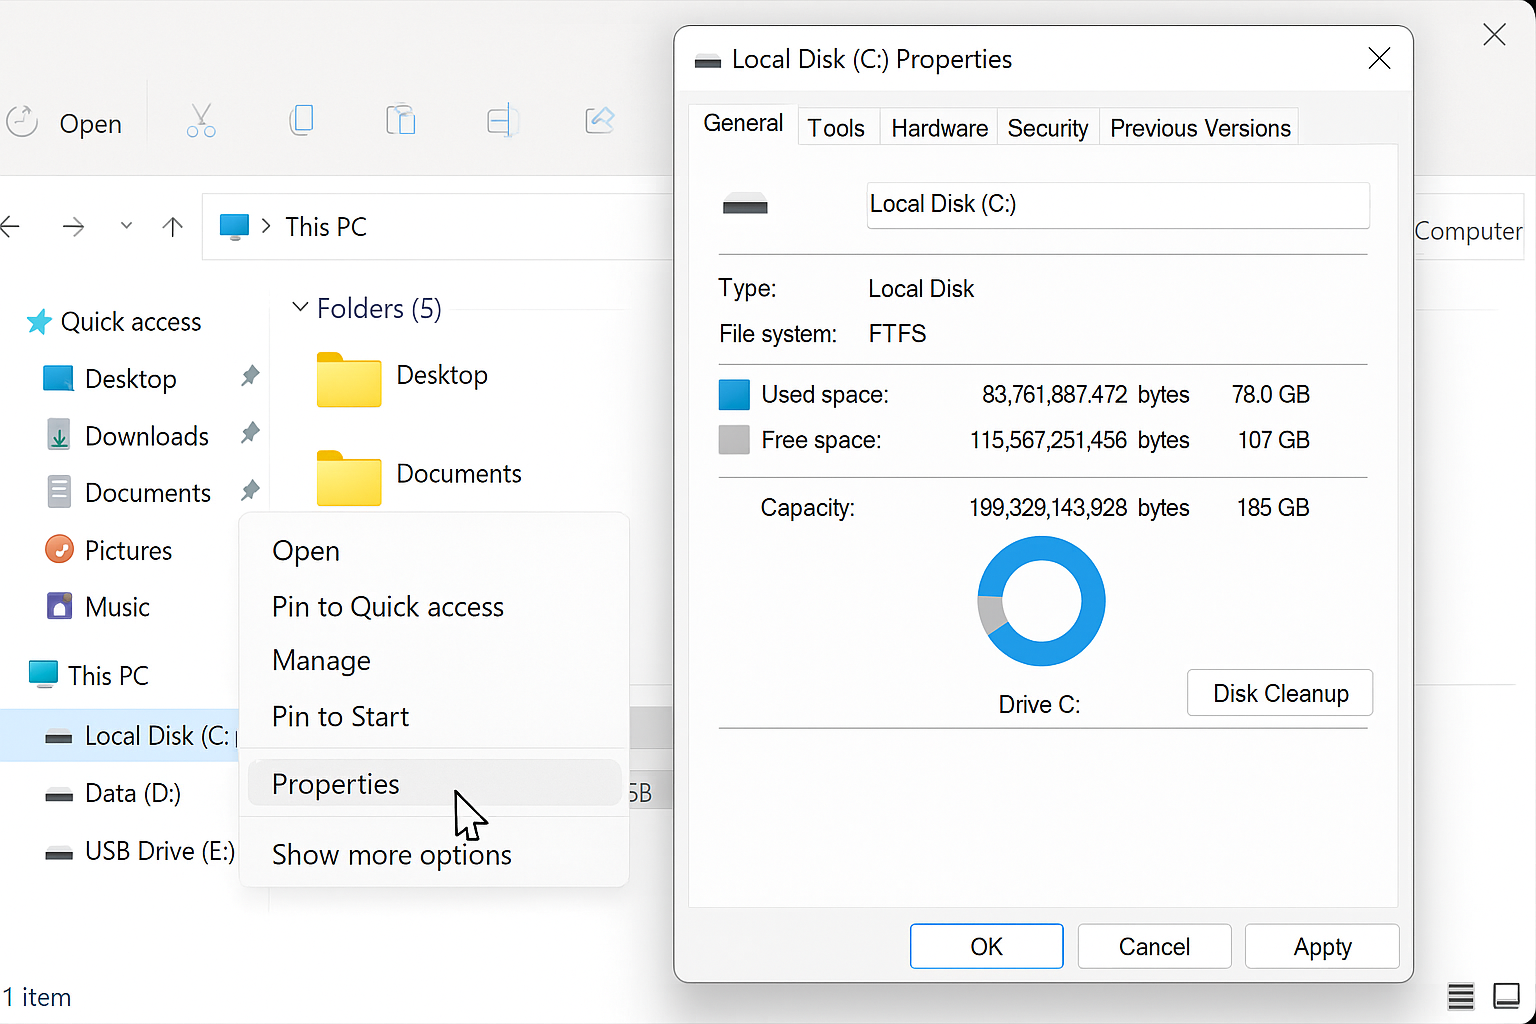
- Open File Explorer, right-click on your C: drive (or whichever drive contains your Windows installation), and select “Properties” from the context menu.
- In the Properties window that appears, click on the “Disk Cleanup” button located in the General tab to launch the utility.
- Wait for the scan to complete, then review the list of file categories that can be deleted, making sure to check boxes for “Temporary files,” “Temporary Internet Files,” and “Windows Update Cleanup.”
- For a more thorough cleaning, click the “Clean up system files” button, which requires administrator privileges but allows access to additional system temp files.
- Review the selected items, then click “OK” and confirm by clicking “Delete Files” when prompted to permanently remove the selected temporary files.
Note: Before starting the cleanup process, you might want to pin frequently accessed folders to your taskbar for quick access to important locations during the cleaning process. Then, open File Explorer and right-click on your C: drive to begin the cleanup procedure.
Clear temp files using run command Windows 10
- Press the Windows key + R on your keyboard to open the Run dialog box, which provides quick access to various system locations.
- Type “%temp%” (without quotes) in the text field and press Enter to open your personal temporary files folder containing application-specific temporary data.
- Press Ctrl+A to select all files and folders, then press Delete to remove them (some files may be in use and cannot be deleted).
- Return to the Run dialog and enter “temp” to access another temporary files location, repeating the selection and deletion process.
- Finally, enter “prefetch” in the Run dialog to access the Windows Prefetch folder, and delete the contents to remove application launch data that Windows stores.
Clear temporary internet files in Edge
- Open Microsoft Edge and press Ctrl+Shift+Delete to access the “Clear browsing data” dialog, or click on the three-dot menu, select Settings, and choose “Privacy, search, and services.”
- Select the time range (preferably “All time” for a complete cleanup) and check the boxes for “Cookies and other site data” and “Cached images and files.”
- Click the “Clear now” button to remove all browser temporary files and cached content that may be consuming significant disk space.
- For other browsers like Chrome or Firefox, access their respective settings menus and look for privacy or history sections to find similar clearing options.
- Remember to repeat this process for all browsers installed on your system to maximize space savings.
Permanently delete temporary files using Storage Sense
- Open the Windows Settings app by pressing Windows key + I, then navigate to System > Storage to access storage management features.
- Toggle on the “Storage Sense” option to enable automatic cleanup of temporary files based on your configured settings.
- Click on “Configure Storage Sense or run it now” to access detailed settings for controlling when and what gets deleted automatically.
- Under “Temporary Files,” check the option to “Delete temporary files that my apps aren’t using” and set how often you want Windows to run this cleanup.
- Click “Clean now” at the bottom of the page to run Storage Sense immediately rather than waiting for the scheduled cleanup.
Troubleshooting when you remove junk files
- If you encounter “File in use” errors when attempting to delete temporary files, try closing all running applications including background processes through Task Manager, or consider performing the cleanup in Safe Mode for complete access.
- When disk space doesn’t increase significantly after cleanup, check hidden system folders like “System Volume Information” which contains System Restore points that may be consuming space, and consider reducing the allocated space through System Properties > System Protection.
- For systems that rapidly accumulate temporary files again after cleaning, investigate potential causes such as malfunctioning applications by monitoring the Temp folder contents after using specific programs to identify the culprits.
- If Windows Update temporary files continue to consume excessive space even after cleanup, you might need to reset the Windows Update components using the troubleshooter or command-line tools provided by Microsoft Support.
- When automated cleanup tools fail to run as scheduled, check the Task Scheduler library for any error messages related to the Storage Sense or maintenance tasks, and ensure the service is properly configured with appropriate permissions.