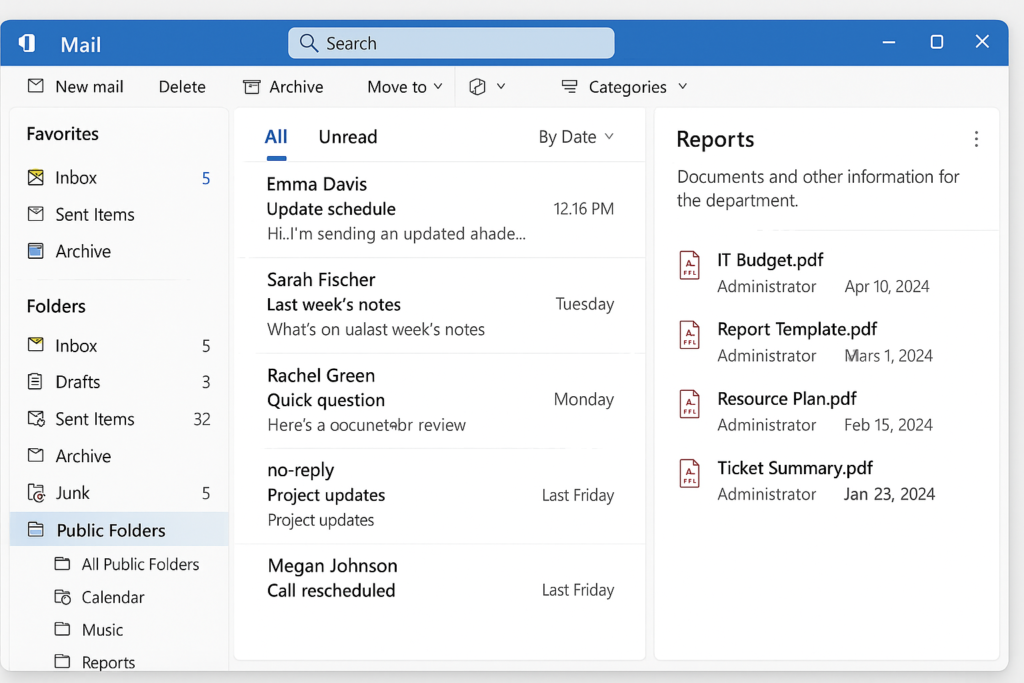
“Where did all the public folders go in my Outlook?”
Have you recently upgraded to the new Outlook or migrated to Microsoft 365 and suddenly can’t locate your organization’s public folders? Many users face this common frustration when trying to access shared company resources. Public folders often contain critical departmental information, shared contacts, or collaborative calendars that teams rely on daily. Finding these resources shouldn’t require an IT support ticket every time you need them.
Show public folders in Outlook
Public folders remain valuable collaborative tools in many organizations despite newer alternatives like SharePoint and Microsoft Teams integration. The confusion stems from Microsoft’s evolving interface designs across different Outlook versions (desktop client, web version, and mobile apps). Additionally, public folder visibility depends on your organization’s configuration and permission settings. Without proper access, these shared resources remain invisible, creating workflow disruptions and communication gaps.
How to open public folders in the Outlook desktop client?
This tutorial will guide you through accessing public folders across different Outlook versions, including desktop clients, Outlook on the web (OWA), and the new Outlook experience. We’ll assume your organization has already deployed public folders and that you have appropriate permissions. The methods vary significantly between versions, so we’ll cover each major scenario.
Outlook 365 access public folders
For Outlook Desktop (Windows)
- Navigate to the folder pane on the left side of your Outlook window and look for “Public Folders” near the bottom of your folder list, which may require scrolling down past your personal mailbox folders.
- If Public Folders aren’t visible, click on the “More…” or “…” button at the bottom of your folder list to expand additional options where public folders might be hidden.
- Alternatively, press Ctrl+6 as a keyboard shortcut to directly switch to the Folder view, making it easier to locate public folders when they’re not immediately visible in your default view.
- Once you’ve located Public Folders, click the triangle or arrow icon beside it to expand the hierarchy and browse through the available folders based on your organization’s structure.
- To add frequently used public folders to your Favorites for quicker access, right-click any public folder and select “Add to Favorites” which creates a shortcut in your Favorites section.
For New Outlook Experience
- Click on the “Apps” icon (the grid of dots) in the left navigation pane and select “Folders” from the dropdown menu that appears, which opens the full folder tree view.
- Look for “Public Folders” in the displayed folder list, which typically appears below your personal mailboxes and shared mailboxes if you have access to them.
- If you don’t see Public Folders, click on the “Add Account” or “Add Another Mailbox” option, then enter “Public Folders” (without quotes) when prompted to access the public folder hierarchy.
- Navigate through the public folder structure by clicking on folder names, which will expand to show subfolders and their contents based on the organization’s folder design.
- For persistent access, pin frequently used public folders by right-clicking them and selecting “Add to Favorites” or using the pin icon that appears when hovering over folder names.

How to create a public folder in Outlook when needed?
- Ensure you have administrator permissions, as regular users typically cannot create top-level public folders without appropriate rights assigned by Exchange administrators.
- Right-click on “Public Folders” or the specific parent folder where you want to create a new subfolder, then select “New Folder” from the context menu that appears.
- Enter a descriptive name for your new public folder that clearly identifies its purpose, as this name will be visible to all users with access permissions.
- Choose the folder type (Mail and Post Items, Calendar, Contacts, etc.) from the dropdown menu to determine what kind of items can be stored in this public folder.
- Click “OK” to create the folder, but be aware that it may take some time to propagate through your organization’s Exchange environment depending on your infrastructure configuration.
- Set appropriate permissions by right-clicking the newly created folder, selecting “Properties,” then “Permissions” tab, where you can add users and assign specific access levels.
Search public folders in Outlook issues
- If public folders are completely missing from your view, verify with your IT administrator that public folders are enabled for your organization and that you have been granted appropriate access permissions to view them.
- When experiencing synchronization issues where public folder content appears outdated, try closing and reopening Outlook completely or manually triggering a send/receive operation by pressing F9, which refreshes your connection to the Exchange server.
- For performance problems with large public folders, consider creating a dedicated Outlook profile for public folder access or use Outlook’s cached exchange mode with the “Download Public Folder Favorites” option enabled in account settings.
- If you encounter error messages about “insufficient permissions” when trying to access specific public folders, contact your administrator to review your access rights, as permissions are often assigned at individual folder levels rather than globally.
- When public folders appear in the folder list but won’t open or display content, check your network connection and verify that you’re not working in offline mode, which can be toggled in the Send/Receive tab of the Outlook ribbon.
Pro tip: Create a dedicated search folder specifically for public folders to quickly find content across multiple public folders without navigating through the entire hierarchy each time.
