“I recently upgraded to Windows 11, but my microphone isn’t working during Teams meetings and Zoom calls. I’ve checked that my headset is properly connected, but colleagues still can’t hear me. How do I activate my microphone in Windows 11 and make sure it’s working properly for all my applications?”
Troubleshooting microphone activation issues in Windows 11
Microphone problems in Windows 11 can stem from various sources – hardware connections, driver issues, or incorrect system settings. Resolving these issues is crucial for effective communication in virtual meetings, voice recordings, and voice commands. Windows 11 offers several built-in tools to diagnose and fix microphone problems, whether you’re using a built-in microphone, headset, or external USB microphone.
Setting up your microphone properly in Windows 11
Before diving into advanced troubleshooting, we’ll establish a workflow to properly configure your microphone in Windows 11. This tutorial covers checking physical connections, verifying Windows settings, updating drivers, and ensuring your microphone works across different applications. You’ll need administrator access to your Windows 11 computer and the microphone you want to activate.
Note: If you’re experiencing microphone issues during Teams meetings, you might want to check our guide on how to fix Teams microphone not detected for specific Teams-related troubleshooting steps.
Activate your microphone with these essential steps
- Check your physical connections by ensuring your microphone or headset is properly plugged into the correct audio jack, typically colored pink or labeled with a microphone icon on most computers.
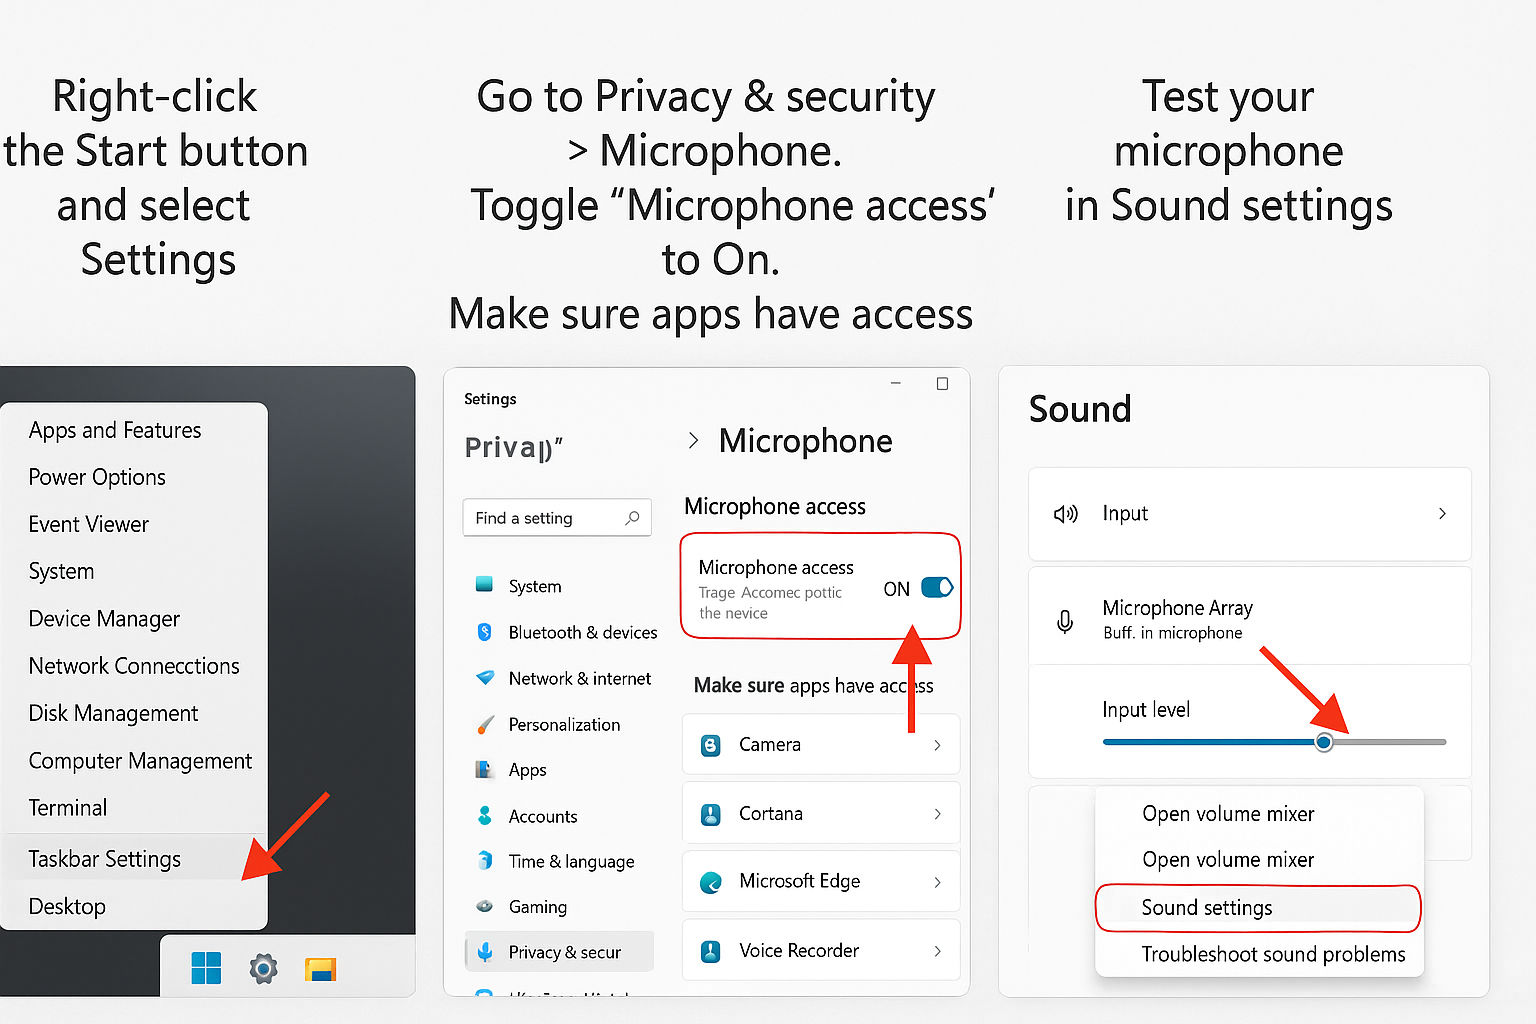
- Access microphone privacy settings by right-clicking the Start button, selecting Settings, then navigating to Privacy & Security > Microphone to verify that “Microphone access” is turned on for the device.
- Enable microphone access for specific applications by scrolling down in the same Microphone settings page and ensuring that apps you want to use with your microphone have permission to access it.
- Test your microphone by opening Sound settings (right-click the volume icon in the taskbar and select “Sound settings”), then clicking on “Input” to see your microphone listed and speaking into it to check if the input level bar moves.
- Select the correct input device by clicking the dropdown menu next to “Choose your input device” if you have multiple microphones connected and selecting the one you want to use.
- Adjust microphone properties by clicking the three dots next to your microphone in Sound settings and selecting “Properties” to access volume levels, enhancements, and spatial sound options for optimal performance.
- Update your microphone driver by right-clicking the Start button, selecting Device Manager, expanding “Audio inputs and outputs,” right-clicking your microphone device, and selecting “Update driver.”
- Reinstall your microphone driver if updating didn’t work by right-clicking the microphone in Device Manager, selecting “Uninstall device,” checking “Delete the driver software for this device,” clicking Uninstall, and then restarting your computer to let Windows reinstall the driver automatically.
- Run the Windows troubleshooter by going to Settings > System > Troubleshoot > Other troubleshooters, finding “Recording Audio,” and clicking “Run” to let Windows automatically detect and fix common microphone issues.
- Enable the built-in microphone in your BIOS if you’re using a laptop with an integrated microphone that still doesn’t work by restarting your computer, entering BIOS (typically by pressing F2, F10, or Delete during startup), and ensuring the internal microphone is enabled.
Microphone Configuration in Windows 10 vs Windows 11
While the core microphone functionality remains similar between Windows 10 and Windows 11, the interface and navigation paths differ significantly. In Windows 10, microphone settings were accessed through Settings > Privacy > Microphone, whereas Windows 11 consolidates this under Privacy & Security > Microphone with a redesigned interface.
Windows 11 introduces enhanced audio processing features not available in Windows 10, including AI-powered noise suppression and improved spatial audio support for recording scenarios. These features appear in the microphone properties under the “Enhancements” or “Spatial sound” tabs, depending on your audio driver version.
The Device Manager interface remains nearly identical between both operating systems, making driver-related troubleshooting steps universal. However, Windows 11’s updated Settings app provides a more streamlined experience for testing microphones with real-time visual feedback that’s more responsive than Windows 10’s implementation.
Validate the complete microphone path
Start with the physical connection. Reconnect a USB or 3.5 mm microphone, check any hardware mute switch, and try a different approved port. For a Bluetooth headset, confirm that Windows shows it as connected for audio, not only paired. Avoid changing several devices at once because that makes the failing stage harder to identify.
Open Settings, System, Sound, then select the intended input device. Speak normally and watch the input-level meter. If the meter moves, Windows is receiving audio and the remaining issue is probably the application, its selected device, or its permissions. If it does not move, review the device connection, input volume, driver, and privacy settings.
Check privacy access at both levels
In Settings, Privacy & security, Microphone, enable microphone access for the device and allow applications to use it. Desktop programs can have a separate access control from Microsoft Store apps. On a managed computer, a disabled or locked setting may be controlled by organizational policy; ask IT to verify it instead of attempting to bypass the restriction.
Then open the calling or recording application and choose the same microphone explicitly. An application can keep an old headset as its default even after Windows changes.
Compare a Windows test with an app test
Use the microphone test in Windows Sound settings, then make a short test recording or test call in the affected app. Close other meeting, browser, or recording tools that might be holding the device. If the microphone works in Windows but not in one app, reset that app’s audio selection and permissions before reinstalling drivers.
For intermittent input, turn off hardware noise suppression temporarily, test without a dock or USB hub, and compare a wired device. Record whether the problem begins after sleep, docking, or switching headsets.
If support is needed, provide the microphone model, connection type, selected Windows input, whether the input meter moves, the affected app, and the exact error. That evidence separates hardware, driver, privacy, and per-app selection problems while avoiding unnecessary system-wide changes.
Common microphone activation problems and solutions
- Your microphone shows as connected but has no input level when speaking into it, which often indicates a driver issue requiring reinstallation through Device Manager or downloading the latest audio drivers from your computer manufacturer’s website.
- Applications cannot access your microphone despite being enabled in Windows settings, which typically requires checking app-specific permissions in Settings > Privacy & Security > Microphone and ensuring each application has microphone access.
- Your microphone works in some applications but not others, suggesting an application-specific issue that can be resolved by checking in-app audio settings and ensuring the correct input device is selected within each program’s preferences.
- Windows 11 doesn’t recognize your USB microphone when connected, which usually requires unplugging the device, restarting your computer, and connecting the microphone to a different USB port, preferably one directly on your computer rather than through a hub.
- Your microphone picks up too much background noise, which can be improved by accessing the microphone properties through Sound settings, clicking the “Additional device properties” link, selecting the Enhancements tab, and enabling noise suppression features.
Pro tip: If you frequently switch between multiple microphones, you can quickly access sound settings by right-clicking the speaker icon in the taskbar and selecting “Sounds” to switch input devices without navigating through the Settings app.