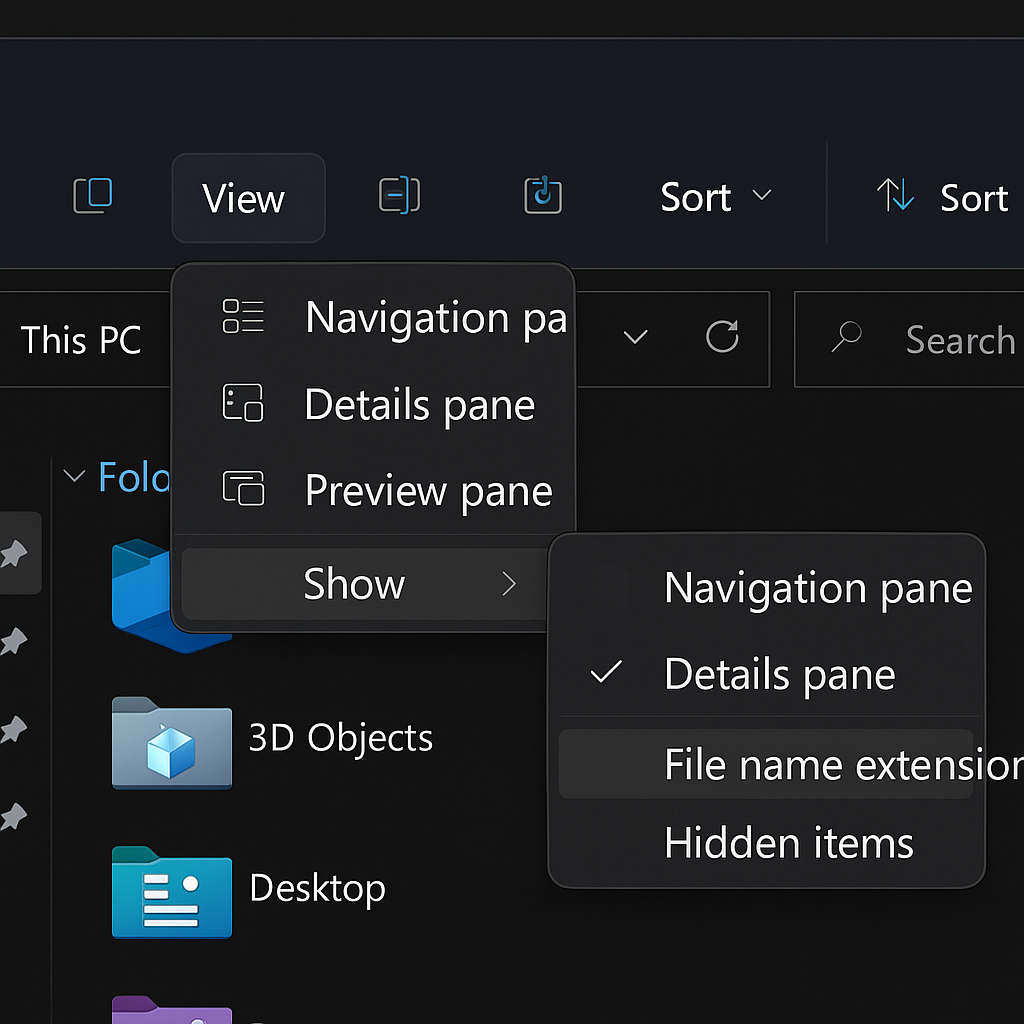
Understanding Windows 11 filename extensions visibility
“I’m working with multiple file types in my Windows 11 system, and I can’t tell which files are Word documents versus PDFs because the extensions aren’t showing. Sometimes I accidentally open the wrong application or can’t identify potentially dangerous file types. How can I control whether Windows 11 shows filename extensions so I can better manage my files and improve security awareness?”
Configuring Windows 11 file explorer show extensions settings
Windows 11 hides extensions by default to maintain a cleaner interface. However, power users and professionals often need this information visible for better file management and security awareness.
That said, you can toggle file extension visibility in Windows 11 File Explorer. Today you will learn to show all filenames with their complete extensions or hide them for a cleaner view. The process involves accessing File Explorer options and modifying view settings. No administrative privileges are required for this configuration change.
Note: If you’re experiencing issues with file extensions not showing correctly, it might be related to system performance. Consider clearing temporary files in Windows 11 to ensure smooth operation of File Explorer.
Step-by-step process to show file extensions in Windows 11
- Open File Explorer by clicking the folder icon in the taskbar or pressing Windows key + E to launch the file management interface
- Navigate to the View menu in the File Explorer ribbon at the top of the window to access display options
- Locate the “Show” section within the View ribbon, which contains various file display toggles and visibility controls
- Click the checkbox next to “File name extensions” to enable extension visibility for all file types in the current and future folder views
- Alternatively, access this setting through the traditional menu by clicking the three dots (More options) in the View ribbon
- Select “Options” from the dropdown menu to open the comprehensive Folder Options dialog box with advanced settings
- Switch to the “View” tab in the Folder Options window to access detailed file display preferences and visibility controls
- Scroll through the Advanced settings list to find “Hide extensions for known file types” checkbox option
- Uncheck “Hide extensions for known file types” to show hidden extensions for all recognized file formats throughout the system
- Click “Apply to Folders” if you want these settings to affect all existing folders, not just the current location
- Press “OK” to save your changes and immediately apply the new extension visibility settings across File Explorer
Expert tip: Use Ctrl+Shift+N to quickly create new folders while testing your extension visibility settings.

Troubleshooting common Windows 11 show file extensions issues
• Extensions still not appearing after enabling the setting may indicate cached folder views that need refreshing through F5 or closing and reopening File Explorer
• Some system files remain hidden even with extensions enabled because they require additional “Show hidden files” settings to be activated in the same View options menu
• Group Policy restrictions in corporate environments might prevent users from changing extension visibility settings, requiring administrator intervention or policy modifications to enable this functionality
• Certain file types like shortcuts (.lnk) or system files may not display extensions due to Windows security measures that protect critical system file identification
• File Explorer crashes or becomes unresponsive when changing extension settings can be resolved by restarting the Windows Explorer process through Task Manager
• Third-party file managers or shell extensions might override Windows 11 native extension display settings, requiring temporary disabling of these applications to test the configuration
