
“I’ve just upgraded to Windows 11 and connected my second monitor, but my computer doesn’t seem to detect it at all. I’ve tried unplugging and reconnecting the cables, but Windows still shows only one display in the settings. This is frustrating because I need dual monitors for my work. Is there something specific to Windows 11 that I’m missing, or is there a way to force Windows to detect my second monitor?”
Why Windows 11 system isn’t detecting your second monitor
When Windows 11 fails to recognize a second monitor, productivity can grind to a halt. Many users rely on multi-monitor setups for multitasking, comparing documents, or running different applications simultaneously. This issue can stem from various causes including outdated drivers, connection problems, or Windows 11-specific display settings. The good news is that most second monitor detection problems can be resolved without technical support using built-in Windows tools and a systematic troubleshooting approach.
Solutions for when Windows 11 doesn’t detect second monitor
This tutorial will guide you through a comprehensive set of troubleshooting steps to resolve second monitor detection issues in Windows 11. We’ll cover everything from basic hardware checks to advanced display settings. These solutions apply to various connection types including HDMI, DisplayPort, and USB-C. You’ll need administrator access to your Windows 11 computer and possibly a different cable for testing purposes.
Aside: When Windows 11 fails to recognize a second monitor, you may experience issues similar to when your Microsoft Teams camera isn’t being recognized. The good news is that most second monitor detection problems can be resolved without technical support using built-in Windows tools and a systematic troubleshooting approach.
Step-by-step fixes when your second monitor is not detected
- Verify physical connections first by ensuring all cables are firmly connected to both the monitor and your computer, checking for any visible damage to the cables or ports, and confirming that your monitor is powered on with the correct input source selected.
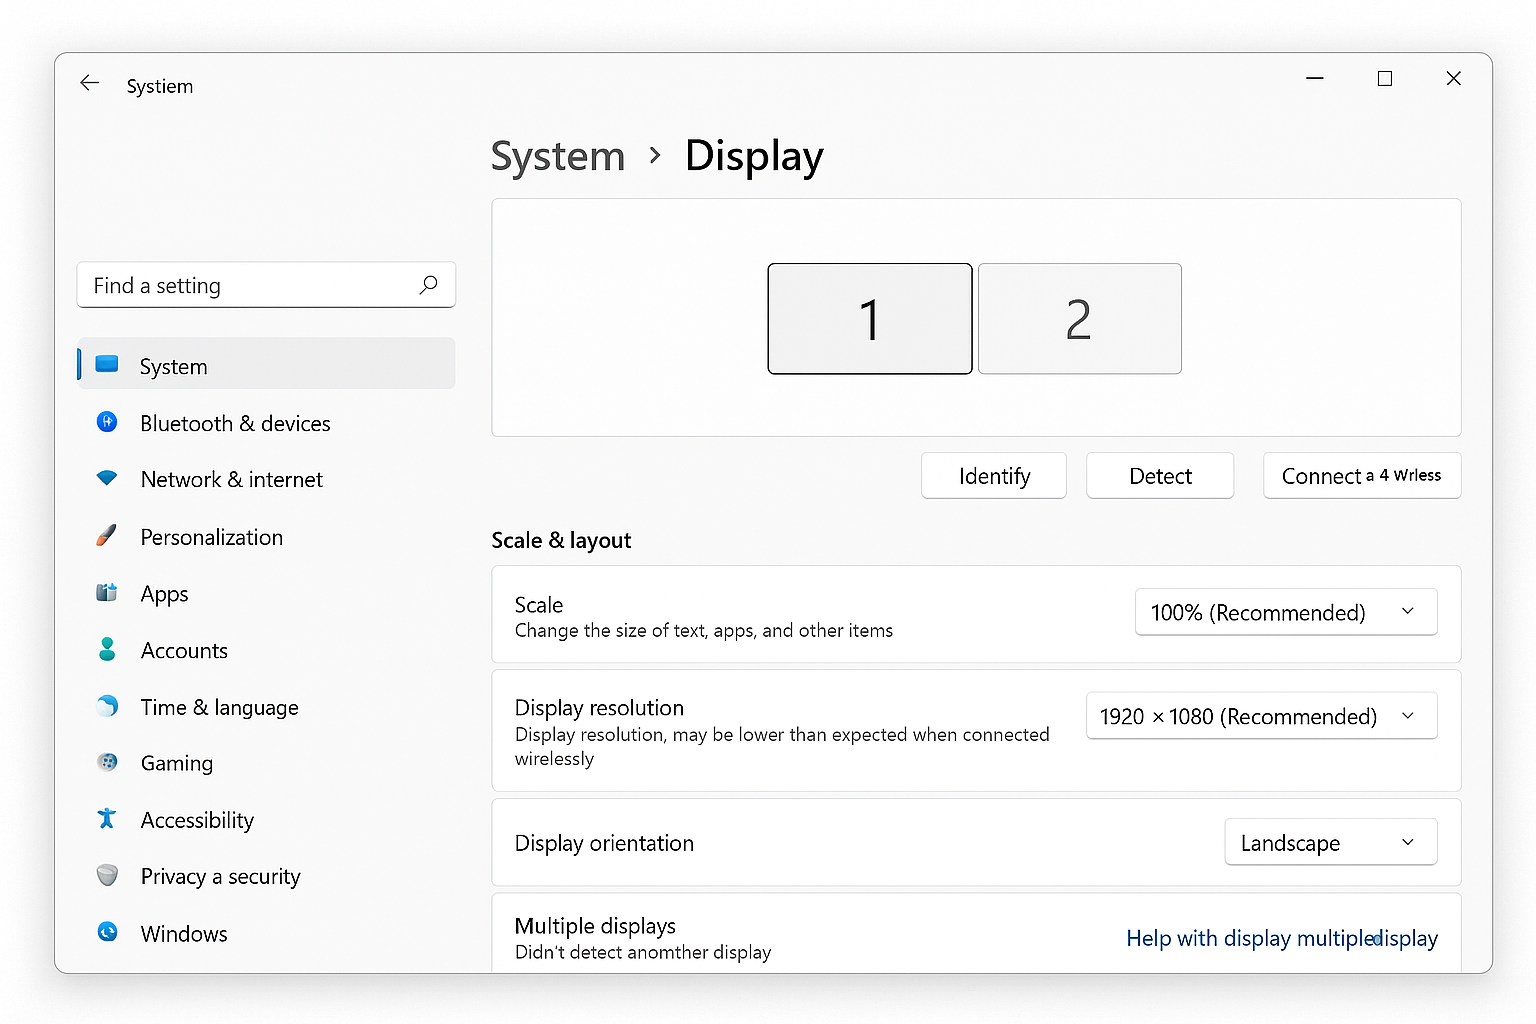
- Force Windows to detect your display by right-clicking on your desktop, selecting “Display settings,” scrolling down to the Multiple displays section, and clicking the “Detect” button to prompt Windows to search for connected displays.
- Update your graphics drivers through Device Manager by right-clicking the Start button, selecting “Device Manager,” expanding “Display adapters,” right-clicking your graphics card, and selecting “Update driver” to ensure you have the latest compatible drivers.
- Try the Windows troubleshooter by opening Settings, navigating to System > Troubleshoot > Other troubleshooters, finding “Hardware and Devices,” and running the troubleshooter which can automatically identify and fix common display connection issues.
- Check your display output settings by pressing Windows key + P to open the Project menu, then selecting “Extend” or “Duplicate” instead of “PC screen only” which might be preventing your second monitor from displaying.
- Adjust advanced display settings by opening Display Settings, scrolling to the bottom, clicking “Advanced display,” then “Display adapter properties,” selecting the “Monitor” tab, and ensuring the monitor isn’t disabled or set to an incompatible refresh rate.
- Test different ports and cables if available, as sometimes specific ports may be disabled in BIOS or the cable might be faulty, so trying alternative connections can help isolate hardware-specific issues.
- Reset display settings as a last resort by right-clicking on the desktop, selecting “Display settings,” scrolling to the bottom, clicking “Advanced display settings,” and selecting “Reset all display settings” to return to default configurations.
Note: For business environments, consider creating a standardized troubleshooting document for your IT team that includes these steps plus any organization-specific configurations to streamline support for multi-monitor setups.
If Windows 11 still won’t recognize your monitor
- When Windows shows “We didn’t find another display” despite your monitor being connected, try rebooting both your computer and monitor in the correct order—turn off the computer first, then the monitor, wait 30 seconds, turn on the monitor first, then boot your computer to allow proper device detection during startup.
- If your monitor worked with previous Windows versions but not with Windows 11, check compatibility by visiting the monitor manufacturer’s website for Windows 11 drivers or known issues, as some older monitors may require specific updates to function properly with the newest operating system.
- For laptops with docking stations that aren’t detecting external monitors, try bypassing the dock by connecting the monitor directly to your laptop’s video port, which can help determine if the issue is with the docking station rather than Windows 11 itself.
- When graphics drivers keep reverting or causing issues, consider using Display Driver Uninstaller (DDU) in safe mode to completely remove current drivers before installing fresh ones directly from your graphics card manufacturer’s website rather than through Windows Update.
- If your monitor is detected but shows a black screen, adjust the resolution settings by right-clicking on the desktop, selecting “Display settings,” selecting the problematic monitor, and trying a lower resolution that might be better supported by your monitor or connection type.
- For laptops with docking stations that aren’t detecting external monitors, try bypassing the dock by connecting the monitor directly to your laptop’s video port. This is similar to how you might need to troubleshoot PowerPoint display issues by testing different connection methods.
Asked Questions
How do I check if my graphics card supports multiple monitors in Windows 11?
Open Device Manager and expand Display adapters. Right-click your graphics card and select Properties, then check the Details tab. Look for the hardware IDs and search them on the manufacturer’s website to verify multi-monitor support. Most modern graphics cards support at least two displays, but older integrated graphics may have limitations.
Can I use different cable types for each monitor?
Yes, you can mix connection types such as HDMI for one monitor and DisplayPort for another, as long as your graphics card has the appropriate ports. However, ensure both cables support the resolution and refresh rate you need. Some graphics cards may prioritize certain ports, so check your GPU documentation if one monitor consistently fails to detect.
Why does my second monitor only work in BIOS but not in Windows 11?
This indicates a driver issue rather than hardware failure. BIOS uses basic display protocols that don’t require specialized drivers, while Windows 11 needs proper graphics drivers. Boot into Safe Mode and reinstall your graphics drivers from the manufacturer’s website. You may also need to disable Secure Boot temporarily if driver installation fails.
What should I do if Windows 11 detects the monitor but labels it as a generic PnP display?
Navigate to Device Manager, expand Monitors, right-click the generic PnP monitor, and select Update driver. Choose “Browse my computer for drivers” and then “Let me pick from a list of available drivers.” Select the correct monitor model if available, or download the specific driver from the monitor manufacturer’s support page.