Resizing a folder of photos one file at a time is slow, and using the wrong batch option can crop pictures or overwrite the only full-size copies. Microsoft PowerToys Image Resizer adds a batch command to File Explorer, so you can select every photo in a folder, choose one size, and process the selection in a single pass.
The safest method creates resized copies beside the originals. This tutorial shows that workflow first, then explains how to send copies to a subfolder, preserve proportions, avoid enlarging small pictures, and resolve the most common problems.
Prepare the folder before resizing anything
Install Microsoft PowerToys from the Microsoft Store, GitHub release, or Windows Package Manager. Open PowerToys Settings, select Image Resizer in the left navigation, and confirm that the utility is enabled. You normally do not need administrator rights to resize photos in a folder you can already edit.
Pick a useful target size
Choose dimensions for the place where the pictures will be used. A maximum width of 1600 pixels is often comfortable for documents, email, or web uploads, while a smaller preset may be better for thumbnails. If only one dimension matters, leave the other dimension automatic so Image Resizer calculates it from the original aspect ratio.
Use Fit when the complete picture must remain visible. Fit scales the image proportionally inside the selected dimensions and does not crop it. Fill also keeps the proportions but crops the edges when necessary, while Stretch forces the exact dimensions and can distort people or objects.
Keep the batch limited to photos
Move or copy the source pictures into one working folder before using Ctrl+A. If the folder also contains documents, videos, or subfolders, filter by Type or search for an extension such as *.jpg, then select only the image results.
Screenshots may be stored somewhere other than the folder you expect. If those are part of the batch, first trace the captures back to their save folder and copy the required files into the working folder.
Resize every selected photo in File Explorer
The following sequence keeps the original files and creates clearly named copies:
- Press Windows+E to open File Explorer and browse to the folder that contains the source photos.
- Select the photos. Press Ctrl+A only when the folder or filtered results contain nothing you want to exclude.
- Right-click any selected picture and choose Resize with ImageResizer. On some Windows 11 menus, you may need to choose Show more options first.
- Select a preset or choose Custom, enter the maximum width and height, and set the mode to Fit.
- Turn on Make pictures smaller but not larger. This prevents a small image from being enlarged to the target dimensions and becoming softer.
- Leave Replace the originals off for the first run. Select Resize and wait for the copies to appear.
- Open several resized files, including one landscape image and one portrait image, and confirm that the framing, orientation, and readable details look right.
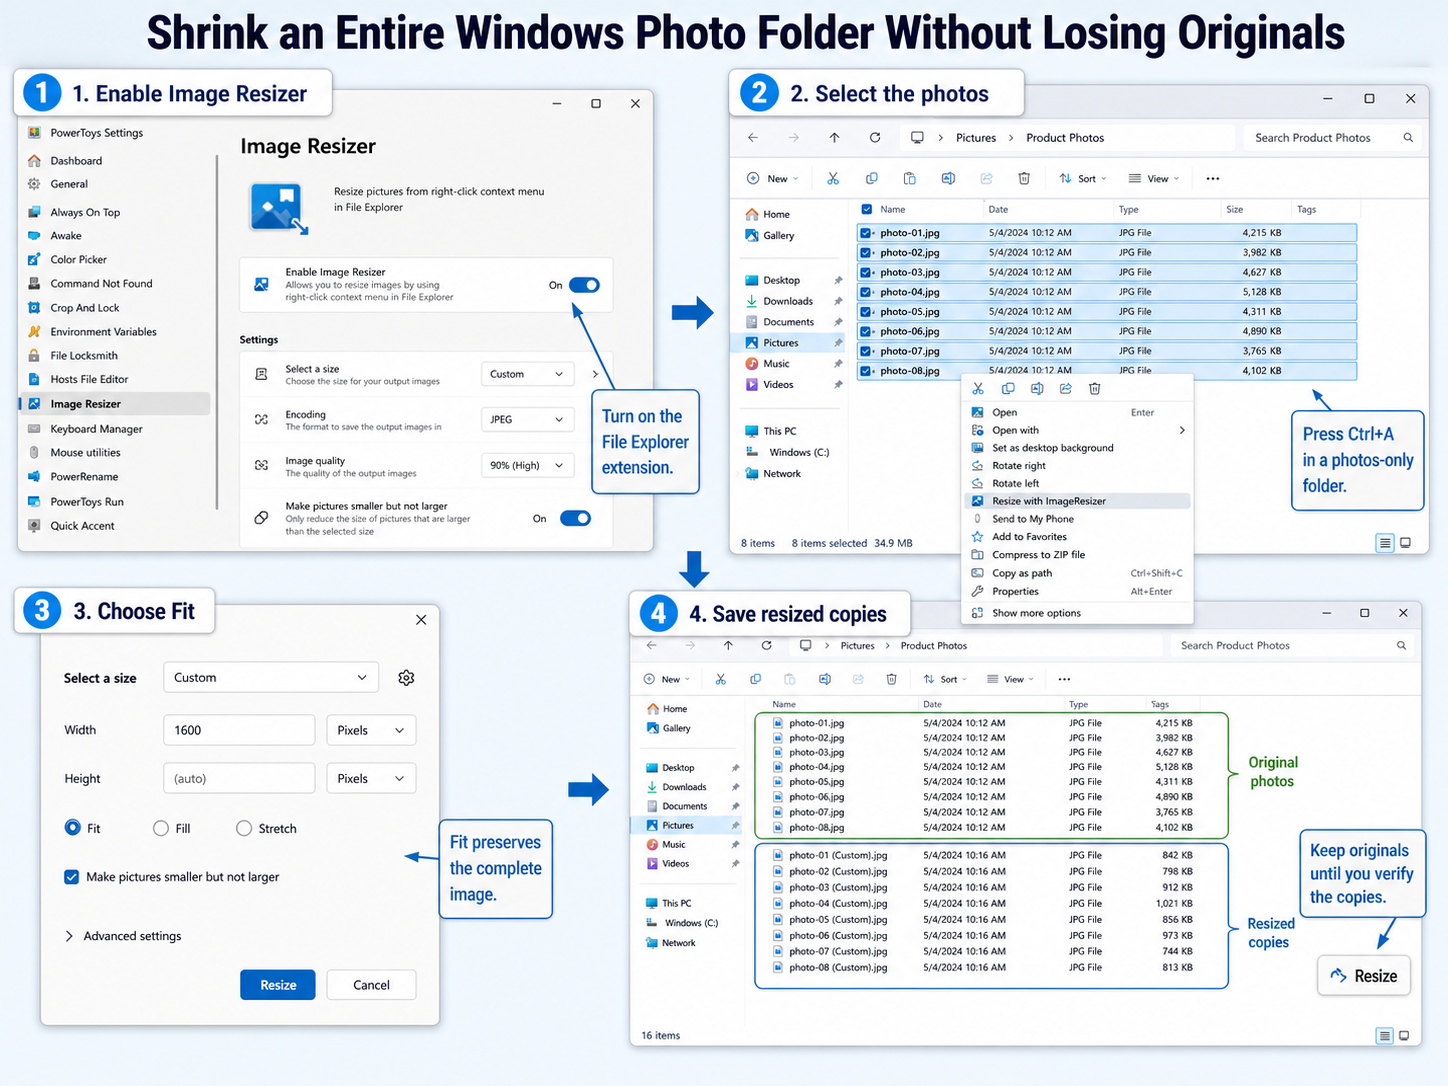
Image Resizer uses a filename pattern to distinguish its output. The default pattern commonly adds the selected size name, producing a copy such as photo-01 (Custom).jpg. If you repeat the job with a different preset, check the names carefully so you do not confuse earlier and later output.
Protect image quality and organize the output
Batch resizing changes pixel dimensions, and JPEG output may also use the quality setting configured in PowerToys. It cannot add real detail to a small source picture. Keeping Make pictures smaller but not larger enabled is therefore a sensible default for mixed folders.
Separate Fit, Fill, and orientation behavior
Use Fit for product photos, screenshots, scanned receipts, or any picture where the edges contain important information. Use Fill only when every result must occupy the same frame and you accept cropping. Reserve Stretch for rare cases where exact dimensions matter more than natural proportions.
PowerToys also offers Ignore the orientation of pictures. When enabled, the width and height can be swapped to match portrait or landscape orientation. Leave it off when a fixed width and height have a specific meaning, and test both orientations before processing a large archive.
Keep formats visible while you review
Image Resizer tries to save a resized file in its original format. Its fallback encoder is used when Windows can read a format but cannot save back to it; Microsoft specifically notes that this is not a general file-conversion feature.
During review, it helps to display JPG, PNG, and other suffixes beside the names. That makes it easier to see whether a folder mixes formats and to spot any output that used the fallback encoder.
For a tidier result, open PowerToys Settings > Image Resizer and adjust the filename format. A directory pattern such as %2\%1 stores output in a subfolder named after the selected size, while %1 (%2) keeps resized copies beside the originals. Test a pattern on two files before applying it to hundreds.
Fix a batch that does not behave as expected
- The context-menu command is missing: Confirm Image Resizer is enabled in PowerToys, then reopen File Explorer. Also check Show more options in the Windows 11 context menu.
- Some files were not resized: Verify that the missing items are image files and that you selected them rather than only selecting the folder. Cloud-only OneDrive files may need to finish downloading before a local utility can process them.
- The output looks cropped: Run the batch again with Fit instead of Fill. Fit preserves the entire image, although the final width or height may be smaller than the entered box.
- Small photos look blurry: Enable Make pictures smaller but not larger and return to the originals. Enlarging changes pixel dimensions but does not recreate lost detail.
- Portrait and landscape photos have inconsistent dimensions: Review the Ignore the orientation of pictures setting and test one example of each orientation before processing the full folder.
- Copies are difficult to identify: Use a filename pattern that includes
%2, the preset name, or route each preset into its own subfolder.
Questions you might have
Can Image Resizer process photos inside subfolders automatically?
The File Explorer command works on the image files you select, so Ctrl+A in a parent folder does not recursively select pictures inside every nested folder. Open and process each subfolder separately, or use the Image Resizer command-line interface when you need a carefully controlled automated workflow. Test any automation on copied files first.
Can I resize a mixture of JPG and PNG files together?
Yes, you can select supported image formats in the same batch. Image Resizer attempts to preserve each source format, so JPG and PNG results can remain different file types. Review transparency in PNG files and image quality in JPEG files before deleting or archiving the originals.
Does resizing remove photo metadata?
Do not assume resizing removes location, camera, or other metadata. The Image Resizer command-line interface provides a --remove-metadata option, but the normal right-click workflow should be treated as a resizing task rather than a privacy-cleaning tool. Inspect metadata separately before sharing sensitive photos.
Can I send the resized files to another folder?
Yes. Configure a subdirectory in the Image Resizer filename pattern, or right-drag selected images to a destination and use the Image Resizer action offered there. A dedicated output folder is useful when the resized set will be uploaded, emailed, or handed to another person.
A safer batch habit
Run the first batch on copies, use Fit, and keep enlargement disabled