Can you integrate Microsoft Planner with Teams to track meeting action items?
Many professionals struggle to keep track of action items and decisions made during Microsoft Teams meetings, often relying on scattered notes or separate task management tools that disconnect meeting discussions from actual work execution. I personally solve this challenge by integrating Microsoft Planner directly within Teams so that i can capture meeting outcomes and transform them into trackable tasks that team members can access without switching applications. This is similar to how you can manage tasks in Microsoft Teams channels, Planner integration streamlines your workflow management.
Enable Planner in Teams to streamline collaborative workflows
Microsoft Teams and Microsoft Planner work together to bridge the gap between meeting discussions and task execution, allowing teams to document action items in real time and assign ownership immediately after decisions are made.
This tutorial demonstrates how to add Planner as a tab within your Teams channels, connect existing plans to specific teams, and configure your workspace so meeting participants can view and update tasks without leaving the Teams environment. You will learn multiple methods for integrating Planner, including creating new plans directly in Teams and linking plans that already exist in your Microsoft 365 tenant. The only prerequisites are an active Microsoft 365 subscription with Teams and Planner licenses, and appropriate permissions to add tabs within your target Teams channel or private team.
Creating a Planner in Teams and adding existing plans
You can integrate Microsoft Planner into your Teams workspace using several approaches depending on whether you need to start fresh or connect existing task boards to your collaboration channels.
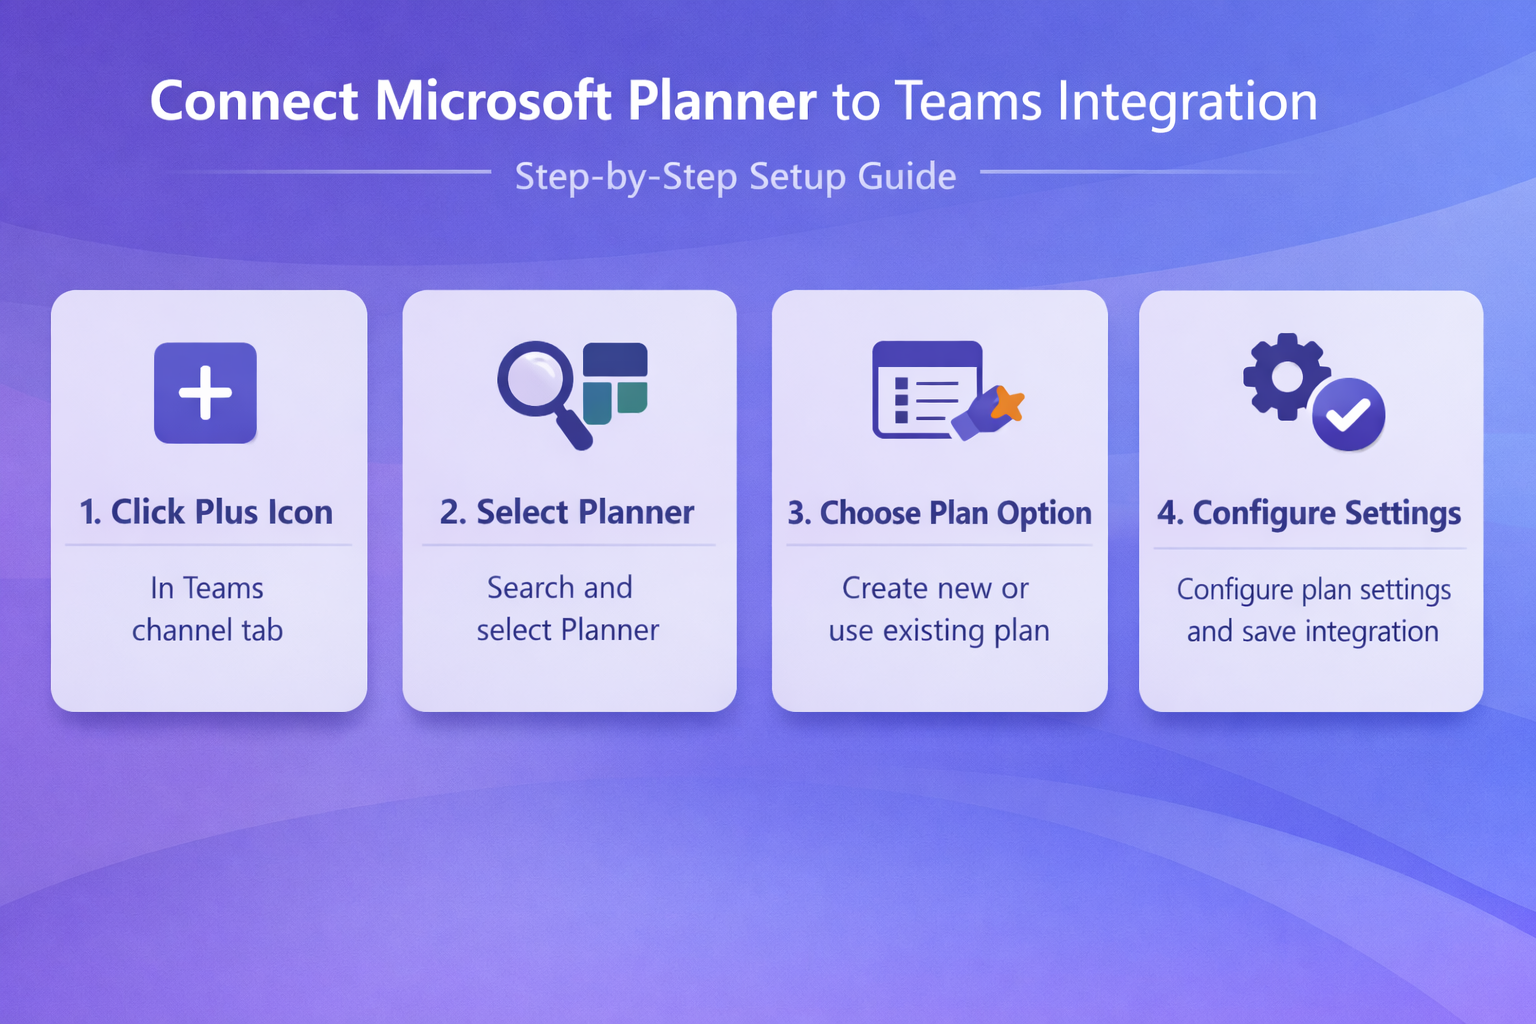
Open Planner in Teams by adding it as a channel tab
Navigate to the Teams channel where you want to track meeting tasks, then select the plus icon located at the top of the channel next to your existing tabs like Files and Posts. A dialog box appears displaying available apps and services that you can add as tabs to enhance your channel functionality. Type “Planner” into the search box to filter the available options, then select the Planner icon from the results to begin the configuration process. The system prompts you to choose between creating a new plan or adding an existing Planner board that may already contain tasks related to your team projects. If you select “Create a new plan,” Teams generates a fresh Planner board automatically linked to your channel, naming it after the channel by default though you can customize this name immediately. Alternatively, choosing “Use an existing plan from this team” displays a dropdown menu listing all Planner boards already associated with your Teams workspace, allowing you to select the appropriate board and click Save to complete the integration.
Expert Tip: When you create a new plan directly from a Teams channel tab, Microsoft automatically creates a corresponding Microsoft 365 Group that synchronizes membership between Teams and Planner, ensuring consistent access permissions.
Connect Microsoft Planner to Teams through the Teams app menu
Access the Apps section by clicking the three-dot menu icon on the left navigation rail of Microsoft Teams, which opens the app marketplace where you can browse and install additional functionality. Search for “Planner” using the search bar at the top of the Apps window, then select the Microsoft Planner app from the results to view its details and installation options. Click the “Add” button to install Planner as a personal app in your Teams environment, which makes it accessible from your left navigation bar for quick access across all teams. Once installed, you can pin Planner to your navigation rail by right-clicking the Planner icon and selecting “Pin,” ensuring it remains visible whenever you need to review tasks without navigating through multiple menus. This method provides organization-wide access to all your Planner boards rather than limiting visibility to a single channel, making it ideal for users who manage multiple projects simultaneously.
Adding existing Planner to Teams channels for centralized collaboration
If your organization already uses Microsoft Planner and has established task boards with historical data and ongoing projects, you can connect these existing plans to Teams channels rather than starting from scratch. Open the Teams channel that corresponds to the project or work stream managed by your existing Planner board, ensuring that the channel members align with the Planner board participants for consistent collaboration. Click the plus icon to add a new tab, select Planner from the app options, then choose “Use an existing plan” when prompted during the setup dialog. The dropdown menu displays all plans associated with the Microsoft 365 Group underlying your Teams workspace, but if your desired plan does not appear, you may need to verify that both the Teams channel and Planner board share the same Group membership. After selecting the appropriate plan and clicking Save, you can configure whether to post a notification to the channel announcing the new tab, which helps inform team members about the integration and encourages adoption.
Remember: Teams channels and Planner boards both rely on Microsoft 365 Groups for permission management, so membership synchronization is essential for seamless integration and proper access control.
Common issues when enabling Planner within Teams
- Teams administrators and end users occasionally encounter obstacles when attempting to integrate Microsoft Planner with Teams channels, but most challenges have straightforward resolutions that restore functionality quickly.
- The Planner app does not appear in the Teams app marketplace search results, which typically indicates that your organization’s IT administrator has disabled Planner through the Teams admin center app permission policies. Contact your Microsoft 365 administrator to request that they enable the Planner app for your security group or tenant-wide, and verify that your user account has the necessary Planner license assigned through the Microsoft 365 admin portal.
- You successfully add a Planner tab to your Teams channel, but the “Use an existing plan” dropdown appears empty even though you know Planner boards exist in your organization. This occurs because only Planner boards associated with the same Microsoft 365 Group as your Teams workspace appear in the dropdown menu, so plans created independently or belonging to different groups remain hidden. Navigate to Planner directly through the web interface or the standalone app, locate your desired plan, then modify its group membership or create a new plan within the correct group context.
- Team members report that they cannot view or edit tasks in the Planner tab you added to a Teams channel, receiving permission errors or seeing a blank screen instead of the expected task board. Permission mismatches happen when users belong to the Teams channel but are not members of the underlying Microsoft 365 Group that controls Planner access, which can occur if someone manually added them to the channel without group membership. Add the affected users to the Microsoft 365 Group associated with your Teams workspace through the Teams settings menu, or ask them to leave and rejoin the team properly to synchronize permissions.
- The Planner tab displays outdated task information or changes made in Teams do not sync to the standalone Planner app, creating confusion about the current status of action items and assignments. This synchronization delay usually resolves within a few minutes, but persistent issues may indicate browser cache problems or service disruptions, so try refreshing the Teams tab, clearing your browser cache, or checking the Microsoft 365 Service Health dashboard for reported outages affecting Planner or Teams integration services.