How can I quickly spot differences between two versions of the same spreadsheet without manually reviewing hundreds of rows?
Many professionals receive updated budget files, inventory lists, or project trackers and need to identify what changed between versions. Manually comparing two Excel files cell by cell consumes valuable time and increases the risk of overlooking critical updates. Microsoft Copilot offers intelligent assistance to streamline this comparison process, helping you identify discrepancies, merge data, and maintain accuracy across your workbooks. This tutorial demonstrates practical methods for comparing and combining Excel files using Copilot, along with techniques for comparing documents in Word.
Spreadsheet comparison challenges and available solutions
Comparing two Excel files becomes necessary when collaborating with team members, tracking version changes, or consolidating data from multiple sources. Traditional comparison methods involve opening both files side by side and visually scanning for differences, which proves inefficient for large datasets.
We will show how to Microsoft Copilot in Excel to compare spreadsheets, identify differences, and combine data from multiple workbooks. You will learn to use Copilot prompts effectively, understand the Compare Files feature in Excel, and apply similar comparison techniques in Word. The methods work with Excel desktop and web versions that support Copilot integration, requiring a Microsoft 365 subscription with Copilot access and appropriate licensing for your organization.
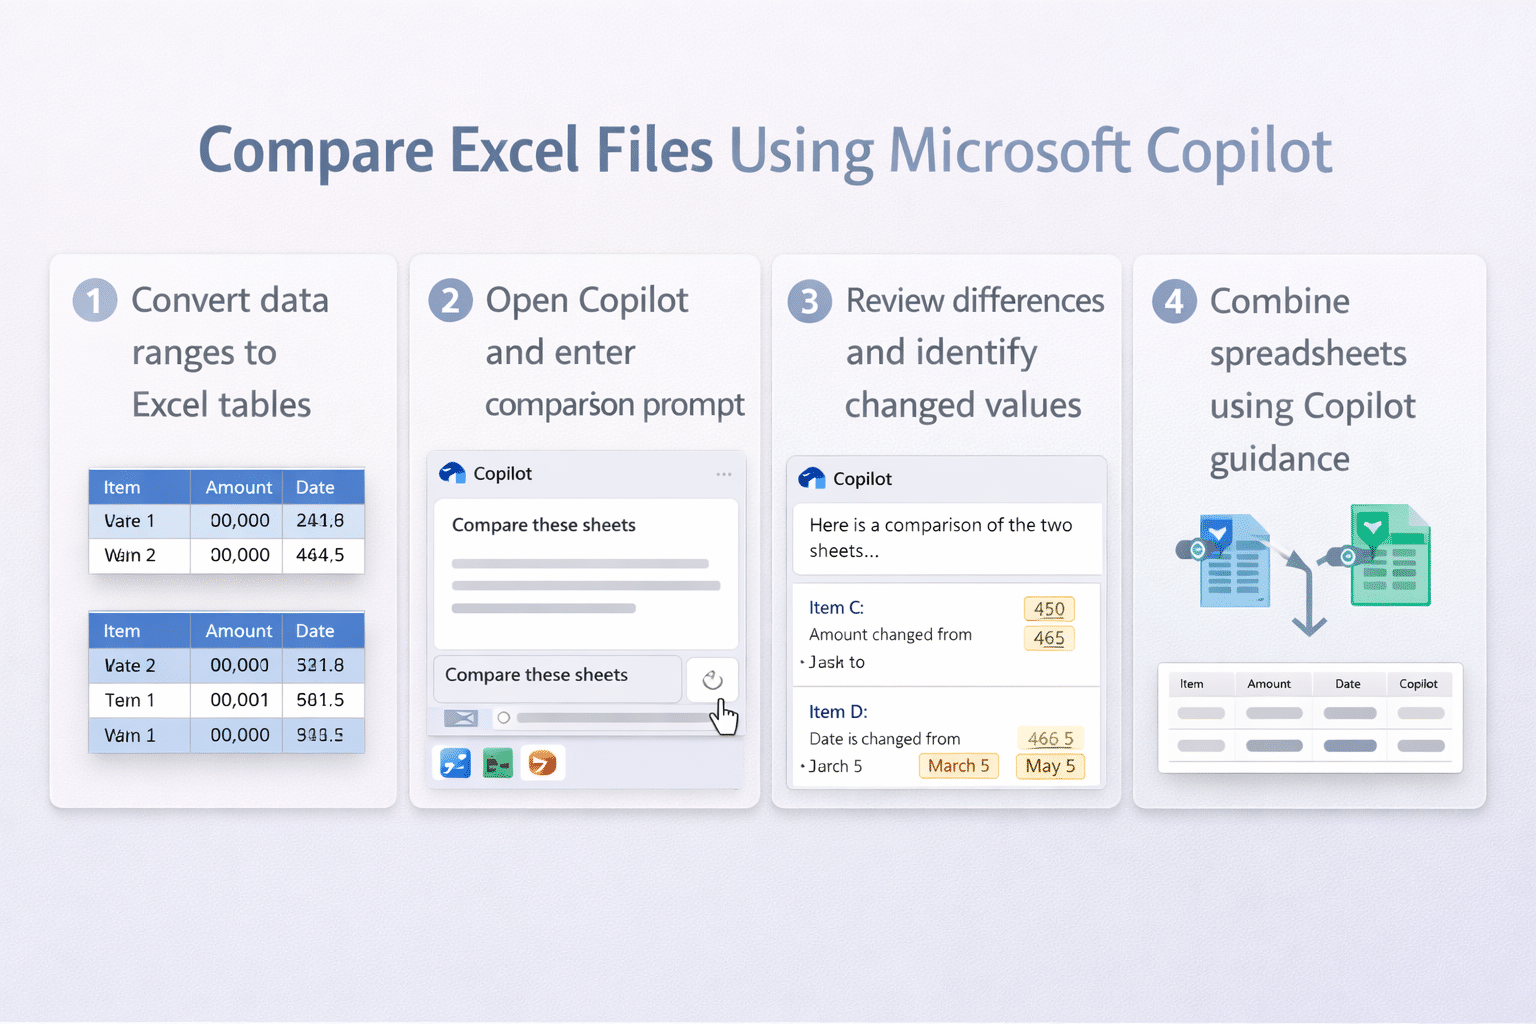
Copilot prompts to identify differences between workbooks
Microsoft Copilot in Excel can analyze your data and respond to natural language queries about differences between sheets or datasets. Begin by opening both Excel files you want to compare and ensuring they contain structured tables rather than unformatted ranges, as Copilot works most effectively with properly formatted Excel tables.
- Open the first Excel file and select the data range you want to compare, then convert it to a table by pressing Ctrl+T or navigating to Insert tab and clicking Table to ensure Copilot can reference the data properly.
- Launch Copilot by clicking the Copilot button in the ribbon or pressing Alt+H then F then Y to activate the Copilot pane on the right side of your Excel window.
- Type a prompt such as “Compare the data in this table with the file named [filename] and highlight any differences in values” to instruct Copilot to analyze discrepancies between the two datasets.
- Review the Copilot response which will summarize key differences, added rows, removed entries, or changed values, and ask follow-up questions like “Which rows have different values in column C” for more specific insights.
- Request Copilot to create a summary by asking “Create a new column showing which rows differ from the comparison file” to visually mark discrepancies directly in your spreadsheet.
Combining multiple spreadsheets with Copilot assistance
When you need to merge data from multiple Excel files into a single workbook, Copilot can guide the consolidation process and help identify overlapping or unique records across sources.
- Open the primary Excel file that will serve as your destination workbook and ensure each source file contains similarly structured data with matching column headers for successful consolidation.
- Access Copilot in the primary workbook and prompt it with “Help me combine data from [filename1] and [filename2] into this sheet, removing duplicate entries based on column A” to receive step-by-step consolidation guidance.
- Follow Copilot’s recommendations which may include using Power Query, the Consolidate feature under Data tab, or creating formulas with VLOOKUP or XLOOKUP functions to merge datasets systematically.
- Ask Copilot “Identify any duplicate records after combining these files” to ensure data integrity and prevent redundant entries in your consolidated workbook, then remove duplicates using the Data tab Remove Duplicates tool.
- Validate the combined dataset by prompting “Summarize the total row count and highlight any missing data from the original files” to confirm all relevant information transferred successfully during the merge process.
Expert Tip: When working with large datasets exceeding 10,000 rows, consider using Power Query for combining spreadsheets instead of manual methods, as it provides better performance and refresh capabilities when source data changes.
Note: For professionals managing complex data workflows, syncing Microsoft Planner and Excel provides automated methods for keeping spreadsheet data current. After consolidating your files, you can generate dashboards in Microsoft Excel with Copilot (guide: here) to visualize the combined data and spot trends that manual comparison might miss.
Common issues when comparing files with Copilot
While Copilot provides powerful assistance for file comparison tasks, you may encounter limitations based on file complexity, licensing restrictions, or data structure incompatibilities that require alternative approaches.
- Copilot may not access files stored outside your Microsoft 365 tenant or in disconnected local folders, so upload both comparison files to OneDrive or SharePoint before attempting to reference them in prompts for reliable access.
- When comparing files with different table structures or mismatched column headers, Copilot struggles to identify corresponding data fields, requiring you to standardize formatting and ensure consistent column names across both spreadsheets before comparison.
- If Copilot returns generic responses without specific difference details, your Excel data might not be formatted as a table, so select your range and press Ctrl+T to convert to table format which enables Copilot to parse the data structure properly.
- Large files exceeding several thousand rows may cause Copilot to timeout or provide incomplete comparisons, in which case you should split the data into smaller segments, compare sections individually, or use Power Query and Excel formulas for more robust large-scale comparisons.