Is Copilot missing from your Word application?
You’ve just opened Microsoft Word expecting to use Copilot for drafting documents, but the feature is nowhere to be found. You check the ribbon, search through menus, and wonder whether you need to download something separately or if your organization hasn’t enabled it yet. This common scenario affects many users who want to leverage AI assistance in their daily document creation tasks.
Enabling Copilot on Word: what you need to know
Microsoft Copilot for Word is an AI-powered assistant integrated directly into Microsoft 365 applications, designed to help you draft, edit, and refine documents more efficiently. Unlike a separate application requiring installation, Copilot appears within Word once your Microsoft 365 subscription includes the Copilot license and your administrator enables it for your account. This tutorial will walk you through verifying your license status, activating Copilot in Word, and accessing it through various methods including keyboard shortcuts and ribbon commands. Before starting, ensure you have a Microsoft 365 subscription that includes Copilot (typically Microsoft 365 Copilot or Copilot Pro) and that your Word application is updated to the latest version available through your organization’s update channel.
Turn on Copilot for Word in your application
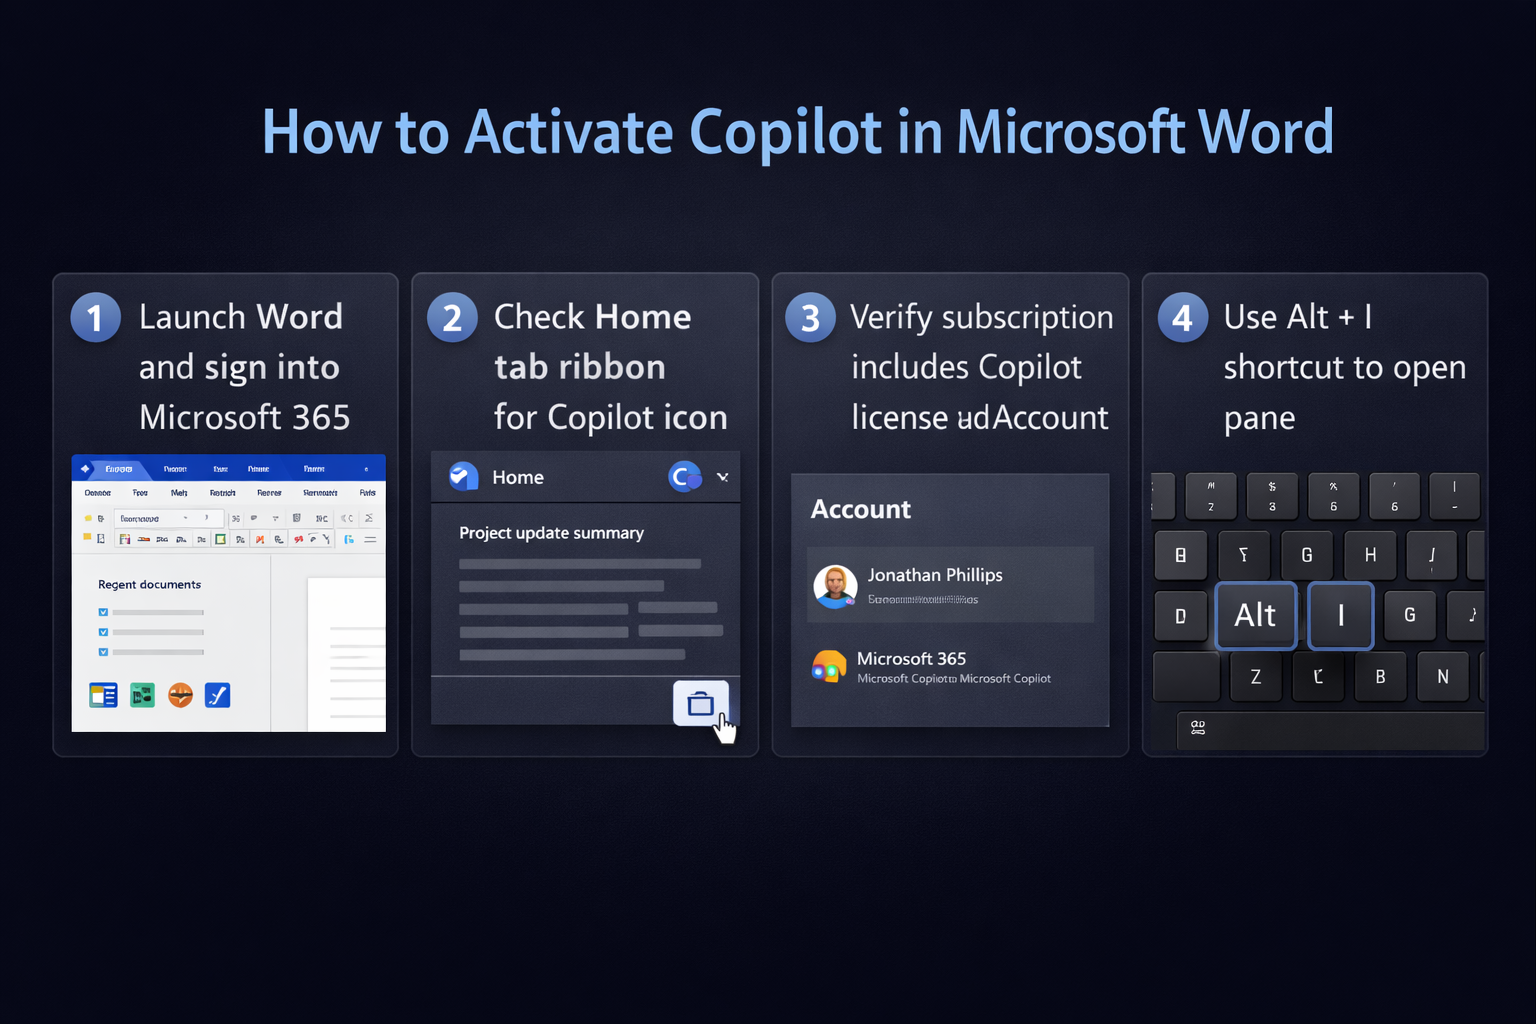
- Launch Microsoft Word on your desktop and sign in with your Microsoft 365 account credentials to ensure your licensing information syncs properly with the application.
- Navigate to the Home tab on the ribbon interface and look for the Copilot icon, which typically appears on the far right side of the toolbar alongside other premium features.
- If the Copilot icon is visible, click it to open the Copilot pane on the right side of your document window where you can begin entering prompts and requests.
- When the Copilot icon is not visible, verify your subscription status by clicking File, then Account, and reviewing the Product Information section to confirm that Microsoft 365 Copilot appears in your active subscriptions list.
- Contact your Microsoft 365 administrator if Copilot does not appear in your subscription details, as they may need to assign the Copilot license to your account through the Microsoft 365 admin center.
- Restart Word completely after your administrator confirms license assignment, as the application needs to refresh its connection to Microsoft services and recognize the new entitlements.
Opening Copilot in Word using shortcuts
- Press Alt + I on Windows or Option + I on Mac to instantly open the Copilot pane without navigating through ribbon menus, providing the fastest access method for frequent users.
- Alternatively, use the slash command by typing /draft directly in your document to trigger Copilot’s drafting assistance inline without opening the separate pane interface.
- Access Copilot through the View tab by selecting Copilot from the Show section if you prefer menu-based navigation over keyboard shortcuts for feature discovery.
- Right-click selected text in your document and choose “Copilot” from the context menu to immediately ask questions or request rewrites of specific content sections.
Once you’ve mastered basic Copilot functions, you can explore advanced features like using Copilot for Word document creation automation to streamline your workflow, or learn how to rewrite Word documents with Copilot to enhance existing content efficiently.
Insert Copilot in Word documents for immediate assistance
- Position your cursor where you want AI-generated content to appear, then click the Copilot icon in the Home tab to open the prompt interface for content generation.
- Type a descriptive prompt in the Copilot pane such as “Draft a project proposal for implementing new collaboration tools” to generate initial content based on your requirements.
- Review the generated content that appears in the Copilot pane preview area before deciding whether to insert it into your document or request revisions with modified prompts.
- Click “Keep it” to insert the AI-generated content at your cursor position, or select “Regenerate” to produce alternative versions if the initial output doesn’t meet your needs.
- Use the “Adjust” options to modify tone, length, or format of generated content, allowing you to refine outputs without rewriting prompts from scratch repeatedly.
Important Tip: Copilot works best with specific, detailed prompts. Instead of asking “write about marketing,” try “create a three-paragraph overview of digital marketing strategies for small businesses in 2026.”
Troubleshooting common activation issues
- If Copilot fails to appear after license assignment, navigate to File, Account, and click “Update Options” followed by “Update Now” to ensure your Word application downloads the latest features and capabilities from Microsoft servers.
- When you encounter “Copilot is not available” messages despite having a valid license, sign out of your Microsoft 365 account completely from Word, close the application, then reopen and sign back in to refresh authentication tokens.
- For persistent licensing errors displaying messages like “Your organization hasn’t enabled Copilot,” ask your administrator to verify in the Microsoft 365 admin center that Copilot licenses are both purchased and assigned to your user account specifically.
- If the Copilot pane opens but displays connection errors or fails to generate responses, check your network firewall settings to ensure that traffic to Microsoft AI services endpoints is not blocked by corporate security policies.
Expert Tip: Some organizations deploy Copilot in phases. If colleagues have access but you don’t, your account might be in a later rollout group. Check with IT about your organization’s deployment timeline.