“How can I convert multiple Excel worksheets to CSV format while preserving special characters?”
I need to share data from our quarterly sales workbook with an external analytics system that only accepts CSV files. The workbook contains multiple tabs with regional data, including international characters and specific formatting. Is there a way to efficiently convert these Excel sheets to CSV format without losing data integrity or doing it manually for each tab?
Converting Excel workbooks to CSV for data sharing
Organizations frequently need to exchange data between systems that use different formats. While Excel workbooks (.xlsx) are excellent for analysis and visualization, many data processing systems, databases, and third-party applications require comma-separated values (CSV) files. Converting Excel spreadsheets to CSV format is a common requirement when working with data across different systems. Many data analysis tools, database systems, and third-party applications require CSV input rather than native Excel formats. Before starting the conversion process, you may want to check if your Excel data is properly structured for CSV export to ensure optimal results. Proper conversion ensures data integrity across systems and streamlines automated workflows.
Exporting Excel data as CSV files: Methods and approaches
This tutorial covers multiple approaches to convert Excel data to CSV format. We’ll explore manual export options, batch processing for multiple worksheets, and automation techniques using Power Automate. The methods work for Excel on Windows, Mac, and Excel Online, though some advanced features may vary by platform. You’ll need Microsoft Excel (any recent version) and optionally Power Automate for automation scenarios.

Save Excel spreadsheets as CSV files
Basic manual conversion of Excel workbooks to CSV format
- Open your Excel workbook containing the data you want to convert to CSV format and select the worksheet you need to export.
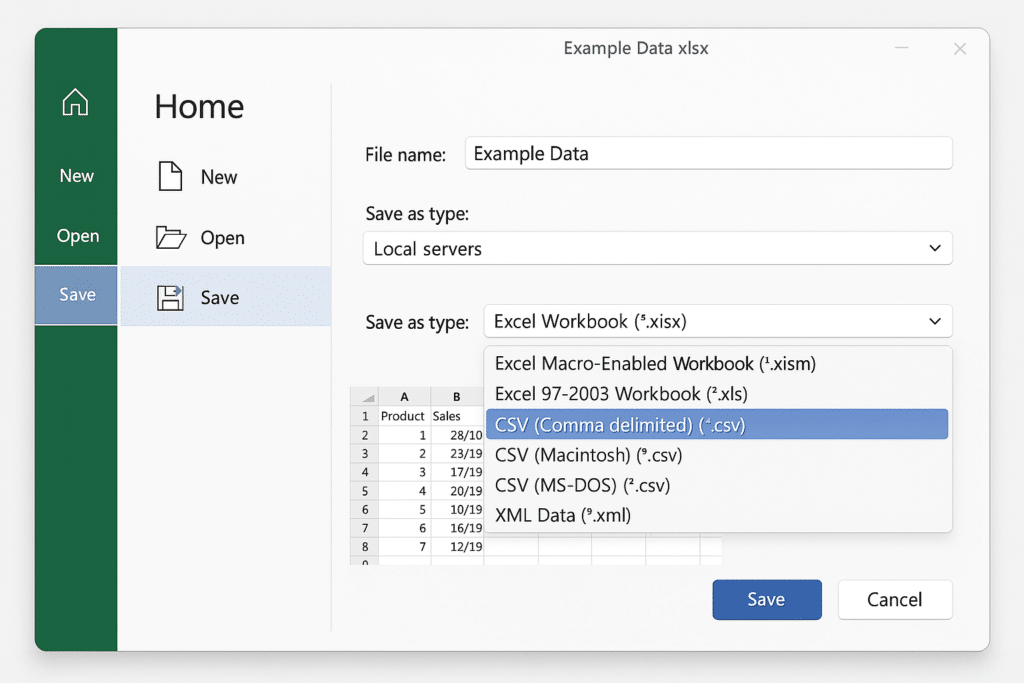
- Navigate to File > Save As in the Excel ribbon, which opens the save dialog where you can specify the file location and format.
- Select CSV (Comma delimited) (*.csv) from the “Save as type” dropdown menu to specify the output format for your data.
- Choose a location for your new CSV file, keeping in mind that only the active worksheet will be saved in this format.
- Click Save and review the warning messages about features not supported in CSV format, as Excel will notify you about potential data or formatting loss.
- For UTF-8 encoding support (important for international characters), use the “Save As” dialog and select “CSV UTF-8 (Comma delimited) (*.csv)” instead of standard CSV.
Batch exporting multiple Excel tabs to CSV files
- Create a simple VBA macro by pressing Alt+F11 to open the Visual Basic Editor, then insert a new module from the Insert menu.
- Copy and paste the following code into the module window to create a macro that will export each worksheet as a separate CSV file:
Sub ExportWorksheetsToCSV()
    Dim ws As Worksheet
    Dim savePath As String

    ' Set the folder path where CSV files will be saved
    savePath = ThisWorkbook.Path & "\"

    ' Loop through each worksheet
    For Each ws In ThisWorkbook.Worksheets
        ' Save current worksheet as CSV
        ws.Copy
        ActiveWorkbook.SaveAs Filename:=savePath & ws.Name & ".csv", _
            FileFormat:=xlCSV, CreateBackup:=False
        ActiveWorkbook.Close SaveChanges:=False
    Next ws

    MsgBox "All worksheets have been exported as CSV files."
End Sub- Run the macro by returning to Excel, pressing Alt+F8, selecting the macro name, and clicking Run to process all worksheets at once.
- Check the same folder as your original workbook to find all the newly created CSV files, each named after its source worksheet.
Automating Excel to CSV conversion with Power Automate
- Create a new automated flow in Power Automate by selecting “Automated cloud flow” and choosing a trigger like “When a file is created” in OneDrive or SharePoint.
- Add an Excel Online (Business) action called “Get tables” to identify and process the Excel file that was uploaded or modified.
- Add a “Convert Excel to CSV” action from the Excel Online connector, configuring it to use the file identifier from the previous step.
- Configure the output settings by specifying the destination location for the CSV file and any naming conventions you want to apply.
- Add notification actions if you want to be alerted when conversions complete, such as sending an email or Teams message with the CSV file location.
Common issues when exporting Excel to CSV
- Special characters appear corrupted in the CSV output – This typically occurs due to encoding issues; solve this by specifically choosing “CSV UTF-8” format when saving, which preserves international characters and symbols better than standard CSV.
- Formulas are replaced with values in the exported CSV file – CSV format cannot store formulas, only their calculated results; if you need to preserve formulas, keep a copy of the original Excel file as a master and use CSV only for data exchange.
- Complex formatting like conditional formatting, colors, and merged cells disappears – CSV is a plain text format that doesn’t support Excel’s visual formatting; consider using Power Query to transform data before export if specific formatting is crucial for interpretation.
- Date formats change unexpectedly in the CSV output – Different systems interpret dates differently in CSV files; use explicit date formatting in Excel before export (like YYYY-MM-DD) or include a data dictionary explaining date formats for recipients.
- Decimal separators change when opening the CSV in different regions – CSV files use the system’s regional settings when opened; for consistent decimal handling across regions, consider setting explicit number formatting or include processing instructions for recipients.
