Microsoft Teams lets you blur the room behind you before you join a meeting or after the call has started. The controls are close to the camera preview, but their names and placement differ between desktop and mobile.
This guide is a focused reference for those camera controls. It covers the two desktop blur choices, the paths to use at each stage of a meeting, what Teams remembers, and what to check when the effects panel is missing.
Decide which blur effect fits the call
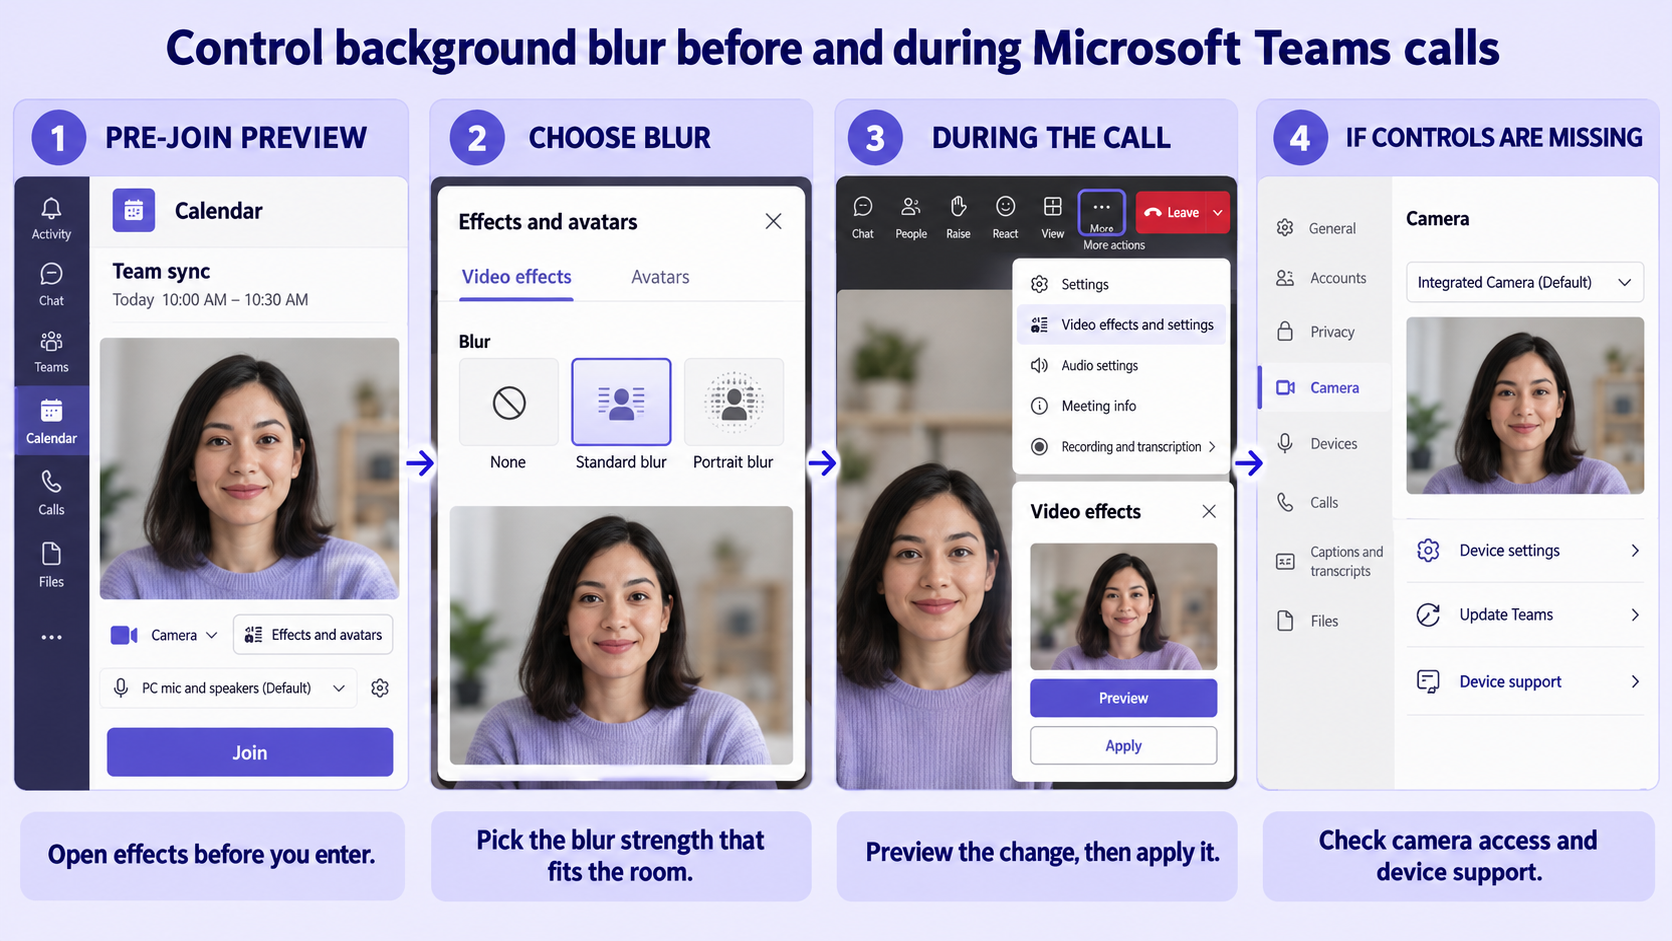
On the Teams desktop app, the Blur control can offer Standard blur and Portrait blur. Both reduce background detail, but they create different results around your face and body. Availability can vary by device, so seeing only one blur choice does not necessarily mean your installation is broken.
Standard blur hides more of the room
Standard blur is the safer choice when privacy matters most. It strongly softens the entire background while trying to keep you in focus. Use it when shelves, paperwork, people moving behind you, or other room details should be less recognizable.
Blur is still a visual effect, not a privacy barrier. Microsoft warns that blurring or replacing a background may not prevent sensitive information from being visible. Move confidential material out of the camera frame before joining.
Portrait blur keeps a more natural depth effect
Portrait blur applies a lighter, portrait-style separation between you and the background. It can look more natural when the room is already tidy and you only want to reduce distraction. If edges around hair, glasses, or moving hands look uneven, switch to Standard blur and preview again.
Teams remembers the selected effect
Your chosen background effect persists across later meetings and calls until you change it. That behavior is convenient, but it also means you should check the preview when you move to a different room or camera. Select None when you want to remove the effect completely.
Blur the background from the pre-join screen
The pre-join preview is the best place to set blur because you can inspect the result before anyone else sees your video.
- Open the meeting from the Teams calendar and select Join.
- Turn on the Camera toggle so the preview can show the effect.
- Select Effects and avatars on the pre-join screen.
- Open the arrow beside Blur, then choose Standard blur or Portrait blur when both are offered.
- Check the outline around your head and shoulders, confirm the correct camera is selected, and join the meeting.
The same panel also contains Teams backgrounds and the option to add your own image. If blur is not the look you need, setting up a consistent room replacement can be useful for recurring customer calls or presentations. Keep this article’s blur workflow separate from that broader background-customization task.
Change blur while the meeting is running
You do not need to leave a call to correct an exposed or distracting background. Microsoft documents the in-meeting path through the meeting toolbar:
- Select More actions in the meeting controls.
- Choose Video effects and settings.
- Select Video effects, open the arrow beside Blur, and choose the blur style.
- Select Preview to inspect the change privately.
- Select Apply when the edges and background look right.
Depending on the Teams layout available to your account, the arrow beside Camera may also expose background choices. The full Video effects and settings panel remains the clearest route when you need Preview and Apply.
Use the shorter mobile path
Mobile labels differ from desktop
In the Teams mobile app, the pre-join control is named Background effects, not Effects and avatars. Tap it, choose an effect, preview the result, and tap Done. During a meeting, tap More > Background effects, select the effect, and tap Done again.
Microsoft says the chosen mobile effect also persists until you change it. If Background effects is absent, the feature may not be available on that device. Android support also depends on the operating system and graphics hardware, so an updated app alone may not add the control to older phones.
Work through missing blur controls logically
When Effects and avatars does not appear
First confirm that the camera can produce a live preview. Close other apps that may be using the camera, select the intended camera in Teams, and restart the app. Then reopen the meeting’s pre-join screen and check again.
Device and environment limits matter. Microsoft notes that background effects are unavailable on Linux and in optimized virtual desktop infrastructure. A device may also omit the option when it cannot support the feature, so compare the same account on a supported desktop before treating the problem as an account policy issue.
In a browser, verify that the Teams site can use the camera. Chrome, Edge, Firefox, and Safari each expose camera permissions in their site settings. If the preview is blank or permission is denied, this camera access checklist walks through the operating-system and app permissions that can block video before effects are even loaded.
If the camera works but the effects panel is still missing, update Teams and test the desktop app rather than the browser. Managed organizations may restrict features, so provide IT with the client type, device model, operating system, and whether the control appears on another supported device.
Questions about Teams background blur
Can I turn on blur without turning on my camera?
You can open the effects controls before joining, but a live camera preview is the practical way to judge the result. Turn the camera on in the pre-join screen, apply the effect, and inspect the edges before entering the meeting.
Why do I see Standard blur but not Portrait blur?
Effect availability depends on the device and client. Standard blur is the more broadly useful fallback when Portrait blur is not offered. Update Teams and compare with the desktop app on a supported computer before spending time changing unrelated account settings.
Will background blur stay on for my next meeting?
Yes. Microsoft states that the selected background persists across meetings and calls until you change it. Use the pre-join preview as a quick reminder, especially when moving between a home office, shared workspace, and conference room.
Does blur guarantee that private details are hidden?
No. Blur can reduce recognizable detail, but it may leave shapes, movement, or objects partly visible. Remove confidential papers and screens from the camera frame, and use Standard blur when you need stronger visual separation.
Keep the camera preview as your final check
Use the pre-join screen whenever possible, choose the blur strength that matches the room, and confirm the result around moving edges. During a call, use More actions > Video effects and settings to make a controlled change without leaving. If the control is absent, separate a camera-permission problem from a device-support limitation before escalating it to IT.