A Teams call test is a fast way to catch the wrong microphone, silent speaker, or unavailable camera before other people join. Microsoft Teams includes a Test Call Bot in the desktop app, so you can record a short message, hear it played back, and review a device summary without calling a colleague.
This built-in test is different from creating a private practice meeting. It focuses on the microphone, speaker, and camera selected by Teams. It does not fully simulate a real meeting’s network load, organizer policies, screen sharing, or Bluetooth behavior over a long call.
What the Teams test call actually checks
The test confirms that Teams can open the selected input and output devices at that moment. The bot plays instructions through your chosen speaker, records a short message through your chosen microphone, and plays the recording back. Teams also shows the camera during the call and displays a summary when the test ends.
Use the result as three separate signals:
- If you hear the bot but not your recording, inspect the microphone selection or mute state.
- If you cannot hear the bot, inspect the speaker, headset connection, and output volume.
- If the camera preview is blank or frozen, choose the correct camera and check system permission.
A passing result proves the basic device path works. It does not guarantee that a different headset will remain connected later or that another participant’s device is working correctly.
Run the Test Call Bot from Teams settings
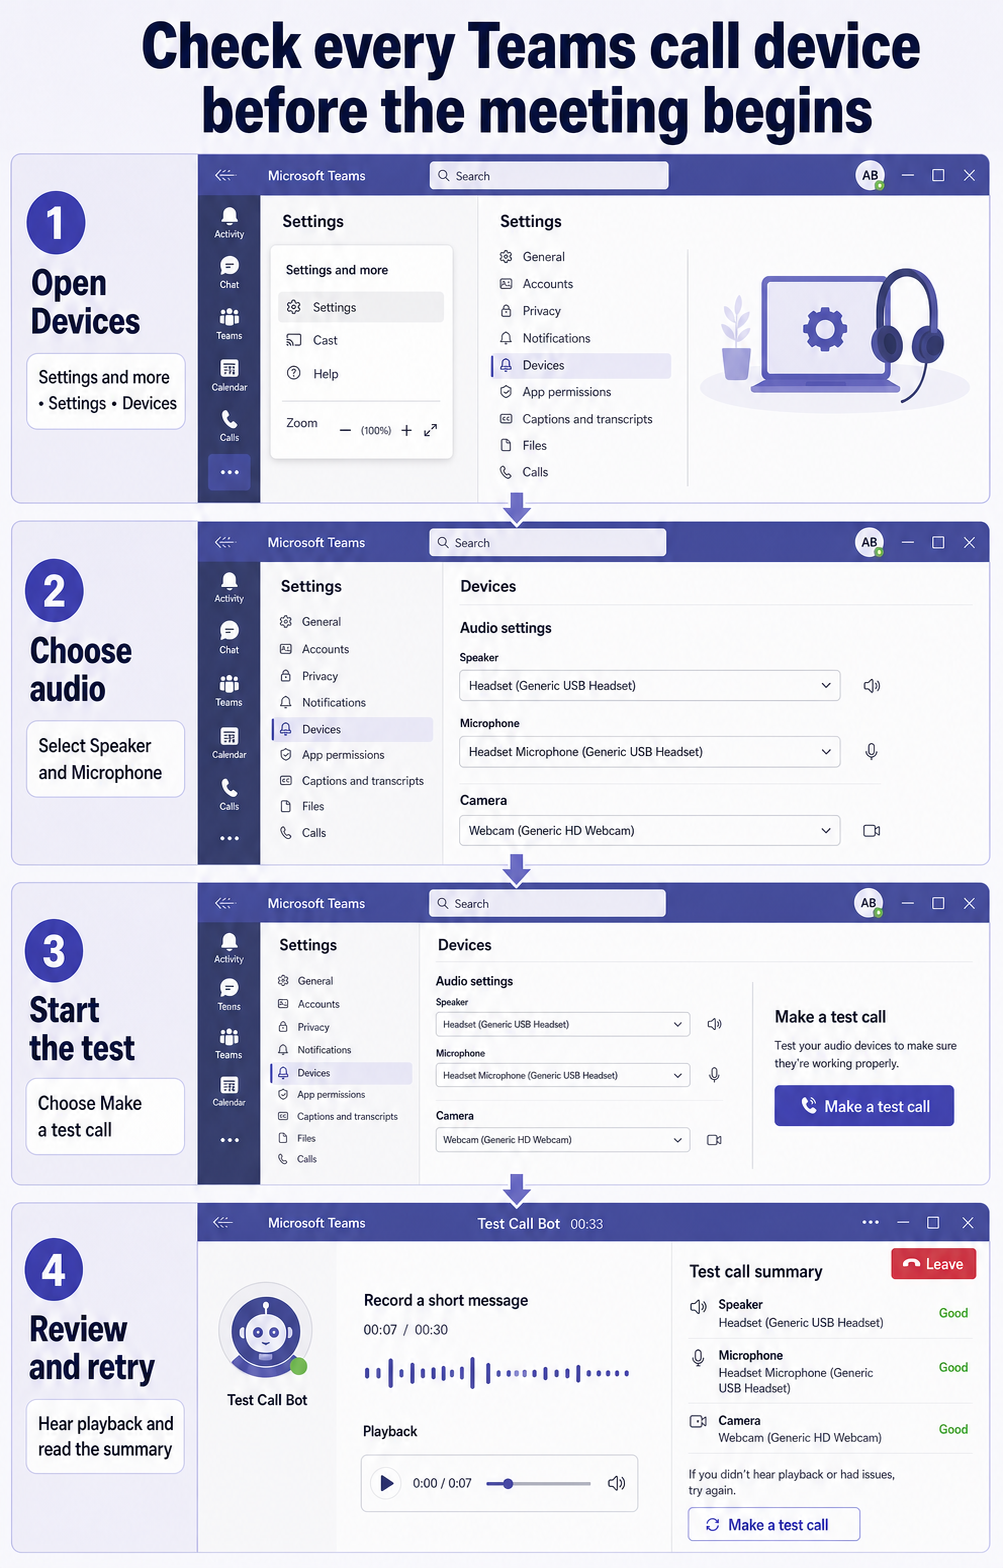
The feature is currently available in the Teams desktop app for Windows and Mac. Open the installed desktop app rather than Teams in a browser, then follow this sequence:
- Select Settings and more beside your profile picture.
- Select Settings, then open Devices.
- Under Audio settings, confirm the Speaker and Microphone dropdowns show the devices you intend to use.
- Select Make a test call.
- Follow the Test Call Bot instructions and record a short message.
- Listen to the playback, end the test, and review the test call summary.
If several similar device names appear, change only one dropdown at a time. That makes it easier to identify whether the wrong microphone or speaker caused the failure.
Listen for more than volume
Your playback should be clear enough for normal conversation, without severe echo, crackling, long gaps, or heavy background noise. A quiet recording can mean the wrong microphone is active, the headset boom is raised, or automatic sensitivity needs adjustment.
Do not judge camera quality from audio alone. Look at the preview for framing, focus, lighting, and whether Teams selected an internal camera instead of a connected webcam.
Read the summary as a routing clue
The summary helps you return to Devices and change the selected source. If the test fails, note which signal failed rather than changing every setting. A speaker failure and a microphone failure usually require different fixes, even when both occur on the same headset.
Match each failed signal to the right setting
Treat the test call as a small diagnostic tool. The symptom tells you where to look next.
| Test result | Most useful next check |
|---|---|
| Bot voice is silent | Speaker dropdown, system output, device volume |
| Recording is silent | Microphone dropdown, physical mute, system permission |
| Playback uses laptop hardware | Re-select the headset in both Teams dropdowns |
| Camera preview is missing | Camera dropdown and operating-system camera permission |
| Audio breaks up | Reconnect the device, close competing apps, test the connection |
Correct a wrong microphone or speaker
Return to Settings > Devices and explicitly choose the hardware you want. “Default” can point to a different route after docking, reconnecting Bluetooth, or joining with a USB headset. Check any physical mute button, headset boom position, cable, battery level, and volume wheel before repeating the test.
When Teams cannot detect the microphone at all, work through the Windows and Teams permission checks before reinstalling the app. Permission or device selection is more common than a damaged Teams installation.
Separate local output from meeting audio
If the bot playback is clear but you cannot hear people in a real meeting, the remote participant may be muted or your meeting may have switched devices. Open the meeting’s audio settings and compare its speaker selection with the one that passed the test.
Persistent one-way or distorted sound may need a broader device-routing review, especially when Windows, a dock, and Teams disagree about the default device.
When the Make a test call button is missing
Microsoft currently limits the Test Call Bot to the Teams desktop app on Windows and Mac. The button is unavailable in Teams for the web, and it is not a substitute for the device controls available on mobile. Sign into the desktop app with the work or school account you plan to use, then reopen Settings > Devices.
Microsoft’s camera troubleshooting guidance also notes that the feature is currently English-only. If the control is missing in another language, switch the Teams app language to English, restart Teams, and check Devices again. Organization rollout differences can still affect what appears, so avoid assuming the hardware is broken solely because the button is absent.
If you must use the browser, allow microphone and camera access in the browser’s site permissions and use the meeting pre-join screen to confirm the selected devices. You will not get the same recorded-message playback that Test Call Bot provides.
Add one real-world check before an important meeting
After the bot passes, open the meeting’s pre-join screen. Confirm Computer audio, the intended microphone, speaker, and camera, then speak and watch the input indicator if Teams displays it. This catches a last-minute device switch after the original test.
For a high-stakes event, join a short private meeting from the exact desk, network, dock, and headset you will use. That extra check can reveal bandwidth problems, echo from room speakers, screen-sharing restrictions, or Bluetooth instability that a brief bot call cannot reproduce.
Common questions about Teams call tests
Does the test call contact another person?
No. The Test Call Bot handles the call and plays your own short recording back to you. You do not need a colleague, meeting invitation, or phone number to run it.
Does Microsoft keep the test recording?
Microsoft says the recording is deleted immediately after the test call. It is not retained or used by Microsoft, so the playback is temporary and only supports the device check.
Why did my microphone pass but fail in the meeting?
Teams may have switched to another device, the headset may have disconnected, or the meeting audio source may differ from the test. Compare the in-meeting audio settings with the Devices selections that passed, then check any physical mute control.
Can I run the same test in Teams for the web?
No. Microsoft currently makes the recorded Test Call Bot workflow available only in the Teams desktop app for Windows and Mac. In the browser, use site permissions and the meeting pre-join screen to check devices instead.
What a passing test means for your next call
A successful test call confirms that Teams can use the selected microphone, speaker, and camera and that you can hear a recorded message through the chosen route. Keep the same devices connected, then verify them once more on the pre-join screen. If the meeting still fails, troubleshoot the specific symptom rather than repeating unrelated settings. The bot is most useful as an early warning, not as proof that every network and meeting condition will remain unchanged.