Version History can return an Excel workbook to an earlier saved state after accidental deletion, a bad paste, unwanted formatting, or a damaging formula change. The safe method is to preview the old version first, preserve any good work added later, and restore only after you know the selected version is correct.
This workflow applies most directly to files stored in OneDrive or SharePoint. A local workbook that was never saved to a versioned location may require Excel’s Recover Unsaved Workbooks feature instead.
Stabilize the file before recovery
Ask collaborators to pause editing and close duplicate copies. Confirm the file name, folder, and cloud location so you do not restore a similarly named workbook. If Excel reports an invalid format or will not open the file, check the cloud-file checks before assuming that the content itself is damaged.
Make a note of what went wrong and approximately when it happened. A useful marker might be the last correct total, the presence of a worksheet, or a known formula in a key cell. That evidence helps you choose between versions with close timestamps.
Preview from Excel
Open the current workbook, select File > Info, and choose Version History. In some Microsoft 365 interfaces, you can also select the file name in the title bar and choose Version History. The pane lists versions with dates, times, and editors.
Select a candidate to open it in a separate view. Inspect the affected sheets, formulas, tables, and named ranges. Do not select Restore until you have confirmed that the unwanted change is absent and the required earlier data is present.
Preview from OneDrive or SharePoint
Navigate to the folder that contains the workbook, right-click the file, and choose Version history. Open an older version or use its menu to inspect available actions. This route is useful when the current workbook will not open in Excel for the web.
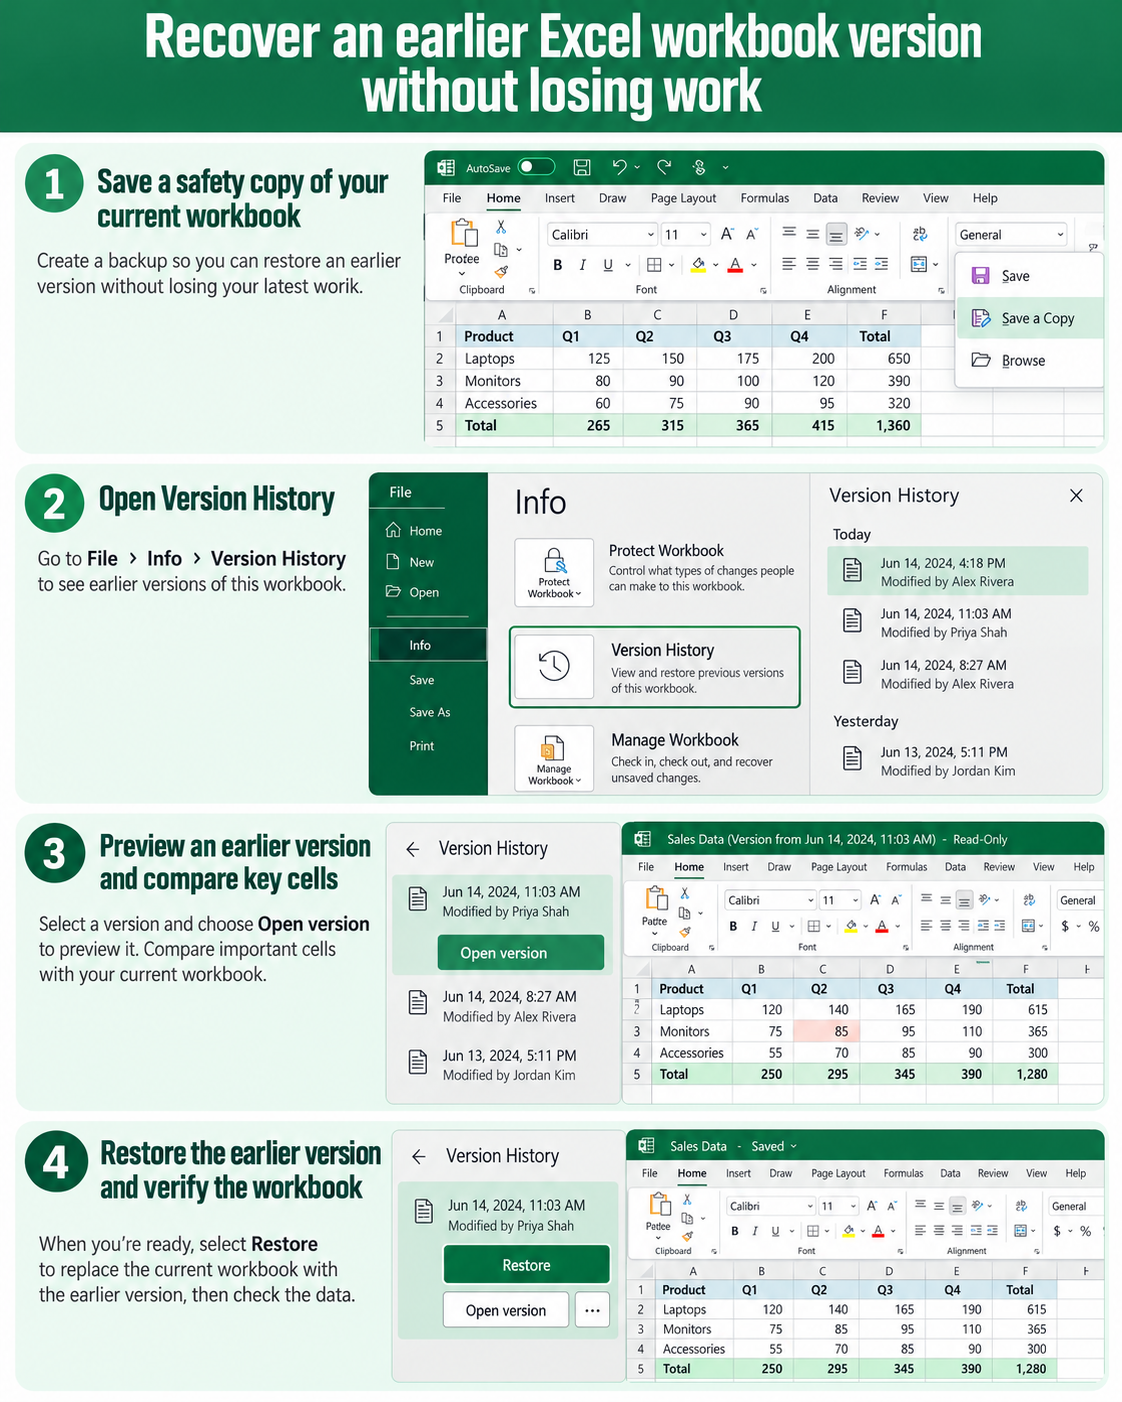
Preserve useful changes made afterward
Restoring an old version makes that historical copy current. Work completed after the chosen timestamp may no longer appear in the restored state, so capture anything that still matters.
Use one of these recovery tactics before restoring:
- Save the current workbook under a temporary comparison name.
- Copy a later worksheet or range into a separate workbook.
- Export a critical table to CSV when formulas are not needed.
- Record recent comments, decisions, or approved values that must be reapplied.
For a complex workbook, compare the old and current copies side by side. Avoid copying entire sheets blindly because names, formulas, queries, and external links can behave differently after duplication.
Restore and verify the recovered workbook
Once the candidate passes inspection, select Restore. Microsoft warns that restoring replaces the current version with the selected one. Versioning normally retains history, but you should still treat the action as a deliberate rollback.
After restoration, reopen the workbook from its cloud location and verify the outcome in this order:
- Confirm that the expected worksheets and tables are present.
- Recalculate formulas and compare key totals with a trusted reference.
- Refresh only the queries or connections you understand; a refresh can change recovered data again.
- Test links, named ranges, data validation, filters, and protected areas.
- Ask one collaborator to open the same link and confirm that the corrected version appears.
When the recovery is complete, return the team to a single shared master copy so edits continue in one version chain.
If Version History is missing
First confirm that the file is actually stored in OneDrive or SharePoint and that you are signed in with an account that can access it. A workbook downloaded locally, sent as an attachment, or copied to a non-versioned folder will not show the same cloud history.
If the file was closed without saving, open Excel and go to File > Info > Manage Workbook > Recover Unsaved Workbooks. Open the available recovery file and use Save As immediately. AutoRecover is not the same as cloud Version History, and its temporary copies are not guaranteed to exist indefinitely.
When the workbook is corrupted
Try Version History from the file’s OneDrive or SharePoint menu even when Excel cannot open the current copy. Select a version older than the apparent corruption. If no version opens, preserve the original file and escalate to your Microsoft 365 or storage administrator rather than repeatedly overwriting it.
Recovery questions readers ask
Will restoring an older version delete the current version forever?
The selected historical version becomes the current file state, which means later content will not appear in that restored copy. Version History may continue to retain other versions, but do not rely on that as your only safeguard. Save or copy important later work before the rollback.
Can I restore only one worksheet?
Version History restores the workbook version, not a single sheet. To recover one sheet, open the historical version, copy the needed data carefully into a separate file, and then merge it into the current workbook. Check formulas and named ranges after copying.
Why are two versions only a few minutes apart?
AutoSave and collaborative editing can create closely spaced versions. Use the editor name, timestamp, and a known workbook marker to choose the right one. Preview several candidates rather than assuming the earliest nearby version is correct.
Is Recover Unsaved Workbooks the same as Version History?
No. Recover Unsaved Workbooks uses AutoRecover data for local unsaved work, while Version History stores prior versions of a saved cloud file. Use the feature that matches where the workbook lived and whether it had been saved.
Return the file to service carefully
Tell collaborators when the restore point was created and which later changes must be reapplied. Keep the temporary comparison copy until the owner verifies totals, connections, and required worksheets. Only then resume normal coauthoring, using the same cloud link so the next recovery has a coherent version history.