Applies to: Microsoft Excel 365, 2021, 2019, 2016.
In today’s VBA for Excel Automation tutorial we’ll learn about how we can programmatically change the color of a cell based on the cell value.
We can use this technique when developing a dashboard spreadsheet for example.
Step #1: Prepare your spreadsheet
If you are not yet developing on Excel, we’d recommend to look into our introductory guide to Excel Macros. You also need to make sure that the Developer tab is available in your Microsoft Excel Ribbon, as you’ll use it to write some simple code.
- Open Microsoft Excel. Note that code provided in this tutorial is expected to function in Excel 2007 and beyond.
- In an empty worksheet, add the following table :
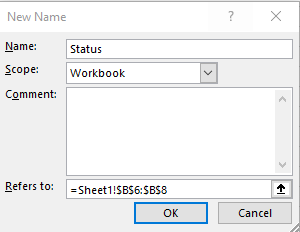
- Now go ahead and define a named Range by hitting: Formulas>>Define Name

- Hit OK
Step #2: Changing cell interior color based on value with Cell.Interior.Color
- Hit the Developer entry in the Ribbon.
- Hit Visual Basic or Alt+F11 to open your developer VBA editor.
- Next highlight the Worksheet in which you would like to run your code. Alternatively, select a module that has your VBA code.
- Go ahead and paste this code. In our example we’ll modify the interior color of a range of cells to specific cell RGB values corresponding to the red, yellow and green colors.
- Specifically we use the Excel VBA method Cell.Interior.Color and pass the corresponding RGB value or color index.
Sub Color_Cell_Condition()

Dim MyCell As Range
Dim StatValue As String
Dim StatusRange As Range

Set StatusRange = Range("Status")

For Each MyCell In StatusRange

StatValue = MyCell.Value
Select Case StatValue

    Case "Progressing"
    MyCell.Interior.Color = RGB(0, 255, 0)

    Case "Pending Feedback"
    MyCell.Interior.Color = RGB(255, 255, 0)

    Case "Stuck"
    MyCell.Interior.Color = RGB(255, 0, 0)

End Select

Next MyCell

End Sub- Run your code – either by pressing on F5 or Run>> Run Sub / UserForm.
- You’ll notice the status dashboard was filled as shown below:
- Save your code and close your VBA editor.


